Catherine Hu
You just spent 45 minutes meticulously crafting the perfect spatial grid of Artifacts and Tablets, carefully balancing your elemental chains, only to get absolutely obliterated by a Chapter 4 boss because you missed a single Precise Defense window. We have all experienced that soul-crushing moment in Sephiria. When you transition from the forgiving early chapters into the brutal endgame, button-mashing will no longer save you.
Editor’s Note: After clocking over 1,000 hours in Sephiria since its Early Access launch in April 2025, and grinding through the relentless full-release endgame updates, I have mapped out exactly what separates a doomed run from a god-tier expedition. This Sephiria High Difficulty Guide: Best Builds to Survive breaks down the math, the mechanics, and the madness behind the ultimate endgame setups.
TL;DR: The Short Answer
If you are looking for the absolute best strategies to survive the punishing procedural generation of Sephiria, here is the immediate breakdown:
- Top Survival Weapon: The Rapier. Its fast attack speed allows for animation canceling into the Spacebar Dash, making it the safest melee option.
- Core Defensive Mechanic: Master the “Parry Counter.” Triggering Precise Defense completely negates damage and opens dynamic bosses to massive critical strikes.
- Inventory Strategy: Never place Artifacts randomly. Always position them adjacent to Tablets to trigger the Empower mechanic, scaling your base stats exponentially.
- Co-op Synergy: If playing multiplayer, designate one player as the Tank (Heavy Sword/Sweeping attacks) and another as Ranged DPS (Staff/Elemental chains) to exploit boss weak points.
- Resource Management: Trade strategically with the animal characters found within the tower instead of hoarding your currency.
Table of Contents
- TL;DR: The Short Answer
- The Foundation of Survival: Correcting Common Mistakes
- Protecting Your Progress (Crucial Setup)
- Top Tier Weapon Builds for High Difficulty
- Mastering the Artifact and Tablet Synergy Grid
- Advanced Combat Mechanics: Dash & Precise Defense
- The QoL Solution: Bypassing the Grind with XMODhub
- Endgame Stat Priorities & Artifact Tier List
- Frequently Asked Questions
- Final Verdict
The Foundation of Survival: Correcting Common Mistakes
Before diving into the specific builds that will carry you through all 6 chapters of Sephiria, we must address the fundamental errors that get players killed. Sephiria is not a traditional hack-and-slash RPG; it is a highly tactical action roguelite where your immediate combat decisions must perfectly align with your long-term progression strategy.
Common Mistake 1: Ignoring the Spatial Inventory Puzzle
Many players treat the inventory in Sephiria like a standard RPG bag, simply throwing in every piece of loot they find. This is a fatal error. Sephiria features a strategic inventory management system where spatial placement dictates your power. Placing an Artifact without linking it to a Tablet means you are leaving up to 60% of your potential damage or survivability on the table.
Common Mistake 2: Over-Committing to Attack Animations
With over 60 distinct and dangerous enemies, combat in Sephiria is incredibly fast-paced. Players often lock themselves into long attack combinations, particularly with the Sword, leaving them vulnerable to enemy sweeping attacks. In high-difficulty runs, a single hit from an elite enemy can strip away half your health pool.
Alternative Methods: Pivoting Your Strategy
If you find yourself constantly dying because you cannot execute the Precise Defense timing, your alternative method is to pivot entirely to a zoning strategy. Instead of forcing melee combat, switch to the Staff. The Staff allows you to utilize elemental chains from a distance, turning Sephiria into a bullet-hell management game rather than a melee brawler. Alternatively, if you are playing in the 4-player cooperative mode, communicate with your team via the team inventory viewing feature (optimized heavily since version 0.7.47) to ensure someone else takes the aggro while you focus on safe, ranged DPS.
Protecting Your Progress (Crucial Setup)
When you are experimenting with these complex builds and pushing deep into the procedurally generated tower, the last thing you want is to lose your overarching meta-progression due to a corrupted file or a PC crash. Because Sephiria relies heavily on unlocking new Talents and over 50 unique upgrades per weapon across multiple runs, safeguarding your data is mandatory. Before you even attempt these high-difficulty builds, you need to know the Sephiria Save File Location: How to Backup Your Progress. Securing your save file allows you to experiment with radical Artifact combinations without the fear of losing your hard-earned unlocks.
Top Tier Weapon Builds for High Difficulty
With 6 distinct weapons to master, choosing the right tool is the first step in our Sephiria High Difficulty Guide: Best Builds to Survive. Here are the most dominant setups for conquering the endgame.
Build 1: The Rapier Parry-Crit Engine
The Rapier is arguably the highest-ceiling weapon in Sephiria. It trades raw area-of-effect damage for surgical precision and unparalleled mobility.
- Core Strategy: The goal here is to play reactively. You will use the Rapier’s rapid thrusts to bait enemies into attacking. The moment they wind up, you execute a Precise Defense.
- Required Upgrades: Focus your weapon tree on “Counter-Attack Multiplier” and “Dash Cooldown Reduction.” You want to unlock the specific talent that guarantees a critical hit immediately following a successful Parry Counter.
- Advanced Tips: Do not use the Spacebar Dash to engage; save it strictly as an emergency disengage if you miss your Precise Defense window. When facing the dynamic bosses of Chapter 5 and 6, the Rapier allows you to stay glued to their weak points without over-committing.
Build 2: The Elemental Staff Zoning Specialist
For players who prefer to map out the battlefield and control enemy movements, the Staff is the ultimate weapon. This build shines brightest in the procedural map layouts where you can use chokepoints to your advantage.
- Core Strategy: You are playing a game of keep-away. Utilize the Staff to lay down elemental fields (like fire or ice) that damage the 60+ enemy types over time while you focus entirely on dodging.
- Required Upgrades: Prioritize “Elemental Chain Reaction” and “Projectile Penetration.” When you unlock the talent that allows your elemental attacks to bounce between tightly packed enemy hordes, your wave-clearing potential skyrockets.
- Alternative Methods: If RNG does not bless you with good elemental Artifacts, pivot to a raw damage setup. Trade with the animal characters in the tower to acquire physical damage Slates, transforming your Staff into a heavy-hitting kinetic railgun.
Build 3: The Heavy Sword Vanguard (Co-op Meta)
If you are diving into the 4-player online cooperative play, someone needs to be the anchor. The Heavy Sword build is designed to absorb punishment and control the horde.
- Core Strategy: You are the tank. Your job is to step into the fray, utilize sweeping attacks to stagger multiple enemies, and draw the aggro of the 10+ unique bosses away from your fragile teammates.
- Required Upgrades: Maximize “Block Efficiency,” “Health Regeneration on Kill,” and “Stagger Duration.”
- Advanced Tips: Coordinate with your Ranged DPS. Use your sweeping attacks to group enemies together, then call out the target so your Staff-wielding teammate can detonate an elemental chain on the clustered group.
Mastering the Artifact and Tablet Synergy Grid
Your weapons are only half of the equation in Sephiria. The true depth of the game lies in the strategic inventory management system. With over 150 Artifacts and Slates (Tablets) to combine, the possibilities are staggering.
The Anatomy of the Grid
Every time you collect an Artifact, it takes up a specific geometric shape in your inventory. Tablets also take up space but provide directional arrows. If an Artifact is placed in the path of a Tablet’s arrow, it becomes “Empowered.”
- Common Mistakes: Placing highly defensive Artifacts next to offensive Tablets, or vice versa. You must align the synergy. If you are running the Rapier Parry-Crit Engine, you need to surround your Critical Damage Artifacts with Tablets that multiply raw damage output.
- Advanced Tips: Treat the inventory like a dynamic puzzle. As you progress deeper into the tower, you will find animal characters who act as merchants. Do not just buy an Artifact because it is a higher rarity; buy it because its specific shape fits perfectly into the empty slot being targeted by your most powerful Tablet. Sometimes, a common Artifact perfectly placed is mathematically superior to a legendary Artifact awkwardly shoved into a corner.
Advanced Combat Mechanics: Dash & Precise Defense
To truly understand the Sephiria High Difficulty Guide: Best Builds to Survive, we must dissect the micro-mechanics of combat.
The Spacebar Dash (I-Frames Explained)
The Dash in Sephiria is a short-range dodge executed with the Spacebar Dash. What the game does not explicitly tell you is that the first few frames of this animation contain invincibility frames (I-frames).
- How to Exploit It: You can dash through enemy projectiles and sweeping attacks, rather than just dashing away from them. Dashing through an attack puts you directly behind the enemy, instantly opening them up for backstab damage multipliers.
The Parry Counter (Precise Defense)
Precise Defense is triggered by blocking at the exact moment an enemy attack connects.
- The Execution: Watch the enemy animation, not their weapon. Most of the 60+ enemies in Sephiria have a specific “tell”—a slight shoulder drop or a flash of light—right before the active hitbox comes out. Hitting your block button right at this tell triggers the Parry Counter, completely negating damage and staggering the foe.
- Alternative Methods: If the server latency in 4-player co-op makes Precise Defense too risky, rely on positioning and the Spacebar Dash instead. Let the dedicated Tank handle the blocking mechanics while you focus on spacing.
The QoL Solution: Bypassing the Grind with XMODhub
Let us be brutally honest: mastering the mechanics of Sephiria is incredibly rewarding, but the RNG (Random Number Generation) can be exhausting. You might execute perfect Parry Counters through 5 chapters, only to lose the run because the procedural generation refused to drop the specific Tablets you needed to Empower your core Artifacts. If you are tired of losing hours of progress to bad luck and just want to experience the endgame builds, XMODhub is your ultimate quality-of-life solution.
XMODhub allows you to bypass the frustrating aspects of the roguelite grind, giving you the power to manipulate your inventory, ensure perfect drops, or simply give yourself the health required to practice boss timings without the fear of a wiped run.
How to Dominate Sephiria with XMODhub:
- Download XMODhub: Install the secure, lightweight client directly from the official website.

- Auto-Detect Sephiria: Launch Sephiria. XMODhub’s intelligent engine will instantly recognize the game version (whether you are on the Early Access build or the July 2026 full release) and load the specific mod menu.
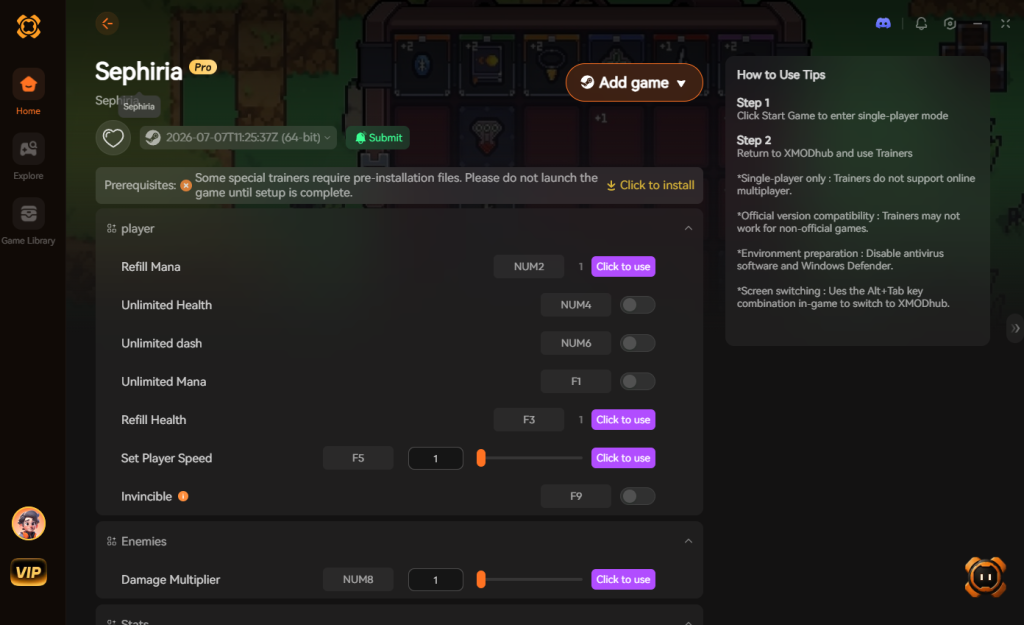
- Toggle Cheats: Use the seamless overlay to activate features like Infinite Health (perfect for practicing Precise Defense against Chapter 6 bosses), Instant Cooldowns for your Spacebar Dash, or Infinite Currency to buy every Artifact from the animal merchants.
With XMODhub, you can test the theoretical limits of the Rapier and Staff builds without spending 40 hours grinding for the perfect procedural drops.
Endgame Stat Priorities & Artifact Tier List
To truly optimize your Sephiria High Difficulty Guide: Best Builds to Survive strategy, you must understand stat scaling. In Chapters 5 and 6, raw base damage falls off significantly. Surviving the abyss requires stacking multiplicative stats through the Empower mechanic.
Here is the definitive high-difficulty tier list for the most impactful Artifacts to target during your procedural runs:
| Artifact Category | Best in Slot (BiS) Artifact | Primary Stat Focus | High Difficulty Utility |
|---|---|---|---|
| Offensive | Crimson Lotus Blade | +40% Crit Damage | Essential for the Rapier Parry-Crit Engine. Multiplies counter-attack damage. |
| Defensive | Aegis Core | +25% Block Efficiency | Mandatory for the Heavy Sword Vanguard tank build in co-op. |
| Elemental | Frostfire Prism | +30% Chain Reaction | BiS for the Elemental Staff Zoning Specialist. Triggers massive AoE clears. |
| Utility | Chronos Hourglass | -15% Dash Cooldown | Maximizes Spacebar Dash I-frames, ensuring you always have an escape route. |
Optimal Tablet Synergy Combinations
Securing a top-tier Artifact is only the first step; binding it to the correct Tablet is where the real power spike happens.
- The Critical Feedback Loop: Pair the Crimson Lotus Blade with a Tablet of Precision (which grants guaranteed crits after a Precise Defense). This creates a self-sustaining damage loop that can melt elite enemies in seconds.
- The Elemental Battery: Link the Frostfire Prism with a Tablet of Resonance. This combination ensures that every elemental chain reaction restores a fraction of your mana, allowing continuous zoning without resource starvation.
Frequently Asked Questions
How many chapters are in Sephiria?
Sephiria features a total of 6 distinct chapters. As you explore downward through the tower, each chapter introduces new procedurally generated map layouts, tougher enemy variants, and complex environmental hazards.
Can you play Sephiria completely solo?
Absolutely. While the game heavily promotes its up to 4-player online cooperative play, the entire campaign is balanced for solo players. In solo play, you must balance your own damage and defense, whereas co-op allows players to specialize in roles like Tank or Ranged DPS.
How exactly does the “team inventory viewing” work in multiplayer?
Introduced in version 0.7.47, this feature allows you to open a UI panel that displays the exact spatial inventory grid of your teammates. This is crucial for coordinating builds, as you can drop Artifacts or Tablets that fit perfectly into a teammate’s grid to maximize the whole team’s synergy.
What happens when you die in Sephiria?
Because Sephiria is an action roguelite, death means the end of your current run. You will lose your current weapons, Artifacts, and Tablets. However, you retain meta-currency which is used to unlock permanent Talents, ensuring that every failed run still contributes to your long-term power.
Final Verdict
Surviving the brutal depths of Sephiria requires more than just fast reflexes; it demands an intimate understanding of the game’s interlocking systems. By choosing the right weapon—whether it is the mobile Rapier or the zoning Staff—and meticulously managing your spatial inventory of Artifacts and Tablets, you can tilt the odds of the procedural generation in your favor. Remember that mastering the Precise Defense and the Spacebar Dash are your true keys to mitigating damage against the dynamic bosses that guard the lower levels of the tower.
If the relentless roguelite grind begins to burn you out, remember that you do not have to suffer through bad RNG. XMODhub offers the perfect bridge, allowing you to tailor the difficulty to your liking, practice high-level encounters, and experiment with ultimate builds instantly. Joining the XMODhub community gives you access to enhancements not just for Sephiria, but for a massive ecosystem of over 5,000 supported titles, including fellow roguelite titans like Hades II or The Binding of Isaac: Repentance. Equip your best loadout, optimize your grid, and dive back into the tower.
Stop Grinding, Start Enjoying.
Bypass the tedious resource gathering and unlock your full potential instantly.

I am a passionate gamer and writer at XMODhub, dedicated to bringing you the latest gaming news, tips, and insights.
Connect with me:
LinkedIn Profile ↗

 Nancy Miller