Catherine Hu
Nothing crushes your ego faster than getting one-shot by a basic swamp lurker because you mistimed a harden mechanic while piloting a Shell that doesn’t fit your playstyle. Mortal Shell II violently punishes indecision, and choosing the wrong vessel to inhabit will turn an already brutal dark fantasy action RPG into an agonizing death loop. If you are struggling to survive the decaying landscapes of this 2026 sequel, your problem likely isn’t your reflexes—it is your choice of Shell.
Editor’s Note: Having logged over 1,000 hours in the Mortal Shell franchise, including extensive mechanical testing in the Mortal Shell II closed beta and launch builds, I’ve frame-counted every dodge, calculated Resolve generation multipliers, and mapped the exact stamina costs for every weapon swing. This tier list isn’t based on feelings; it is built on raw mathematical efficiency and endgame viability.
TL;DR: The Short Answer
If you just want the absolute best options to dominate Mortal Shell II without reading the deep-dive statistical breakdown, here is the current meta ranking:
- S-Tier (Meta Dominators): Syra (The Blood-Starved), Oram (The Scholar of Ash)
- A-Tier (Highly Viable): The Nameless Prodigy, Vaelin (The Vanguard)
- B-Tier (Situational/Niche): Garrick (The Iron Colossus)
- Best for Beginners: Vaelin (Balanced stats, forgiving stamina pool).
- Best for Hardcore Veterans: Syra (Massive stamina, lethal dodge i-frames, but dies in two hits).
Table of Contents
- TL;DR: The Short Answer
- Core Mechanics: How Shell Stats Dictate Survival
- The Definitive Mortal Shell II Tier List
- Upgrades and Resource Management
- Bypassing the Grind: Advanced Quality of Life
- Weapon Synergy: Pairing Your Shell Correctly
- How to Unlock Every Shell: Locations Guide
- Advanced Build Customization: Glands and Consumables
- Frequently Asked Questions
- Final Verdict
Core Mechanics: How Shell Stats Dictate Survival
In Mortal Shell II, you don’t level up a central character; you upgrade the distinct bodies (Shells) you inhabit. Understanding the underlying holy trinity of stats—Durability (Health), Stamina, and Resolve—is critical before picking a main.
The Holy Trinity of Stats
Every Shell in Mortal Shell II operates on a strict stat budget.
- Durability: Determines your raw HP pool. A high durability Shell can tank hits that would otherwise knock you out of your body.
- Stamina: Dictates how many attacks, dodges, and sprints you can execute. In Mortal Shell II, stamina regeneration is universally slower than in other Soulslikes, making this stat incredibly valuable.
- Resolve: The resource used to execute weapon abilities and trigger parry-heals. High Resolve generation allows for aggressive, ability-spamming playstyles.
Stat Distribution Matrix
To understand why certain Shells outrank others, we must look at their base stat distribution.
| Shell Name | Durability | Stamina | Resolve | Base I-Frames on Dodge | Playstyle Archetype |
|---|---|---|---|---|---|
| Vaelin | 5/10 | 5/10 | 5/10 | 11 Frames | Balanced / All-Rounder |
| Syra | 3/10 | 10/10 | 4/10 | 14 Frames | Evasion / DPS |
| Garrick | 10/10 | 3/10 | 3/10 | 9 Frames | Tank / Heavy Hitter |
| Oram | 4/10 | 4/10 | 10/10 | 11 Frames | Ability Spammer / Parry |
| Prodigy | Variable | Variable | Variable | 12 Frames | Adaptable / Custom |
To dive deeper, read our guide on How to Fix Mortal Shell II Crashes, Stuttering & Fatal Errors: The Definitive Optimization Guide.
The Definitive Mortal Shell II Tier List
S-Tier: The Meta Dominators
Syra, The Blood-Starved
Syra represents the absolute pinnacle of high-risk, high-reward gameplay in Mortal Shell II. Her health pool is abysmal—most mid-game bosses will one-shot you if you aren’t hardened. However, her maximum stamina allows for relentless aggression.
- Passive Trait – Shadow Step: Syra’s dodge transforms into a teleport, granting 14 i-frames (the highest in the game).
- Why she is S-Tier: In Mortal Shell II, mobility is king. Syra can sequence three heavy attacks with the Hallowed Sword and still have enough stamina to fade away safely.
Oram, The Scholar of Ash
Oram breaks the game’s economy through sheer Resolve generation. While his health and stamina are mediocre, his ability to spam weapon arts makes him a boss-killing machine.
- Passive Trait – Arcane Leech: Successful parries generate 1.5x Resolve and heal for 20% more than other Shells.
- Why he is S-Tier: Oram can infinitely stagger bosses by chaining weapon abilities. If you master the parry timing in Mortal Shell II, Oram essentially becomes immortal.
A-Tier: Highly Viable
The Nameless Prodigy
A late-game unlock, the Prodigy allows you to cherry-pick abilities from other fully upgraded Shells.
- Why it is A-Tier instead of S-Tier: While highly customizable, the base stat scaling is slightly lower across the board to compensate for the versatility. It requires an immense amount of Tar to optimize.
Vaelin, The Vanguard
The first Shell you find in Mortal Shell II remains incredibly viable all the way to the credits.
- Passive Trait – Hardened Will: Hardening cooldown is reduced by 15%.
- Why he is A-Tier: Vaelin is the ultimate safety net. His balanced stats mean you are never caught lacking stamina, and the reduced harden cooldown forgives mechanical mistakes.
B-Tier: Situational Tanks
Garrick, The Iron Colossus
Garrick is a trap for new players. His massive health bar looks appealing, but his tragic stamina pool makes him a liability against fast-attacking endgame bosses.
- Passive Trait – Unyielding: Cannot be knocked down by heavy attacks.
- Why he is B-Tier: In Mortal Shell II, tanking hits is inherently worse than avoiding them. You will find yourself constantly stamina-starved, unable to exploit boss vulnerability windows.
To dive deeper, read our guide on Where is the Mortal Shell 2 Save File Location? (Backup Guide).
Upgrades and Resource Management
Unlocking a Shell’s true potential requires feeding them Tar (currency) and Glimpses (rare drops from enemies). The economy in Mortal Shell II is notoriously stingy. To unlock a Shell’s final node, you must invest heavily.
The Cost of Perfection
| Upgrade Tier | Tar Required | Glimpses Required | Notable Unlock |
|---|---|---|---|
| Tier 1 (Base) | 500 | 2 | Lore Reveal / Name |
| Tier 2 (Passives) | 1,500 – 2,500 | 5 – 10 | Minor Stat Buffs |
| Tier 3 (Synergy) | 4,000 | 15 | Weapon Specific Buffs |
| Tier 4 (Ultimate) | 10,000 | 30 | Core Mechanical Overhaul |
Maxing out a single Shell can take upwards of 15 hours of dedicated farming in the Fallgrim outskirts. Maxing out all five for build variety is a monumental grind.
Bypassing the Grind: Advanced Quality of Life
Let’s address the elephant in the room: the mid-game grind in Mortal Shell II is brutal. If you want to test out Syra’s S-Tier mobility but you’ve already dumped 15,000 Tar into Garrick, the game forces you to farm for hours just to make your new Shell viable. If you are a PC player who values your time over tedious resource farming, XMODhub is the ultimate equalizer.
XMODhub allows you to bypass the artificial inflation of playtime by instantly injecting the necessary resources, letting you focus purely on the hardcore combat mechanics and boss fights.
How to optimize your Mortal Shell II experience with XMODhub:
- Download XMODhub: Install the lightweight client from the official site.

- Auto-Detect Mortal Shell II: Launch the game; XMODhub will automatically sync with your active save file.
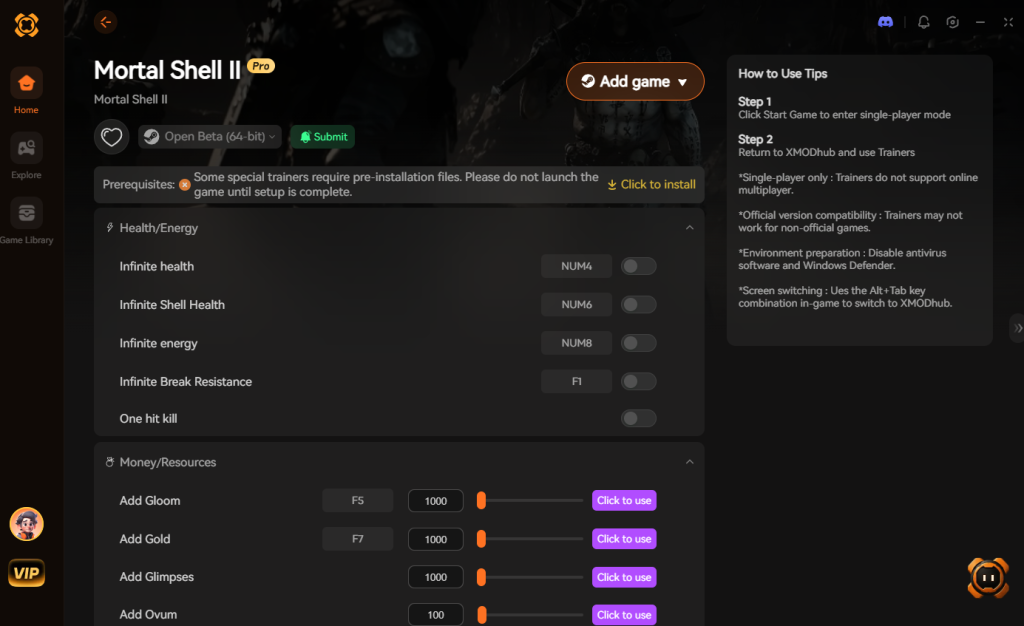
- Toggle Cheats: Use the overlay to activate “Infinite Tar,” “Infinite Glimpses,” or even “God Mode” if you simply want to practice parry timings against endgame bosses without the punishing run-backs.
Download Mortal Shell II Trainer Now
Weapon Synergy: Pairing Your Shell Correctly
A top-tier Shell is useless if paired with the wrong weapon. The weight of your weapon directly impacts stamina drain, which must align with your Shell’s stats.
Heavy Weapons (e.g., The Smoldering Mace)
- Best Pairing: Vaelin or Garrick.
- Why: Heavy weapons consume massive chunks of stamina and have long wind-up animations. You need Vaelin’s balanced stamina or Garrick’s hyper-armor to ensure your swings connect without being staggered out of the animation.
Light/Fast Weapons (e.g., Twin Blades of Ash)
- Best Pairing: Syra or Oram.
- Why: Syra can execute a 6-hit combo and still dodge away. Oram benefits because fast weapons build up Resolve incredibly quickly, allowing him to spam the Twin Blades’ devastating weapon art.
| Shell | Best Weapon Synergy | Worst Weapon Synergy | Reason |
|---|---|---|---|
| Syra | Twin Blades of Ash | Smoldering Mace | Mace drains her entire stamina bar in 2 swings. |
| Oram | Hallowed Sword | Martyr’s Blade | Sword offers fastest Resolve build-up per swing. |
| Garrick | Martyr’s Blade | Twin Blades of Ash | High stagger damage complements his slow, tanky nature. |
To dive deeper, read our guide on Best PC Settings for Mortal Shell 2: Max FPS & Performance.
How to Unlock Every Shell: Locations Guide
Knowing which Shell to main is only half the battle; you actually have to find them scattered across the hostile biomes of the game. Unlike the first game where Shells were relatively close to the starting hub, Mortal Shell II hides its best vessels behind grueling environmental puzzles and mini-bosses.
Here is exactly where you need to travel to claim your preferred main:
| Shell Name | Biome / Region | Exact Unlock Requirement |
|---|---|---|
| Vaelin | Fallgrim Outskirts | Unmissable. Found immediately after the tutorial sequence in the muddy trench. |
| Syra | The Sanguine Crypt | Guarded by the Crucified Matriarch. You must defeat her to interact with Syra’s corpse. |
| Garrick | Ash-Mouth Canyon | Hidden behind a destructible wall near the Sester Genessa checkpoint. Requires a heavy attack to break. |
| Oram | The Grand Library | You must solve the Astral Dial puzzle on the second floor to lower his cage. |
| Prodigy | The Fractured Core | Endgame unlock. Trade 5 Glimpses of Fallacy at the final abyssal altar. |
Advanced Build Customization: Glands and Consumables
To truly min-max your chosen Shell, you need to exploit the game’s Familiarity System. Using consumables repeatedly increases your familiarity, unlocking hidden, potent buffs that synergize directly with specific Shells.
Best Consumables for S-Tier Shells
- Mortal Token: When familiarity is maxed, getting hit while hardened grants a 20% damage buff for your next attack. This is mandatory for Oram, allowing him to parry, harden, and unleash a devastating, buffed weapon art.
- Roasted Rat: Heals a flat amount of Durability over 10 seconds. Because Syra has such a low health pool, a single Roasted Rat can heal her almost to full, making it vastly more efficient on her than on a tank like Garrick.
- Etherial Spore: Increases stamina regeneration by 15%. If you are stubbornly trying to make Garrick viable, you must have these active at all times to offset his terrible stamina recovery.
The Crystalline Core Synergy
Equipping the Crystalline Core gland alters your harden mechanics. When paired with Vaelin’s innate cooldown reduction, you can reach a near-broken 20% reduction in harden cooldowns, allowing you to turtle through some of the most aggressive boss phases in the game.
Frequently Asked Questions
Can you beat Mortal Shell II without using a Shell (Obsidian Dark Form)?
Yes. Just like the first game, Mortal Shell II features an “Obsidian Dark Form” for true masochists. In this form, you have zero shells, practically zero health, and any hit will instantly kill you. It is required for the “Fleshless” achievement but is not recommended for a first playthrough.
Does Resolve scaling diminish at higher tiers?
Yes. Once you cross the threshold of 5 Resolve bars (primarily with Oram), the game applies a hidden 0.8x multiplier to subsequent Resolve generation to prevent infinite weapon-art spamming during boss fights.
Can I switch Shells mid-boss fight?
No. Unlike weapon swapping, which can be done via specific consumable items on the fly, you can only change your Shell at the Sester Genessa checkpoints or by using an Effigy consumable. Using an Effigy during a boss fight has a long animation that will likely get you killed.
Which Shell has the fastest Harden recovery?
Vaelin has a passive that reduces the base Harden cooldown by 15%. However, if you fully upgrade The Nameless Prodigy and equip the Crystalline Core gland, you can achieve a 20% reduction, making it the fastest in the game.
Final Verdict
Choosing the right main in Mortal Shell II ultimately comes down to your mastery of stamina management and i-frames. If you have the reflexes of a seasoned Soulslike veteran, Syra is undeniably the best Shell in the game, offering unparalleled DPS and evasion. If you prefer a tactical, ability-focused approach, Oram will carry you through the toughest encounters with his Resolve generation.
Don’t let the punishing resource economy lock you into a playstyle you hate. Experiment with different Shells, and if the grind for Tar and Glimpses begins to burn you out, remember that XMODhub supports Mortal Shell II alongside 5,000+ other single-player titles, giving you total control over your gaming experience. Choose your vessel wisely, master the harden mechanic, and conquer the shattered world.
Stop Grinding, Start Enjoying.
Bypass the tedious resource gathering and unlock your full potential instantly.

I am a passionate gamer and writer at XMODhub, dedicated to bringing you the latest gaming news, tips, and insights.
Connect with me:
LinkedIn Profile ↗