Catherine Hu
You are deep into Chapter 4 of Sephiria, your brave bunny protagonist is clinging to a mere sliver of health, and a legendary, run-defining Artifact finally drops from a grueling boss fight. But there is a massive problem: your grid is a chaotic, disorganized mess of misaligned Tablets and low-tier junk. You frantically try to play inventory Tetris while the next wave of enemies closes in, only to take a fatal hit because you could not fit that crucial, life-saving item into your bag. We have all experienced this tragic, controller-smashing scenario. In a top-down action roguelite that demands perfection, poor spatial organization is the silent killer of otherwise flawless runs.
Editor’s Note: Having clocked over 1,200 hours since the Early Access days of Sephiria and optimizing countless builds through the massive July 2026 1.0 release, I can confidently tell you that mechanical skill only gets you so far. Precise blocking and sweeping attacks are essential, but true mastery in Sephiria happens within the inventory screen. This guide breaks down exactly how to expand your grid, manage your slots, and ensure you never have to leave a god-tier drop behind.
TL;DR: The Short Answer
If you are looking for the immediate mechanics behind the Sephiria Inventory Management Guide (Maximize Slots), here is the executive summary:
- Unlock Talents Early: Prioritize the “Explorer’s Backpack” nodes in the meta-progression Talent tree at the village atop the tower before spending resources on minor damage buffs.
- Defeat Elite Mini-Bosses: Specific elite enemies in Chapters 2 and 4 drop “Grid Expansion Kits,” which permanently increase your slot capacity for that specific run.
- Understand Shape Synergy: Artifacts and Tablets have specific geometric shapes. Overlapping their connective nodes saves space; placing them randomly wastes up to 30% of your available grid.
- Utilize Co-op Trading: In the four-player online cooperative mode, you can drop bulky items for teammates who have more optimal grid space, effectively quadrupling your party’s total inventory capacity.
Table of Contents
- TL;DR: The Short Answer
- The Core Mechanics of the Sephiria Grid System
- Common Mistakes Ruining Your Sephiria Runs
- Step-by-Step: How to Maximize Slots in Sephiria
- Alternative Methods for Space Management
- Advanced Spatial Organization Techniques
- Optimal Farming Routes for Grid Expansion Kits
- The QoL Solution: Bypassing the Grind with XMODhub
- Frequently Asked Questions
- Final Verdict
The Core Mechanics of the Sephiria Grid System
Before you can manipulate the system, you must understand how Sephiria structures its inventory. Unlike traditional RPGs where items simply sit in a list, Sephiria utilizes a spatial, grid-based inventory system heavily reminiscent of classic puzzle games. As your bunny protagonist descends from the village atop the tower to explore the depths, you will collect two primary types of items: Artifacts and Tablets (often referred to as Steles).
Artifacts are your primary active and passive buffs. They provide the core stat boosts that synergize with Sephiria’s 6 distinct weapons. However, Artifacts are often bulky, taking up awkward L-shapes, T-shapes, or large squares in your inventory grid.
Tablets are modifiers. By themselves, they do nothing. But when placed adjacent to an Artifact so that their “connective nodes” touch, the Tablet empowers the Artifact, adding elemental damage, reducing cooldowns, or granting lifesteal. The complexity of Sephiria lies in fitting these interlocking puzzle pieces into a highly restricted grid while leaving enough room to adapt to the ever-changing threats of the game’s 60+ distinct enemies.
Common Mistakes Ruining Your Sephiria Runs
To master the Sephiria Inventory Management Guide (Maximize Slots), you first need to identify the bad habits that are artificially limiting your space. Many players struggle not because the game is unfair, but because they are terrible quartermasters.
Mistake 1: The Hoarder’s Dilemma
The most common mistake in Sephiria is hoarding early-game items. Players often find a decent Tier 1 Amulet in Chapter 1 and refuse to let it go, even when they reach Chapter 4. Because Sephiria features over 50 unique upgrades per weapon, your build needs to evolve. Holding onto a 2×2 grid item that gives a mere +5% sweeping attack damage when you need space for a massive 3×3 Tier 4 defensive Artifact is a guaranteed way to end your run.
Mistake 2: Ignoring Connective Node Efficiency
Players often place Artifacts and Tablets into their grid haphazardly, simply dragging and dropping them wherever they highlight green. This ignores the connective nodes. If a Tablet has connective nodes on all four sides, placing it in the corner of your grid wastes 50% of its potential. You are essentially throwing away valuable grid real estate that could be used to empower multiple Artifacts simultaneously.
Mistake 3: Tunnel Vision on Weapon Talents
When returning to the village atop the tower after a failed run, it is tempting to dump all your hard-earned progression currency into unlocking new weapon variants or raw damage nodes. By ignoring the utility branch of the Talent tree—which contains permanent starting grid expansions—you are severely handicapping your future expeditions.
Step-by-Step: How to Maximize Slots in Sephiria
If you want to survive the 10 unique bosses scattered across Sephiria’s 6 chapters, you need to actively work on maximizing your inventory slots from the moment you start a run.
Step 1: Maximize Meta-Progression in the Village
Before you even begin your descent, visit the Elder Rabbit in the village hub. Navigate to the “Survival & Utility” tab in the Talent tree. You must prioritize unlocking “Sturdy Straps” and “Expanded Pockets.” These nodes cost a significant amount of early-game currency, but they permanently increase your starting grid size by two vertical columns and two horizontal rows, respectively. This baseline expansion is non-negotiable for late-game success.
Step 2: Hunt Down the Grid Expansion Kits
During your descent, your inventory size is not static. Throughout your run, you have the opportunity to find “Grid Expansion Kits.” These are temporary, run-specific upgrades that add a 2×2 block of usable space to your inventory.
To guarantee finding these:
- Prioritize Elite Rooms: When given the choice between a standard combat room, a merchant, or an Elite encounter, always choose the Elite if your health permits. Elites have a 15% higher drop rate for Expansion Kits.
- Check the Secret Walls: In Chapters 3 and 5, Sephiria’s pixel-art environments hide breakable walls. Look for slight discolorations in the brickwork. These secret rooms often contain chests that hold either high-tier Tablets or Expansion Kits.
Step 3: Master the Art of the “Pivot”
Maximizing slots isn’t just about making the grid bigger; it is about making your items smaller. As you progress, you will unlock merchants who offer a “Condense” service. For a hefty fee of in-game gold, you can compress certain 3×3 Artifacts into 2×2 versions without losing their stats. Always save your gold for the Condense mechanic rather than buying random, low-tier amulets.
Alternative Methods for Space Management
Sometimes, the RNG (Random Number Generation) simply refuses to give you Grid Expansion Kits. When the game forces your hand, you must rely on alternative methods to manage your limited space in Sephiria.
Method 1: The Co-op Mule Strategy
Sephiria features a highly praised four-player online cooperative mode. If you are playing with friends, you can completely bypass individual inventory limits through specialization. Instead of every player trying to balance damage, defense, and utility, assign roles. Have one player run a minimalist, high-damage dagger build (which requires fewer, smaller Artifacts) and use their massive amount of free grid space to carry utility items and healing amulets for the rest of the team. You can freely drop items for your co-op partners between combat encounters.
Method 2: The Minimalist Weapon Trees
If you are playing solo and struggling with space, change your weapon. Sephiria offers 6 distinct weapons. The Heavy Broadsword requires massive stamina management, meaning you have to carry bulky stamina-regen Artifacts. However, the Twin Daggers rely on precise blocking and innate critical hit mechanics. By choosing the Daggers, you naturally eliminate the need for stamina Artifacts, effectively freeing up 20% of your grid space without needing a single expansion kit.
Advanced Spatial Organization Techniques
Once you have expanded your grid as much as possible, you must optimize the layout. High-level Sephiria gameplay requires treating your inventory like a complex circuit board.
You must practice “Center-Buffing.” Always place your highest-value Tablets (such as those granting invulnerability frames on dash) dead center in your grid. Because these Tablets have connective nodes on all four sides, placing them in the center allows you to surround them with four different Artifacts, applying that top-tier buff to every single one of them.
Conversely, practice “Corner-Loading” for your standalone, self-sufficient Artifacts. Items that do not require Tablet synergies should be shoved into the extreme corners and edges of your grid, keeping the valuable central real estate open for your complex, interlocking synergy webs.
To truly master how these shapes interact and which specific items you should be prioritizing for your central grid, you must understand the underlying item combinations. For a complete breakdown of which items are worth your precious grid space, check out our comprehensive guide on Sephiria Multiplayer Co-op Guide: Play with Friends & Win, which will teach you how to turn a limited inventory into an infinite damage loop.
Optimal Farming Routes for Grid Expansion Kits
To fully execute the strategies outlined in this Sephiria Inventory Management Guide (Maximize Slots), you cannot rely on blind luck. Knowing exactly where to farm Grid Expansion Kits is the difference between a cramped backpack and a god-tier setup. The game utilizes a weighted drop system, meaning certain enemies and locations are mathematically more likely to yield these vital upgrades.
| Chapter | Encounter / Location | Key Target | Expansion Kit Drop Rate |
|---|---|---|---|
| Chapter 1 | Tower Descent | Hidden Chests | 5% |
| Chapter 2 | The Aqueducts | Armored Elite Crab | 15% |
| Chapter 3 | Crystal Caverns | Breakable Illusory Walls | 25% |
| Chapter 4 | The Ruined Forge | Magma Golem Mini-Boss | 40% |
| Chapter 5 | Shadow Keep | Corrupted Quartermaster | 60% |
By memorizing this loot table, you can strategically route your runs to intercept the Corrupted Quartermaster and Magma Golem Mini-Boss, drastically increasing your chances of maxing out your slots before the final encounter.
Artifact Shape Efficiency Tier List
Not all Artifacts are created equal when it comes to spatial economy. When your grid is tight, you must prioritize items based on their geometric footprint to maximize the utility of your Connective Nodes:
- S-Tier (1×1 & 2×2 Squares): These are the holy grail of inventory management. They fit cleanly into corners and are easily surrounded by Tablets without creating dead zones.
- A-Tier (Straight 1×3 Lines): Excellent for slotting into the extreme edges of your grid. They create a perfect border of passive buffs without disrupting your central synergy web.
- C-Tier (L-Shapes & T-Shapes): Avoid these unless their stats are absolutely run-defining. The awkward empty spaces they create will prevent optimal Connective Node alignment, forcing you to waste precious in-game gold on the Condense merchant mechanic to fix the gaps.
The QoL Solution: Bypassing the Grind with XMODhub
Let’s be completely honest: Sephiria is a phenomenal game, but the roguelite grind can be exhausting. Sometimes you just want to experience the incredible pixel-art aesthetic, enjoy the fast-paced combat, and see the story of the brave bunny without spending 40 hours grinding for Talent tree currency just to get a decent-sized inventory. If you are tired of losing amazing runs to bad RNG and restrictive grid sizes, it is time to elevate your gameplay with XMODhub.
XMODhub provides the ultimate Quality of Life (QoL) upgrades for Sephiria, allowing you to bypass the tedious meta-progression and focus purely on the fun. With features like Infinite Village Currency (allowing you to instantly buy all permanent grid expansions) and Custom Drop Modifiers (forcing the game to drop Grid Expansion Kits instead of useless junk), you take total control of your run.
Getting started is incredibly simple:
- Download XMODhub: Visit the official website and install the lightweight, secure client.

- Auto-Detect Sephiria: Launch XMODhub and boot up Sephiria. The software will instantly recognize the game, whether you are playing the Steam version or another PC client.
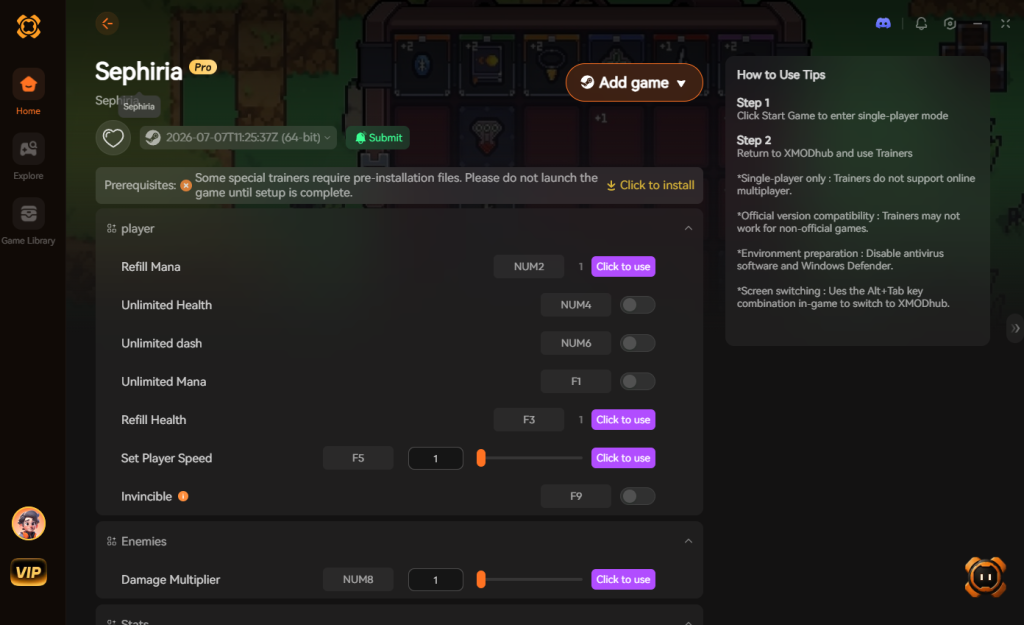
- Toggle Cheats: Open the in-game overlay and toggle on “Max Talent Currency” and “Infinite Grid Expansions.”
Instantly, the frustrating limitations of inventory Tetris vanish, allowing you to build the most overpowered, mathematically impossible Artifact combinations the game has ever seen.
Frequently Asked Questions
Q1: Does the inventory size reset every time I die in Sephiria?
Yes and no. Sephiria utilizes a dual-progression system. The temporary “Grid Expansion Kits” you find during a run via Elite drops or secret rooms will reset upon death. However, the grid expansions you purchase using meta-currency in the village’s Talent tree are permanent and will apply to every future run.
Q2: How do Tablet shapes affect Artifact placement?
Tablets and Artifacts have specific geometric shapes and connective nodes. A Tablet will only empower an Artifact if their connective nodes are physically touching on the grid. Therefore, you cannot simply place a Tablet anywhere; you must rotate and position it so that its active sides align perfectly with the Artifacts you want to buff, making spatial awareness crucial.
Q3: Can I drop items for my co-op partners if my inventory is full?
Yes! In Sephiria’s four-player online cooperative mode, you can drop any Artifact or Tablet from your inventory onto the ground. Your teammates can then pick them up. This is a vital strategy for maximizing the team’s overall inventory efficiency, allowing players to trade items that better fit their specific weapon builds.
Q4: What is the absolute maximum inventory size achievable in Chapter 6?
If you have fully maxed out the “Survival & Utility” Talent tree in the village, and you successfully find every possible RNG-based Grid Expansion Kit across all 6 chapters, the maximum achievable grid size is a massive 12×12 square. This provides more than enough room to house fully upgraded synergies for any of the 6 main weapons.
Final Verdict
Mastering the Sephiria Inventory Management Guide (Maximize Slots) is the true dividing line between casual players and hardcore roguelite veterans. By prioritizing early Talent tree expansions, hunting down Elite enemies for temporary kits, and understanding the complex geometry of Tablet synergies, you can transform your cramped backpack into an arsenal of apocalyptic power. Remember that every single square of your grid matters; optimal placement is just as important as the items themselves.
However, if the relentless RNG and punishing roguelite mechanics of Sephiria are testing your patience, XMODhub is your definitive solution. By utilizing XMODhub, you can bypass the tedious grind for inventory space and instantly unlock the full potential of your builds. With a massive ecosystem supporting over 5,000+ PC titles—including other top-tier roguelites like Hades II and The Binding of Isaac-Brith—XMODhub ensures that your gaming time is spent enjoying the action, not fighting with your backpack. Maximize your slots, optimize your run, and conquer the tower today.
Stop Grinding, Start Enjoying.
Bypass the tedious resource gathering and unlock your full potential instantly.

I am a passionate gamer and writer at XMODhub, dedicated to bringing you the latest gaming news, tips, and insights.
Connect with me:
LinkedIn Profile ↗
 Nancy Miller