Catherine Hu
You drop into the boss arena, your brave bunny protagonist gripping their starter weapon, only to get absolutely obliterated by a massive sweeping attack before you can even figure out the dodge timing. You are sent right back to the village atop the tower, stripped of your hard-earned Artifacts, wondering what exactly went wrong. Sound familiar? Sephiria does not hold your hand, and its pixel-art aesthetic brilliantly masks a deeply punishing, fast-paced action roguelite that demands perfection from the very first chapter.
Editor’s Note: After clocking well over 1,000 hours in Sephiria—from its Early Access days in April 2025 all the way to its massive 1.0 release on July 31, 2026—I have watched countless players hit a massive brick wall at the end of Chapter 1. The first boss is the game’s ultimate skill check. It forces you to understand precise blocking, sweeping attack counters, and the strategic inventory system. This guide breaks down the exact mechanics, optimal builds, and guaranteed strategies you need to secure that easy kill and descend further into the tower.
TL;DR: The Short Answer
If you want to know exactly how to beat the first boss in Sephiria without reading the deep dive, here is the immediate blueprint for success:
- Master Precise Blocking: Do not spam the dodge roll. The boss’s sweeping attacks have massive hitboxes. Tap the block button exactly as the enemy’s weapon flashes white to trigger a precise block, negating all damage and opening a stagger window.
- Optimize Your Inventory: Sephiria requires strategic inventory management. Ensure your primary offensive Artifacts are directly adjacent to your highest-tier Tablets on your inventory board to maximize damage output.
- Upgrade Talents First: If you keep dying, spend your meta-currency in the village atop the tower on base health and precise block window leniency before attempting another run.
- Exploit the Attack Pattern: The boss operates in a 3-strike combo followed by a heavy plunge. Bait the heavy plunge, side-step, and unleash your weapon’s secondary sweeping attack for maximum burst damage.
Table of Contents
- TL;DR: The Short Answer
- The Pre-Fight Setup: Gearing Up Your Bunny
- Common Mistakes That Will Get You Killed in Sephiria
- Mechanics Deep Dive: Decoding the First Boss
- Step-by-Step Easy Kill Guide
- Alternative Methods for Defeating the First Boss
- Advanced Tips for Hardcore Action Roguelite Players
- Optimal Tablet Synergies for the First Boss Encounter
- The QoL Solution: Bypassing the Grind with XMODhub
- Frequently Asked Questions
- Final Verdict
The Pre-Fight Setup: Gearing Up Your Bunny
Before you even step foot into the boss arena at the bottom of Chapter 1, your success is largely determined by the choices you made during your descent. Sephiria is not just about fast-paced combat; it is equally about strategic decision-making and inventory tetris.
Because Sephiria features 6 distinct weapons, each with over 50 unique upgrades, your starting choice drastically alters how you approach the first boss. If you are wielding the standard sword, your precise block timing will be standard. If you opt for the heavier hammer-class weapons, your animation commitments are longer, meaning you cannot greedily attack without getting punished by the boss’s sweeping retaliation.
To ensure you are bringing the absolute best firepower to this encounter, you must optimize your loadout. I highly recommend checking out our comprehensive Sephiria Best Weapons Tier List: Top Builds & Upgrades to understand which of the 6 core weapons provides the highest DPS and safest blocking frames for early-game encounters. Choosing a top-tier weapon from that list will cut the duration of the first boss fight in half.
Common Mistakes That Will Get You Killed in Sephiria
To truly understand how to beat the first boss in Sephiria, we must first address why you are dying. Sephiria is designed by TEAM HORAY to punish traditional action RPG habits. Here are the most common mistakes players make:
1. Ignoring the Strategic Inventory System
Treating equipment as simple passive upgrades is the number one reason players fail. Sephiria features a grid-based inventory system where you must collect Artifacts and empower them with Tablets. If you just throw items into your bag haphazardly, you are missing out on massive stat multipliers. Players often enter the first boss fight with unlinked Artifacts, resulting in a severe lack of damage. You must arrange your inventory so that your offensive Artifacts physically touch the Tablets that boost attack speed or critical hit chance.
2. Spamming the Dodge Roll
In many top-down action roguelite games, the dodge roll gives you generous invincibility frames (i-frames). Sephiria handles this differently. While dodging is useful for repositioning, it leaves you vulnerable at the end of the animation. The first boss uses massive, arena-wide sweeping attacks specifically designed to catch you at the end of your dodge roll. If you rely solely on dodging, you will get hit.
3. Greed During Damage Windows
The combat in Sephiria is incredibly fast-paced. When the boss misses an attack, the immediate instinct is to mash the attack button. However, every weapon in Sephiria has animation commitment. If you swing one too many times, you will be locked in an animation when the boss begins its counter-attack. Greed is the quickest way to end your expedition and get sent back to the village.
Mechanics Deep Dive: Decoding the First Boss
Now that we have corrected the bad habits, let us deeply analyze the mechanics of the Chapter 1 boss fight in Sephiria. The boss operates in two distinct phases, testing your mastery of the game’s core defensive mechanics.
Phase 1: The Sweeping Cleave and The Plunge
When the fight begins, the boss will aggressively close the distance. Its primary attack is a massive sweeping cleave.
- The Visual Cue: The boss will draw its weapon back, and a faint white glint will appear for exactly half a second.
- The Counter: This is your prompt for Precise Blocking. Do not dodge away. Stand your ground and press the block button the moment you see the white glint. A successful precise block will emit a distinct high-pitched clank, completely negating the damage and filling the boss’s stagger meter.
- The Plunge: After two sweeping cleaves, the boss will leap into the air, targeting your current position. A red shadow will appear on the pixel-art floor. This is the only time you should use your dodge roll. Roll out of the red zone, wait for the boss to crash down, and immediately use your weapon’s heavy sweeping attack to capitalize on its recovery frames.
Phase 2: The Enrage and Bullet Hell
Once you deplete 50% of the boss’s health bar, Sephiria shifts the pacing. The boss will roar, glowing red, and introduce projectile elements alongside its melee attacks.
- The Projectile Ring: The boss will slam the ground, sending out a 360-degree wave of magical projectiles.
- The Counter: You cannot precise block all of these simultaneously if you are too close. You must create distance. Use the gaps in the projectile ring to weave through, or use the environment (if any pillars spawned in your specific roguelite seed) to absorb the hit.
- The Frenzy Combo: The boss will now string four sweeping attacks together instead of two. Your precise blocking rhythm must be flawless here. Tap, tap, tap, tap. If you miss one, the combo will juggle you, likely resulting in an instant death if your base health hasn’t been upgraded via Talents.
Step-by-Step Easy Kill Guide
Follow this exact sequence to secure an easy kill on the first boss in Sephiria:
Step 1: The Pre-Fight Inventory Check
Before entering the boss door, open your inventory. Place your primary weapon Artifact in the center. Surround it with at least two empowering Tablets (preferably Attack Damage and Attack Speed). Ensure no empty spaces break the chain.
Step 2: Baiting the Opener
Walk into the arena and immediately walk backward. The boss will always open with a lunging sweep. Because you are walking backward, it will miss, giving you a free window to land two light attacks.
Step 3: The Block Rhythm
Stand right in front of the boss. Wait for the white glint. Execute the precise block. Land one light attack. Wait for the second glint. Execute the precise block. The boss will now jump.
Step 4: Punishing the Plunge
Dodge the aerial plunge. The moment the boss hits the ground, unleash your weapon’s unique ability or heavy sweeping attack. If you are using a weapon with high stagger damage, this will break the boss’s posture, allowing for a massive critical hit.
Step 5: Surviving Phase 2
When the boss glows red, back away immediately. Focus entirely on dodging the projectile rings. Do not attempt to attack during the bullet hell phase. Wait until the boss resumes its melee frenzy combo. Execute four precise blocks in a row to instantly stagger the boss again, then unleash your remaining heavy attacks to finish the fight.
Alternative Methods for Defeating the First Boss
If the precise blocking rhythm is proving too difficult, Sephiria offers alternative ways to tackle this encounter, thanks to its deep build variety and multiplayer mechanics.
Alternative Method 1: The Ranged Kiting Build
While Sephiria is heavily focused on melee combat, certain Artifacts and Tablets can transform your build into a ranged powerhouse.
- How it works: During your descent through Chapter 1, prioritize collecting Tablets that enhance projectile damage or cast speed. Equip a weapon that has a ranged secondary fire.
- The Execution: Instead of engaging in the precise blocking mini-game, you will spend the entire boss fight running along the outer edge of the arena. You will only stop to fire your ranged attacks when the boss is recovering from its heavy plunge. This method takes significantly longer to secure the kill, but it is vastly safer for players who struggle with reaction times.
Alternative Method 2: Four-Player Online Co-op
Sephiria fully supports up to four-player online cooperative play. This completely trivializes the first boss if coordinated correctly.
- How it works: Invite friends or use matchmaking. The boss’s aggro (targeting) system in Sephiria is based on proximity and damage dealt.
- The Execution: Have one player build entirely for defense and health, acting as the “tank.” This player stands in front of the boss, focusing solely on precise blocking. The other three players stand behind the boss, unleashing uninterrupted sweeping attacks and heavy combos. The boss will melt in seconds, completely bypassing Phase 2.
Advanced Tips for Hardcore Action Roguelite Players
For the veterans who want to optimize their run times and farm the first boss for meta-currency, here are some advanced mechanics to master in Sephiria:
Animation Canceling
Every light attack in Sephiria can be animation-canceled by initiating a precise block. This means you do not have to wait for your weapon to return to its resting position before defending. High-level players will continuously attack the boss and only tap the block button on the exact frame the white glint appears, maximizing DPS without sacrificing safety.
Tablet Stacking Synergy
Tablets of the same type can be stacked if placed in an L-shape around an Artifact. If you find three Critical Hit Tablets during your Chapter 1 descent, arrange them in a corner wrapping around your primary weapon Artifact. This creates an exponential multiplier rather than a flat addition, granting you a nearly 100% critical hit rate for the boss fight, turning it into an absolute joke.
Optimal Tablet Synergies for the First Boss Encounter
To further guarantee your success against the Chapter 1 boss, you need to understand which Tablets provide the highest value in the early game. Sephiria’s loot pool is vast, but keeping an eye out for specific drops during your descent can make or break your run. Below is a definitive data table of the best early-game Tablets to slot next to your primary weapon Artifacts.
| Tablet Name | Rarity | Core Effect | Boss Strategy Synergy |
|---|---|---|---|
| Crimson Catalyst | Uncommon | +15% Attack Damage | Maximizes your burst damage during the boss’s post-plunge recovery window. |
| Swiftwind Stone | Common | +10% Attack Speed | Allows you to safely land an extra light attack before needing to precise block. |
| Aegis Shard | Rare | Widens Block Window by 0.2s | Absolute top-tier choice for beginners struggling with the Phase 2 frenzy combo. |
| Leeching Core | Epic | Heals 2 HP per Critical Hit | Pairs flawlessly with L-shape stacking for incredible sustain during the bullet hell phase. |
First Boss Defeat Rewards & Drops
Defeating this massive skill check is highly rewarding. Once the boss shatters into pixelated dust, you are guaranteed to receive the Chapter 2 Descent Key, alongside a massive injection of 500 Meta-Currency. More importantly, the boss always drops one guaranteed Epic-tier Artifact, which will serve as the cornerstone of your build as you push deeper into the tower.
The QoL Solution: Bypassing the Grind with XMODhub
Let us be completely honest. Sephiria is a roguelite. This means that sometimes, the RNG (Random Number Generation) simply hates you. You might spend 45 minutes carefully exploring the tower, only to receive terrible Artifacts and useless Tablets. Fighting the first boss with a sub-optimal build feels like hitting a brick wall with a wet noodle. If you are tired of losing your progress, repeating the same Chapter 1 enemies over and over, and grinding for meta-currency just to buy basic Talents, there is a vastly superior quality-of-life solution.
Enter XMODhub.
XMODhub is the ultimate tool for gamers who want to respect their own time. Instead of spending hours grinding for the perfect RNG seed just to practice the first boss’s precise blocking timings, you can take control of your gameplay experience. With XMODhub, you can enable features like Infinite Health (to practice precise blocking without penalty), Infinite Meta-Currency (to instantly unlock all Talents in the village), or Guaranteed High-Tier Artifact Drops.
Here is how you can instantly bypass the frustration in Sephiria:
- Step 1: Download XMODhub. Head over to the official XMODhub website and install the lightweight, secure client on your PC.

- Step 2: Auto-Detect Sephiria. Launch XMODhub and boot up Sephiria. The software will instantly auto-detect the game’s executable, whether you are playing the Steam version or another PC client.
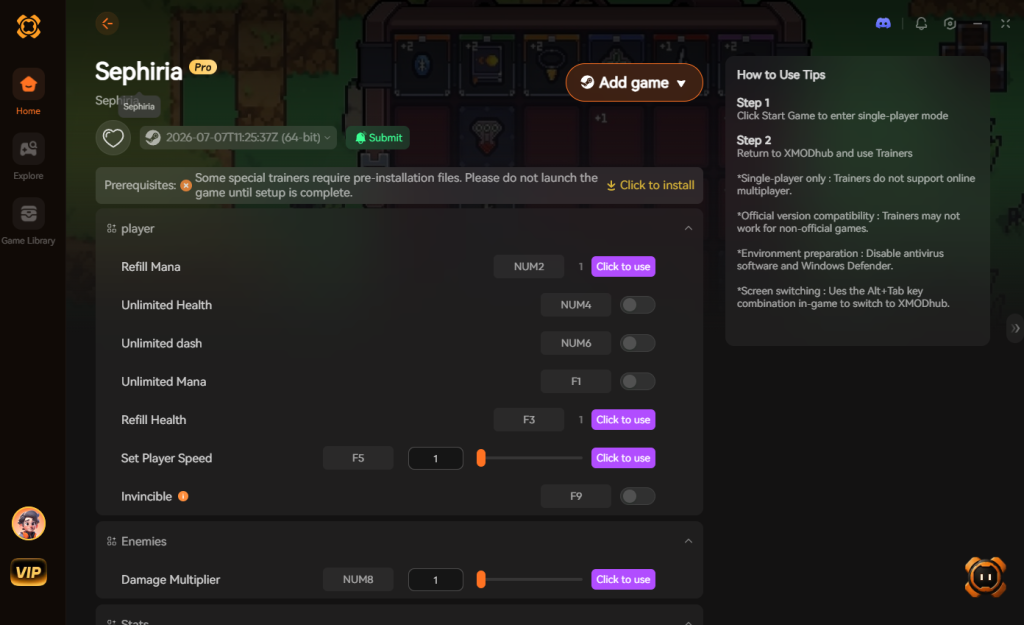
- Step 3: Toggle Cheats. Navigate to the Sephiria dedicated dashboard within XMODhub. Simply click the toggles for “God Mode,” “Infinite Resources,” or “One-Hit Kills,” and return to your game. Watch as the dreaded first boss falls to a single sweeping attack from your brave bunny.
Frequently Asked Questions
Does Sephiria have online co-op for the first boss?
Yes. Sephiria supports both single-player and up to four-player online cooperative play. You can tackle the entire tower, including the first boss, with a full squad. In co-op, the boss’s health scales up, but the ability to distract the boss and attack it from behind makes the fight significantly easier.
Do I lose all my Artifacts when the first boss kills me in Sephiria?
Yes. Sephiria follows strict roguelite rules. If you die to the first boss, you lose all the Artifacts, Tablets, and temporary weapon upgrades you collected during that specific expedition. However, you will retain the meta-currency you gathered, which can be spent back at the village atop the tower to unlock permanent Talents.
Which of the 6 weapons is best for beginners fighting the first boss in Sephiria?
For beginners, the standard Sword and Shield combo is highly recommended. It offers the fastest animation recovery time, making it much more forgiving if you miss a precise block. It also has a wider parry window compared to the heavier two-handed weapons, allowing you to learn the boss’s sweeping attack timings safely.
How exactly does the Precise Blocking mechanic work in Sephiria?
Precise blocking in Sephiria requires you to press the block/defend button just before an enemy attack connects. The game provides a visual cue—a brief white flash on the enemy’s weapon. If timed correctly, you take zero damage, consume no stamina, and deal heavy posture damage to the enemy. If you hold the button too early, it registers as a standard block, which will drain your stamina and let some chip damage through.
Final Verdict
Beating the first boss in Sephiria is the ultimate rite of passage for this incredible pixel-art roguelite. By mastering the exact timing of precise blocking, respecting the boss’s sweeping attack hitboxes, and fully utilizing the strategic inventory system to empower your Artifacts with Tablets, you will transform a frustrating roadblock into an easy kill. Remember, patience and positioning will always out-damage greedy button mashing in TEAM HORAY’s brutal tower descent.
However, if the roguelite grind becomes too tedious, or you simply want to experience the narrative and unlock all 6 chapters without spending hundreds of hours farming, XMODhub is your definitive answer. Supporting over 5,000 PC titles—including massive roguelite hits like Hades II and Dead Cells—XMODhub ensures that your gaming sessions are defined by fun, not frustration. Gear up your bunny, optimize your grid, and go conquer the tower in Sephiria.
Stop Grinding, Start Enjoying.
Bypass the tedious resource gathering and unlock your full potential instantly.

I am a passionate gamer and writer at XMODhub, dedicated to bringing you the latest gaming news, tips, and insights.
Connect with me:
LinkedIn Profile ↗
 Nancy Miller