
 Catherine Hu
Let’s be honest: you searched for this because you just got wiped out by a massive screen-clearing AoE attack, or you are staring down a health bar that refuses to budge. Dragon Sword: Awakening is an action RPG that heavily relies on fast, flashy tag-team combat and exploiting status ailments. It is not a game where you can just mash the basic attack button and expect to win, especially when facing the major story bosses scattered across the continent of Orbis. If you are constantly getting flattened, running out of stamina at the worst possible moments, or failing to trigger your character synergies, you are missing the fundamental mechanics the game demands you use.
Editor’s Note: I spent my first ten hours in Dragon Sword: Awakening treating it like a standard hack-and-slash. I paid the price. It wasn’t until I fully understood how to weave Status Ailments into Signal Skills that the combat finally clicked. The bosses in this game are essentially giant DPS checks combined with strict evasion requirements. This guide breaks down exactly how to dismantle them.
TL;DR: The Short Answer
To defeat any boss in Dragon Sword: Awakening quickly and efficiently, you must master the tag-team and status ailment systems. Here is the universal formula for success:
- Apply Status Ailments: Use a specialized character to quickly apply elemental or physical status ailments (e.g., Burn, Freeze, Stun) to the boss.
- Trigger Signal Skills: Once the boss is afflicted, immediately swap to your main DPS character to trigger high-damage Signal Skills that exploit that specific ailment.
- Manage Stamina for Dodging: Never deplete your stamina entirely on attacks; always reserve a portion for crucial evasive maneuvers during boss wind-ups.
- Use Familiars for Support: Equip Familiars that boost your specific elemental damage output or provide emergency healing.
- Cook Before Combat: Always consume high-tier food crafted from ingredients found in the open world to buff your attack power and stamina regeneration before initiating a boss fight.
Table of Contents
- TL;DR: The Short Answer
- The Core Combat Mechanics: Why You Are Losing
- Phase 1: Early Game Boss Strategies
- Phase 2: Mid-Game Boss Strategies
- Phase 3: Late Game & Secret Boss Strategies
- Advanced Tactics: Maximizing Damage Output
- Boss Weakness & Status Ailment Cheat Sheet
- The Ultimate Shortcut: XMODhub
- Frequently Asked Questions
- Final Verdict: Mastering Orbis
The Core Combat Mechanics: Why You Are Losing
Before we break down individual encounters, we need to address the structural foundation of combat in Dragon Sword: Awakening. The developers, Hound13, built this game around a very specific rhythm. If you are ignoring this rhythm, every boss fight will feel like an insurmountable wall.
The Tag-Team Synergy System
Dragon Sword: Awakening is not designed for solo heroics. The tag-team system is the beating heart of the game. You are meant to swap characters constantly. Each character in your roster serves a specific purpose: some are primers (applying status effects) and some are detonators (capitalizing on those effects for massive burst damage). If you leave one character on the field for too long, their damage output naturally tapers off, and you miss out on the crucial swap-in attacks that often interrupt enemy animations or provide temporary invincibility frames.
Status Ailments and Signal Skills
This is where the real damage happens. Bosses have large health pools and high defense against standard attacks. You must build up a status ailment meter on the boss. Once a boss is afflicted with a status like ‘Shock’ or ‘Ignite’, you need to swap to a character whose ‘Signal Skill’ reacts to that specific status. These Signal Skills are the highest damaging moves in the game and often deal heavy ‘break’ damage, stunning the boss and opening them up for a prolonged damage phase. Ignoring this mechanic is the primary reason players hit progression walls.
Phase 1: Early Game Boss Strategies
The early game bosses in Dragon Sword: Awakening serve as a harsh tutorial for the game’s core mechanics. They punish greed and reward careful positioning and status management.
The Great Boar Chieftain (Tutorial Boss)
- The Threat: Aggressive, straightforward charges and a wide sweeping tusk attack.
- The Strategy: This boss is designed to teach you about dodging and stamina management. Do not try to out-trade him. Wait for him to telegraph his charge (he will scrape his hooves), dodge to the side, and then attack his flank. Use your starter characters to apply a basic physical stagger, then swap to deal burst damage.
The Corrupted Treant
- The Threat: Area-of-effect root attacks and slow, heavy slams. The roots can easily trap you, leaving you vulnerable.
- The Strategy: The Treant is highly susceptible to Fire. Make sure you have a character equipped who can quickly apply the ‘Burn’ status ailment. Once the Treant is burning, its defense drops significantly. Watch the ground for glowing red circles indicating root spawn points. Keep moving, apply Burn, trigger your Fire Signal Skill, and back away when it prepares a slam.
Phase 2: Mid-Game Boss Strategies
By the mid-game, Dragon Sword: Awakening expects you to have a firm grasp on team composition. These bosses require specific elemental counters and flawless dodging.
The Frost Wyvern
- The Threat: High mobility, freezing breath attacks that slow your stamina regeneration, and devastating tail swipes.
- The Strategy: You cannot stay in front of this boss. Its freezing breath is a cone attack that will cripple your mobility. Focus your attacks on its hind legs. You need a fast-attacking character to apply ‘Shock’ or ‘Poison’ to bypass its high physical defense. When it takes to the air, prepare to continuously dodge until it lands, as its aerial dive tracks your movement. If you find yourself constantly running out of energy while trying to dodge the Wyvern’s relentless aerial assaults, you might want to look into How to Get Infinite Stamina in Dragon Sword: Awakening to significantly reduce the frustration of these prolonged encounters.
The Mercenary Captain
- The Threat: A humanoid boss with a moveset very similar to the player’s. He will block attacks, parry, and use his own tag-team assists.
- The Strategy: This is a duel of attrition. You cannot just spam attacks; he will parry you and counter for massive damage. You must wait for him to commit to a heavy attack combo, dodge through it, and punish his recovery frames. Using status ailments like ‘Stun’ or ‘Paralysis’ is critical here to break his guard and interrupt his combos.
Phase 3: Late Game & Secret Boss Strategies
The late-game bosses and hidden encounters in Dragon Sword: Awakening are brutal. They feature multiple phases, complex attack patterns, and tight DPS checks.
The Awakened Dragon (Final Story Boss)
- The Threat: Screen-covering elemental attacks, massive health pool, and multiple distinct phases that change its elemental affinities.
- The Strategy: This fight requires absolute mastery of the tag-team system. You must constantly rotate your characters to match the Dragon’s current elemental weakness. If it shifts to Fire, you must hit it with Water/Ice ailments and Signal Skills. Hoard your ultimate abilities for when the Dragon enters a ‘staggered’ state. You must also manage your Familiars effectively, using them for emergency healing or targeted elemental burst damage during crucial vulnerability windows.
The Shadow of Orbis (Hidden Boss)
- The Threat: Unrelenting speed, teleportation, and attacks that inflict ‘Curse’ (which drains health over time and reduces healing effectiveness).
- The Strategy: This is the ultimate test of reflexes. You must memorize its teleportation patterns. It always strikes immediately after reappearing. Pre-emptively dodge as soon as it vanishes. Bring maximum tier food buffs for stamina regeneration and attack power. Rely on quick, low-commitment attacks to build up status ailments, as you will rarely have time for full combos.
Advanced Tactics: Maximizing Damage Output
To truly conquer Dragon Sword: Awakening, you need to look beyond just the character kits and utilize the entire ecosystem of Orbis.
Mastering the Culinary Arts: Do not ignore the cooking system. Combining ingredients found across the continent is not just flavor text; it is essential for progression. High-tier meals can increase your damage output by up to 20% and significantly boost your stamina recovery rate. Always eat before a boss fight.
Familiar Synergy: Familiars are not just cute pets; they are tactical assets. Ensure your equipped Familiar’s abilities synergize with your team’s elemental focus. If you are running a ‘Burn’ team, equip a Familiar that increases Fire damage or extends the duration of status ailments.
Boss Weakness & Status Ailment Cheat Sheet
Memorizing attack patterns is only half the battle; knowing exactly what element breaks a boss’s posture is what separates the veterans from the players stuck at the respawn screen. To secure those massive Signal Skill detonations, you must bring the right elemental primers. Use this quick-reference data table to build your team before stepping into the arena.
| Boss Encounter | Primary Threat | Elemental Weakness | Optimal Status Ailment |
|---|---|---|---|
| The Great Boar Chieftain | Linear Physical Charges | Fire / Thunder | Burn / Stun |
| The Corrupted Treant | Tracking AoE Roots | Fire | Ignite |
| The Frost Wyvern | Stamina Drain & Freeze | Thunder / Poison | Shock |
| The Mercenary Captain | Parries & Counter-Attacks | Physical / Earth | Paralysis / Bleed |
| The Awakened Dragon | Phase Shifting | Adapts (Use Opposing) | Freeze / Burn (Varies) |
| The Shadow of Orbis | Teleportation & Curse | Light / Holy | Blind / Stun |
Optimal Team Compositions for Boss Fights
To maximize the data in the table above, you need to structure your three-character squad into a strict Primer-Detonator-Support setup.
- The Primer: This character needs high attack speed (like dual-blade or bow users) to rapidly fill the boss’s status gauge. Their raw damage doesn’t matter; their job is purely to apply the Status Ailment.
- The Detonator: A heavy-hitter (greatsword or heavy magic users) whose Signal Skill specifically matches the ailment applied by the Primer.
- The Support: A flex slot dedicated to crowd control, shielding, or dropping AoE healing fields so your Detonator can animation-commit without getting one-shot.
The Ultimate Shortcut: XMODhub
Let’s face reality. Dragon Sword: Awakening has incredible combat, but sometimes you just want to experience the classic fantasy storyline without spending three hours wiping on the same mid-game boss because you missed one dodge timing. If you are tired of the grind, the stamina management, and the strict tag-team timing, there is a much faster way to explore Orbis.
XMODhub is the definitive tool for players who want to dictate their own experience. Instead of endlessly grinding for the perfect status-ailment team composition, you can bypass the frustration entirely.
Here is how to instantly dominate Dragon Sword: Awakening with XMODhub:
- Download XMODhub: Install the secure, lightweight client on your PC.

- Auto-Detect Dragon Sword Awakening: Launch the game. XMODhub will automatically detect it and load the specific cheat profile.
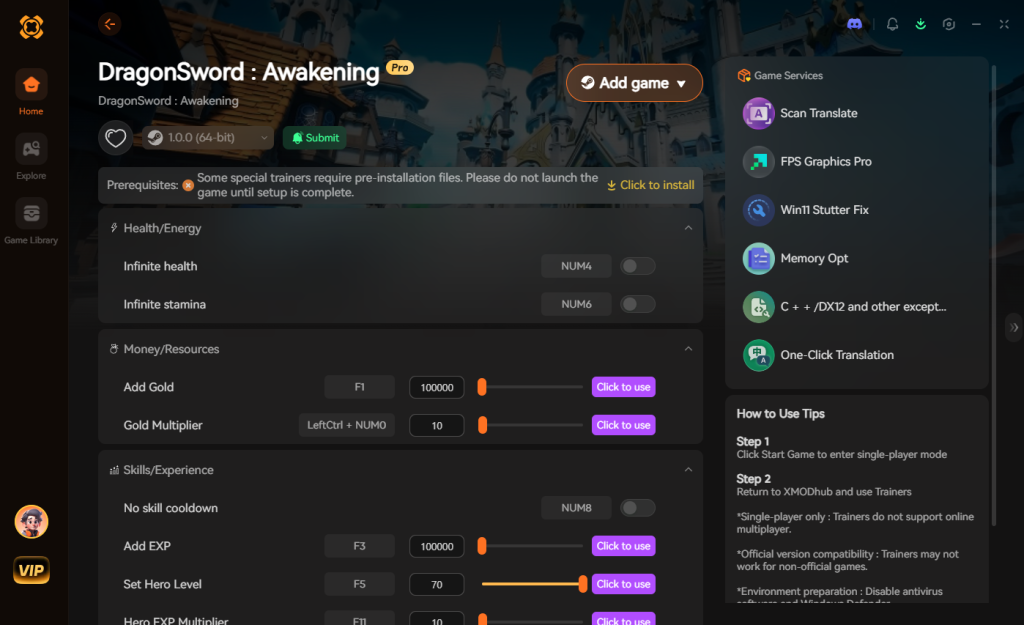
- Toggle Cheats: Enable features like Infinite Health, Infinite Stamina, One-Hit Kills, or Instant Skill Cooldowns with a single hotkey.
Download DragonSword Awakening Trainer Now
Why suffer through a boss’s five-minute attack pattern when you can end the fight in ten seconds and get back to the story?
Frequently Asked Questions
Q: Do I really need to use all the characters, or can I just main one?
A: While you can theoretically play mostly as one character, Dragon Sword: Awakening strongly penalizes this approach during boss fights. The bosses have high defense that is best bypassed by triggering Signal Skills after applying status ailments, which requires swapping.
Q: How do I know which status ailment works best on a boss?
A: Pay attention to the boss’s elemental design and the damage numbers. If you are hitting a Fire boss with Fire attacks, it will resist them. Experiment with opposing elements, or rely on universal physical ailments like ‘Stun’ or ‘Bleed’.
Q: Where can I find the best ingredients for cooking before a tough fight?
A: The rarest ingredients are usually found in higher-level exploration zones, often guarded by elite enemies, or as rewards for completing difficult side quests for local residents across Orbis.
Q: Can I replay boss fights to farm materials?
A: Yes, most major bosses can be challenged again through specific instances or memory systems introduced later in the game, allowing you to farm them for rare crafting materials.
Final Verdict: Mastering Orbis
Defeating every boss in Dragon Sword: Awakening requires a fundamental shift in how you approach ARPG combat. You cannot just rely on raw stats; you must master the tag-team system, expertly weave status ailments, and execute precise Signal Skills. It is a demanding but highly rewarding combat loop that sets the game apart from standard action titles. However, if that level of execution sounds tedious, remember that XMODhub supports over 5,000 single-player PC games. Whether you are trying to bypass the grind in Dragon Sword: Awakening, or looking for God Mode in similar sprawling action RPGs like like Impact Winter and Monster Hunter Wilds, XMODhub gives you the power to play on your exact terms.
Stop Grinding, Start Enjoying.
Bypass the tedious resource gathering and unlock your full potential instantly.

I am a passionate gamer and writer at XMODhub, dedicated to bringing you the latest gaming news, tips, and insights.
Connect with me:
LinkedIn Profile ↗
 Nancy Miller