Catherine Hu
We have all been there. You are feeling incredibly confident exploring the continent of Orbis, your beetle mount is gliding perfectly, and you engage an elite boss thinking you can just button-mash your way to victory. Five minutes later, your main DPS is dead, your party is wiped, and you are staring at the respawn screen wondering what went wrong. The harsh truth about Hound13’s ambitious open-world ARPG is that individual character strength means absolutely nothing if you do not understand synergy. If you are ignoring the tag-team mechanics and status ailments, you are playing the game on hard mode.
Editor’s Note: Having spent hundreds of hours grinding through the remnants of the six Heroes’ legacy and testing every conceivable character combination, I can confidently say that Dragon Sword: Awakening relies heavily on its combo-driven, swap-heavy combat system. Because the developers completely stripped out the original gacha mechanics for this PC release, you now unlock characters and Familiars naturally. This means optimizing your roster is no longer about who swiped their credit card, but who actually understands the math behind Signal Skills and elemental reactions.
TL;DR: The Short Answer
If you just want the absolute best setups to dominate the continent of Orbis, here are the core principles and top compositions for the Best Team Compositions & Builds in Dragon Sword: Awakening:
- The Core Mechanic: Combat revolves entirely around applying Status Ailments (like Burn, Freeze, or Shock) with one character, and triggering Signal Skills (massive tag-team combo attacks) by swapping to another character.
- Top DPS Composition (The Ailment Nuke): Pair a fast-attacking elemental applicator (to build up the status gauge) with a heavy-hitting finisher who has a high-multiplier Signal Skill.
- Top Exploration Composition (The Orbis Drifter): Utilize characters with stamina-reduction passives alongside mobility-focused Familiars to make wall-climbing and gliding seamless.
- Best Early-Game Build Focus: Prioritize upgrading your Familiars and cooking stamina-boosting foods (like Beef Tartare) before worrying about min-maxing late-game gear.
- The Golden Rule: Never leave a character on the field for more than a full rotation. Dragon Sword: Awakening is a fast, flashy game that demands constant character swapping to maintain invincibility frames (i-frames) and maximize damage output.
Table of Contents
- TL;DR: The Short Answer
- Understanding the Tag-Team & Status Ailment Meta
- Common Mistakes Ruining Your Builds
- The Best Team Compositions in Dragon Sword: Awakening
- Alternative Methods & Budget Builds
- Advanced Tips for High-Level Play
- The Ultimate Quality of Life Solution: XMODhub
- Top Elemental Ailment Synergies & Gear Stats
- Frequently Asked Questions
- Final Verdict
Understanding the Tag-Team & Status Ailment Meta
To truly grasp the Best Team Compositions & Builds in Dragon Sword: Awakening, you have to completely rewire your brain if you are used to traditional solo-character action RPGs. The combat system designed by Hound13 is built from the ground up around two massive pillars: Status Ailments and Signal Skills.
When you attack enemies, you are not just depleting their health bar; you are filling up an invisible (and sometimes visible, depending on the boss) status gauge. Once that gauge is full, the enemy is afflicted with a Status Ailment. This is your window of opportunity. Afflicting an enemy triggers a prompt for a Signal Skill. Pressing the swap button at this exact moment causes your incoming character to perform a devastating entrance attack that deals exponentially more damage than their standard kit.
Building a team is therefore about creating a self-sustaining loop: Character A applies the ailment, Character B swaps in with a Signal Skill to detonate the ailment, Character B then applies a secondary ailment, and Character C swaps in to finish the rotation.
The Role of Familiars and Cooking
Your build is not just your three active characters. Familiars—the adorable collectible companions you gather across Orbis—provide massive passive buffs and active utility skills. Furthermore, the cooking system is deeply integrated into combat prep. Gathering ingredients (like hunting wild boars for Beef Tartare) to craft specific meals is mandatory for high-level boss fights, as these meals grant crucial buffs to your status application rates and stamina regeneration.
Common Mistakes Ruining Your Builds
Before we dive into the exact Best Team Compositions & Builds in Dragon Sword: Awakening, we must address the glaring errors most players make. You cannot optimize a build if your foundational gameplay is flawed.
1. The “Main DPS” Fallacy
The biggest mistake players make is investing 90% of their resources (like Tomes of Insight) into a single “Main DPS” character while leaving their supports under-leveled. In Dragon Sword: Awakening, your off-field characters are just as important as your on-field ones. If your setup characters die in one hit because you neglected their gear, your entire rotation falls apart.
2. Ignoring the Stamina Economy
Stamina is everything. It dictates your ability to dodge, wall-climb, glide with your beetle mount, and execute heavy attacks. Players often build pure damage teams but find themselves completely out of stamina during critical boss phases, leading to unavoidable deaths. While exploring the vast map, running out of stamina mid-climb is infuriating. If you are struggling with this, understanding How to Get Infinite Stamina in Dragon Sword: Awakening is an absolute game-changer for maintaining your combat flow and exploration efficiency.
3. Misaligning Signal Skills
Not all Signal Skills are created equal. Some excel at crowd control (AoE knock-ups), while others are single-target nukes. A common mistake is using a single-target Signal Skill on a massive group of trash mobs, or wasting an AoE setup on a single boss. You must read your characters’ skill descriptions and align them with the content you are tackling.
The Best Team Compositions in Dragon Sword: Awakening
Here are the most optimized team setups currently dominating the meta. Because the game has removed all gacha mechanics, you can reliably build towards these compositions by simply progressing through the story, completing mercenary quests, and exploring Orbis.
Composition 1: The Elemental Overload (Boss Melter)
This is the premier single-target damage composition for the Best Team Compositions & Builds in Dragon Sword: Awakening. It relies on rapidly stacking a primary elemental ailment and detonating it for massive burst damage.
- Slot 1 (The Primer): Fast-attacking dual-wielder or ranged character. Their sole purpose is to stay on the field just long enough to apply the primary status ailment (e.g., Burn or Shock). Equip them with gear that enhances Status Application Rate.
- Slot 2 (The Detonator): A heavy-weapon user with a high-multiplier Signal Skill. The moment the boss is afflicted, you swap to this character. Their entrance attack will consume the status for massive burst damage.
- Slot 3 (The Sustainer/Buffer): A character dedicated to crowd control or applying defensive debuffs to the boss (like armor shred).
- Familiar Choice: Choose a Familiar that boosts Critical Hit Damage or extends the duration of Status Ailments.
- Build Focus: Prioritize raw Attack and Critical Rate on your Detonator, and Status Application Rate on your Primer.
Composition 2: The Infinite Juggle (Mob Clearer)
When you are exploring the open world and get ambushed by large groups of mercenaries or monsters, single-target damage will get you overwhelmed. This composition focuses on AoE and keeping enemies stun-locked in the air.
- Slot 1 (The Launcher): A character with heavy upward strikes that can easily break enemy poise and launch them into the air.
- Slot 2 (The Aerial Specialist): A character whose Signal Skill triggers specifically on airborne enemies. They will swap in, deal massive AoE damage in the air, and slam the enemies back down.
- Slot 3 (The Gatherer): A character with a vacuum or grouping skill to pull scattered enemies into one tight cluster before the Launcher does their job.
- Familiar Choice: A Familiar with an active skill that provides a localized shield or AoE elemental damage.
- Build Focus: Cooldown Reduction (CDR) is king here. You want to cycle through your skills as fast as possible to keep enemies perpetually crowd-controlled.
Composition 3: The Orbis Explorer (Resource Farmer)
Sometimes you don’t need to fight a legendary dragon; you just need to farm 50 wild boars for meat or scale a massive mountain to find a hidden Tome of Insight.
- Slot 1 (The Sprinter): A character with passive movement speed buffs or reduced stamina consumption for sprinting.
- Slot 2 (The Harvester): A character whose attacks have wide hitboxes, making it easy to instantly clear resource nodes or low-level wildlife without stopping.
- Slot 3 (The Glider): A character with passives that benefit aerial traversal or mount stamina.
- Familiar Choice: The Beetle Mount is your best friend here, but for Familiars, choose one that highlights nearby interactables or increases item drop rates.
- Build Focus: Equip any gear that provides flat stamina increases or out-of-combat movement speed.
Alternative Methods & Budget Builds
If you have just started tracing the footsteps of the legendary Heroes and do not have access to the late-game roster, you need alternative methods to survive. The Best Team Compositions & Builds in Dragon Sword: Awakening are highly flexible in the early game.
The “Starter Trio” Synergy
Do not underestimate the characters you receive in the first few hours. The game is meticulously balanced so that the starter characters teach you the fundamentals of Signal Skills. Instead of hunting for the “best” characters, focus on upgrading the starter trio’s weapons. A fully upgraded starter weapon will easily out-damage a mid-tier mid-game weapon.
Cooking as a Crutch
If your build is lacking damage, rely on the cooking system. Combining ingredients found across the continent is not just flavor text; it is a core mechanic. A well-timed meal that boosts your attack by 15% and increases your status application rate can completely bridge the gap between a budget build and a meta build. Make it a habit to always have a stack of high-tier food in your inventory before tackling major story quests.
Advanced Tips for High-Level Play
To truly master the Best Team Compositions & Builds in Dragon Sword: Awakening, you need to look beyond the character selection screen and focus on mechanical execution.
1. I-Frame Swapping
When you trigger a Signal Skill and your new character enters the field, they have a brief window of invincibility (i-frames). High-level players do not just swap for damage; they swap to dodge fatal boss attacks. If a boss is winding up a massive AoE that you cannot sprint out of, hitting the swap button to trigger a Signal Skill will allow you to completely phase through the damage while simultaneously counter-attacking.
2. Animation Canceling
Many heavy attacks have long, punishing recovery animations. You can cancel these recovery frames by instantly using a dash or, more optimally, triggering a character swap. This drastically increases your overall DPS (Damage Per Second) because you are removing the “dead time” where your character is just standing there recovering their posture.
3. Managing the Internal Cooldowns (ICD)
Status Ailments cannot be applied instantly back-to-back. There is a hidden Internal Cooldown (ICD) for how often an element can be applied to a boss. Advanced builds account for this by rotating through different elements. Apply Burn, detonate it, and instead of trying to apply Burn again immediately, switch to a character that applies Shock. This constant rotation of different ailments bypasses the ICD and keeps your DPS at maximum efficiency.
The Ultimate Quality of Life Solution: XMODhub
Let’s be brutally honest. As amazing as the combat in Dragon Sword: Awakening is, the open-world resource grind can become incredibly tedious. Hunting wild boars for Beef Tartare, farming Tomes of Insight, and constantly managing your stamina bar while trying to scale a mountain on your beetle mount can take hours away from the actual fun—fighting bosses and experiencing the story.
If you want to skip the tedious grind and focus purely on experimenting with the Best Team Compositions & Builds in Dragon Sword: Awakening, XMODhub is the ultimate solution. XMODhub is a premium, undetectable optimization tool that allows you to bypass the artificial time-sinks of PC gaming.
With XMODhub, you can enable features like Infinite Stamina, allowing you to glide indefinitely and chain heavy attacks without ever pausing. You can also utilize Item Multipliers to turn one piece of boar meat into fifty, completely eliminating the need to grind for cooking ingredients.
How to dominate Orbis with XMODhub:
- Download and Install XMODhub: Head over to the official XMODhub website and install the secure client.

- Auto-Detect Dragon Sword: Awakening: Launch the game. XMODhub’s intelligent engine will instantly recognize the game process.
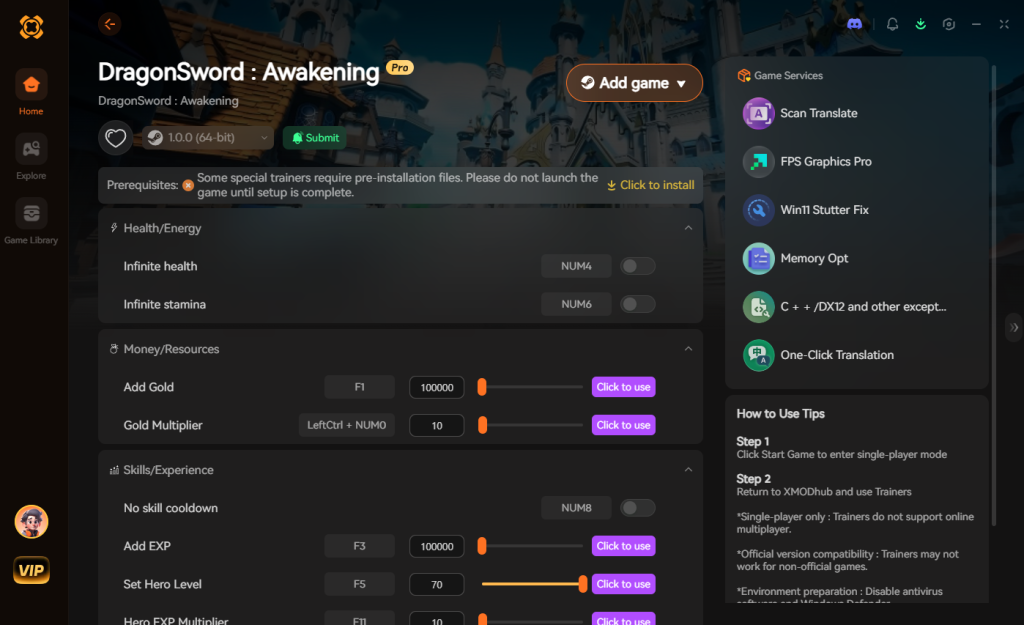
- Toggle Your Enhancements: Open the XMODhub overlay and toggle on “Infinite Stamina,” “Instant Skill Cooldowns,” or “Resource Multiplier.” Return to the game and experience Orbis without limits.
Download DragonSword Awakening Trainer Now
Top Elemental Ailment Synergies & Gear Stats
To truly elevate your gameplay and secure the highest DPS numbers, you must understand how different Status Ailments interact when chained together. The late-game meta revolves around triggering specific elemental reactions through your Signal Skills.
Here is the current tier list for the best elemental synergies to use in your builds:
| Elemental Synergy | Trigger Requirement | Combat Effect & Best Use Case | Tier Rating |
|---|---|---|---|
| Thermal Shock | Apply Burn, detonate with Shock | Triggers a massive AoE explosion that ignores a percentage of enemy defense. Best for dense mob clearing. | S-Tier |
| Shatter Strike | Apply Freeze, detonate with Blunt/Heavy | Instantly shatters the ice for a guaranteed critical hit with a massive damage multiplier. Ultimate boss nuke. | S-Tier |
| Toxic Hemorrhage | Apply Poison, continuously apply Bleed | Stacks two damage-over-time (DoT) effects that drain maximum HP percentages. Excellent for high-HP elites. | A-Tier |
| Superconduct | Apply Shock, detonate with Freeze | Reduces enemy movement speed and lowers physical damage resistance. Great for physical DPS carries. | A-Tier |
Essential Gear Stats for Meta Builds
No matter which of the Best Team Compositions & Builds in Dragon Sword: Awakening you choose, your gear substats will make or break your rotation. Always prioritize the following rolls on your equipment:
- Status Application Rate: Mandatory for your “Primer” (Slot 1) characters. This ensures you can apply Burn or Freeze in one brief combo string rather than staying on the field too long.
- Signal Skill Damage Boost: The absolute best stat for your “Detonator” (Slot 2) characters. Since 70% of your burst damage comes from the swap-in attack, scaling this stat yields the highest DPS return.
- Cooldown Reduction (CDR): Crucial for your Sustainer/Buffer characters, allowing them to cast grouping abilities or shields every single rotation without delay.
Frequently Asked Questions
Did they really remove all the gacha mechanics from Dragon Sword: Awakening?
Yes. The game was originally conceptualized as a mobile gacha title in South Korea, but developer Hound13 completely overhauled it for the PC/Steam release. All characters, Familiars, and weapons are now unlocked through natural gameplay progression, quests, and exploration, making it a true premium Action RPG experience.
How important are Familiars in combat?
Familiars are critical. They are not just cosmetic pets; they provide essential passive stat boosts and have active abilities that can heal you, shield you, or apply additional status ailments. Choosing the right Familiar is just as important as choosing the right characters for your team composition.
Where do I find Tomes of Insight?
Tomes of Insight are essential upgrade materials used to level up your characters’ skill trees. They are primarily found by completing major story quests, clearing out mercenary camps in the open world, and exploring hidden dungeons scattered across the continent of Orbis.
Can I play Dragon Sword: Awakening with just one character?
While the game allows you to stay on one character, it is highly discouraged. The combat system is balanced around the massive damage multipliers provided by Signal Skills and tag-team combos. Playing solo will result in agonizingly slow boss fights and frequent deaths due to stamina depletion.
Final Verdict
Mastering the Best Team Compositions & Builds in Dragon Sword: Awakening is the key to unlocking the true potential of Hound13’s spectacular Action RPG. By moving away from the “Main DPS” mindset and embracing the fluid, fast-paced tag-team mechanics, you will transform from a struggling mercenary into a true successor to the six legendary Heroes. Remember to balance your elemental applications, manage your stamina meticulously, and never underestimate the power of a well-cooked meal before a boss fight.
If you find the open-world resource gathering and stamina limitations are hindering your enjoyment of the combat, remember that XMODhub is there to streamline your experience. Supporting over 5,000 titles—including massive open-world ARPGs like Impact Winter and Monster Hunter Wilds—XMODhub gives you the power to play the game exactly how you want, on your own terms. Now get out there, build your ultimate team, and save the continent of Orbis.
Stop Grinding, Start Enjoying.
Bypass the tedious resource gathering and unlock your full potential instantly.

I am a passionate gamer and writer at XMODhub, dedicated to bringing you the latest gaming news, tips, and insights.
Connect with me:
LinkedIn Profile ↗
 Nancy Miller