Catherine Hu
You spent four gruelling hours gathering components, meticulously wiring your complex logic gates, and finally pressing the switch on your brand-new flyer—only to watch it immediately flip backward into a horde of Tapebots and explode into a shower of bearings and scrap metal. If you have played Scrap Mechanic for more than a few days, you know this exact pain. The physics engine in Scrap Mechanic is as unforgiving as it is rewarding, and bridging the gap between a clunky box on wheels and a master-crafted engineering marvel requires serious knowledge.
Editor’s Note: After clocking well over 1,500 hours in Scrap Mechanic since its early access days, and surviving countless Farmbot raids in the survival mode update, I have seen every physics glitch, bearing failure, and suspension exploit known to man. This guide is not about building pretty sports cars; it is about engineering the absolute most efficient, unbreakable, and game-breaking contraptions to dominate both Survival and Creative modes.
TL;DR: The Short Answer
If you are looking for the absolute Scrap Mechanic best builds to prioritize in your playthrough, here is the executive summary of what you need to construct:
- The Piston-Drill Miner: A low-center-of-gravity, six-wheeled rover utilizing pistons to push drills into rock formations, maximizing resource yield without flipping.
- The Suspension-Glitch Hovercraft: A flyer that abandons traditional steering wheels in favor of the suspension glitch, allowing for strafing and perfect stabilization during exploration.
- The Sensor-Automated Farm Defense: A base surrounded by Tier 3 Metal, utilizing logic gates and sensors to trigger crushing pistons and sawblades automatically when Farmbots approach.
- The Controller-Driven Mobile Base: A massive, gas-free nomadic fortress that uses upgraded controllers to power bearings directly, saving you infinite amounts of fuel while housing your craftbots and beds.
Table of Contents
- TL;DR: The Short Answer
- The Core Mechanics of Scrap Mechanic Engineering
- Build 1: The Unflippable Resource Miner
- Build 2: The Stabilized Exploration Flyer
- Build 3: The Automated Farm Defense System
- Build 4: The Controller-Powered Mobile Fortress
- The QoL Solution: Bypassing the Grind with XMODhub
- Essential Components & Material Tier List
- Frequently Asked Questions
- Final Verdict
The Core Mechanics of Scrap Mechanic Engineering
Before diving into the exact blueprints of the Scrap Mechanic best builds, you must understand the holy trinity of the Scrap Mechanic physics engine: Weight Distribution, Bearing Load, and Logic. Unlike simpler sandbox games, Scrap Mechanic calculates the weight of every individual block. A Tier 3 Metal Block weighs significantly more than Wood, meaning armoring the top of your vehicle will instantly make it top-heavy and prone to rolling. Furthermore, bearings have a weight limit; overloading a single bearing with a massive drill arm will cause the bearing to sag, glitch through other blocks, and summon the dreaded physics lag (often referred to by the community as the “Clang”).
Common Mistakes Novice Engineers Make
The most frequent mistake players make in Scrap Mechanic is relying solely on the Gas Engine for everything. Gas is a finite resource in Survival mode, and powering a massive 10-wheel vehicle with a Gas Engine is incredibly inefficient. Another massive error is hard-mounting wheels directly to the chassis without suspension. Scrap Mechanic terrain is notoriously bumpy; without suspension, your vehicle will bounce, lose traction, and spin out of control.
Build 1: The Unflippable Resource Miner
In Scrap Mechanic survival mode, gathering stone and wood is your primary gameplay loop. You need a dedicated mining vehicle, but building a good one is much harder than it looks.
Common Mistakes
Most players put their drills on a long arm attached to the front of their vehicle. When the drills hit a rock, the physics engine pushes back, lifting the front wheels off the ground and rendering the vehicle completely immobile. Alternatively, they make the vehicle too narrow, causing it to tip over sideways when navigating the rocky biomes where stone is found.
The Optimal Blueprint
The best miner build utilizes a wide wheelbase—at least 9 blocks wide—with a drastically lowered center of gravity. Instead of a static arm, you should build a “Drop Miner.”
- Build a hollow U-shaped chassis.
- Mount your drills on a separate horizontal beam inside the “U”.
- Connect this beam to the main chassis using downward-facing Pistons.
- When you drive over a rock, you activate the drills and extend the pistons downward. The weight of the vehicle keeps the drills pressed firmly into the rock, grinding it to dust in seconds without lifting your wheels.
Alternative Methods
If you lack the component kits to upgrade pistons, an alternative method is the “Pincer Miner.” You build two arms on the front of your vehicle attached to bearings, wired to a controller. You drive up to a rock, hit a switch, and the arms close inward like a crab, grinding the rock from both sides simultaneously. This prevents the pushback effect entirely.
Advanced Tips
For high-level Scrap Mechanic players, integrate a resource collector directly behind the drills. Wire the collector to a vacuum pump that shoots the refined materials directly into a large chest mounted on the back of your rover. This creates a fully automated gathering loop.
Build 2: The Stabilized Exploration Flyer
Walking across the massive map in Scrap Mechanic is a death sentence, and driving can be perilous due to dense forests and aggressive Tapebots. A flyer is essential, but achieving stable flight is the pinnacle of Scrap Mechanic engineering.
Common Mistakes
Players often slap four thrusters on the corners of a flat board, wire them to a seat, and expect a drone-like experience. In Scrap Mechanic, if your center of mass is even one block off-center, your flyer will aggressively list to one side and crash. Furthermore, using standard bearings to tilt thrusters for steering often results in overcorrection and uncontrollable spins.
The Optimal Blueprint
To build the ultimate flyer, you must utilize the “Suspension Glitch.” While some consider it an exploit, the developers at Axolot Games have left it in the game because it has become a staple of advanced building.
- Build a compact, symmetrical chassis using lightweight blocks (like Wood or Plastic).
- Place a suspension piece horizontally, attach a block to the end of it, and connect that block back to the main chassis using a bearing.
- Wire the bearing to your steering seat.
When you turn the steering wheel, the bearing tries to turn the suspension, but because it is welded back to the chassis, it creates artificial rotational torque without needing wheels or tilted thrusters. This gives you perfectly stable, UFO-like strafing capabilities.
Contextual Navigation: Building and testing these advanced flyers requires hundreds of component kits and countless trial-and-error crashes. If you are tired of losing resources while testing these complex flyers, you might want to check out our Scrap Mechanic Crash Fix Errors: Ultimate Troubleshooting Guide to bypass the tedious grind and focus purely on your engineering creativity.
Alternative Methods
If you refuse to use glitches, the alternative is a Thruster-Logic Flyer. This requires placing multiple thrusters on bearings and using a complex array of Logic Gates (XOR and AND gates) connected to sensors facing the ground. When the flyer tilts, the sensors detect the ground getting closer and automatically fire specific thrusters to auto-level the vehicle. This is incredibly complex but highly rewarding.
Build 3: The Automated Farm Defense System
Farming is the only way to get high-tier food and trigger the essential Farmbot raids to harvest their parts. However, defending a massive farm manually with a spud gun is inefficient and dangerous.
Common Mistakes
Building a simple wall out of Wood or Scrap Wood. Farmbots will chew through low-tier materials in seconds. Another mistake is building static defenses. Placing a few sawblades on the outside of your wall won’t stop a raid; the bots will simply walk around them or destroy the bearings holding them.
The Optimal Blueprint
The absolute best Scrap Mechanic farm defense is the Sensor-Triggered Crusher Wall.
- Enclose your farm entirely in Tier 3 Metal Blocks (the highest durability in Scrap Mechanic).
- Create a secondary outer perimeter wall made of Tier 3 Metal, but mount this entire outer wall on horizontal pistons attached to your inner wall.
- Place Level 5 Sensors facing outward, set to a range of 10 blocks.
- Wire the sensors to a controller that dictates the pistons’ movement.
When a horde of Haybots or the massive red Farmbot boss approaches, the sensors detect them. The pistons instantly fire outward, slamming the heavy Tier 3 Metal wall into the bots, crushing them instantly with physics damage, and then retracting. This requires zero ammunition and resets automatically.
Alternative Methods
A highly effective alternative is the “Water Cannon Moat.” Farmbots in Scrap Mechanic are temporarily stunned by water. You can build a trench around your farm and line the inner edge with Water Cannons hooked up to a rapid-fire logic clock (a loop of logic gates that pulses signals rapidly). This creates an impenetrable wall of water that permanently stuns the bots, allowing you to easily pick them off with a spud gun at your leisure.
Advanced Tips
Incorporate vacuum pumps into the floor of your defense perimeter. When the bots are destroyed, their component kits and metal scrap will drop to the ground. The vacuum pumps can automatically suck up the loot and deposit it into chests inside your base, meaning you never even have to step outside to reap the rewards of the raid.
Build 4: The Controller-Powered Mobile Fortress
Why build a static base when you can take your entire operation on the road? A mobile base allows you to strip-mine an area and move on, but powering a vehicle large enough to hold beds, craftbots, and refinebots is a monumental task.
Common Mistakes
Trying to power a 5000-block heavy mobile base with Gas Engines. You will spend 90% of your gameplay diving for crude oil just to move your base 100 meters. Additionally, using standard steering bearings on a massive vehicle will cause the wheels to buckle under the immense weight.
The Optimal Blueprint
The true endgame of Scrap Mechanic best builds is the Controller Drive. Controllers in Scrap Mechanic do not require fuel; they only require the initial component kits to upgrade.
- Build your massive chassis.
- Instead of engines, place Level 5 Controllers.
- Wire the controllers directly to the bearings of your wheels.
- Set the controller sequence to spin the bearings in a continuous 360-degree loop.
- Hook the controller up to a switch at your driver’s seat.
When you flip the switch, the controller forces the bearings to rotate, driving the massive vehicle forward with infinite torque and absolutely zero fuel cost.
Alternative Methods
For steering a colossal mobile base, traditional wheels often fail. The alternative is “Tank Steering.” By dividing your left wheels and right wheels onto separate controller circuits, you can create a skid-steer system. Pushing one button moves the left wheels forward and the right wheels backward, allowing your massive fortress to turn on a dime without needing delicate steering bearings.
Advanced Tips
To prevent your mobile base from lagging the game, ensure that all moving parts (craftbots, pistons, loose blocks) are welded securely when the vehicle is in motion. Scrap Mechanic calculates physics for every loose entity; locking them down reduces the CPU load drastically.
The QoL Solution: Bypassing the Grind with XMODhub
Engineering these Scrap Mechanic best builds takes thousands of metal blocks, hundreds of component kits, and countless hours of grinding. Losing a complex flyer to a random physics glitch and having to farm oil and metal for another three hours can completely drain the fun out of the game. If you want to focus entirely on the brilliant engineering mechanics without the tedious survival grind, XMODhub is the ultimate quality-of-life upgrade.
XMODhub provides safe, seamless modifications that allow you to tailor the Scrap Mechanic experience to your exact preferences. Want to test a massive logic-gate build without starving to death? Need infinite component kits to max out your controllers? XMODhub bridges the gap between survival and creative mode effortlessly.
How to transform your engineering sessions:
- Download XMODhub: Install the secure, lightweight client from the official site.

- Auto-Detect Scrap Mechanic: Launch the app; it will automatically locate your Scrap Mechanic installation and verify the game version.
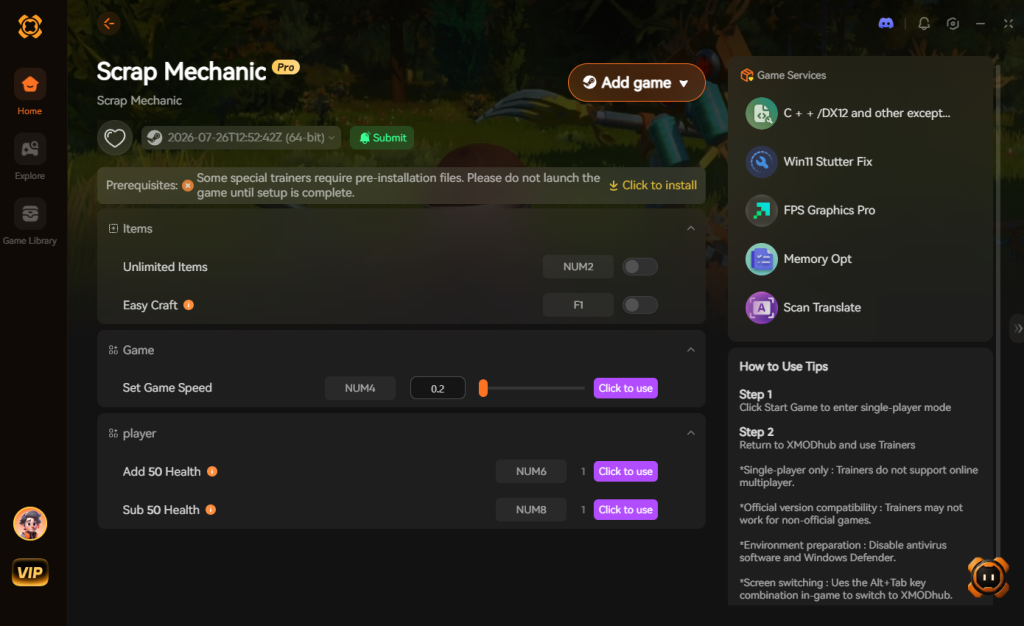
- Toggle Cheats: Use the intuitive overlay to activate Infinite Health, Infinite Resources, or Instant Crafting. You can now build your dream mobile fortress without spending weeks hitting rocks with a hammer.
Download Scrap Mechanic Trainer Now
Essential Components & Material Tier List
When designing the Scrap Mechanic best builds, selecting the right materials is the difference between an invincible Scrap Mechanic survival base and a pile of smoking debris. To capture maximum efficiency and dominate the game’s physics engine, you must memorize the weight-to-durability ratios of your inventory.
| Component / Material | Weight / Durability | Strategic Application in Builds |
|---|---|---|
| Tier 3 Metal Block | Very Heavy / Maximum | Essential for outer armor on automated farming Scrap Mechanic bases and massive mobile fortresses. |
| Concrete Block 3 | Heavy / High | Perfect for chassis floors to drastically lower the center of gravity and prevent vehicles from flipping. |
| Level 5 Controller | Light / Indestructible | The core of fuel-free Scrap Mechanic vehicle design, powering bearings directly without gas. |
| Off-Road Suspension | Medium / High | Crucial for absorbing heavy impacts on uneven terrain and executing the perfect suspension glitch flyer. |
| Logic Gate | Very Light / Fragile | The brain behind complex sensor defenses, automated resource loops, and specialized piston engines. |
Mastering Logic Gate Configurations
A true engineering marvel goes beyond raw horsepower. Integrating Logic Gates (AND, OR, XOR) with Sensors and Timers transforms a static vehicle into a smart machine. For example, wiring an XOR gate to your thrusters allows for alternating pulse engines, while an AND gate ensures your crusher wall only triggers when your base defense system is actively armed and a Farmbot is detected in range.
Frequently Asked Questions
Q1: How do I stop my Scrap Mechanic vehicles from flipping over constantly?
The physics engine in Scrap Mechanic heavily relies on the center of mass. To stop flipping, you must widen your wheelbase and lower your center of gravity. Use heavy blocks (like Tier 3 Metal or Concrete) exclusively for the floor of your chassis, and use lightweight blocks (like Wood or Plastic) for the roof and upper structures. Additionally, stiffening your suspension settings can prevent the vehicle from leaning too hard during turns.
Q2: What exactly is a suspension glitch and how do I build one?
A suspension glitch is a physics exploit where a suspension piece is forced to turn by a bearing, but the end of the suspension is welded back to the same body as the bearing. Because the game tries to calculate the rotation but cannot physically move the blocks, it generates artificial rotational force. You build it by placing a block, attaching a horizontal suspension piece, putting a block on the end of the suspension, attaching a bearing to that block, and welding the bearing back to the original structure.
Q3: How many controllers do I need to make a fully functional walking mech?
Building a bipedal walking mech is one of the hardest Scrap Mechanic best builds. At minimum, you need two Level 5 Controllers. One controller manages the hip and knee joints for the forward walking cycle, while the second controller manages the ankle stabilization and weight shifting. You will also need a complex array of logic gates to ensure the sequence resets perfectly; otherwise, the mech will trip over its own feet.
Q4: Can Farmbots destroy Tier 3 Metal blocks?
No block in Scrap Mechanic survival is entirely invincible forever, but Tier 3 Metal is extremely resistant. A standard Haybot or Tapebot will take an incredibly long time to break a single Tier 3 Metal block. However, the massive red Farmbot boss wields a scythe that deals massive structural damage. While it won’t break Tier 3 Metal instantly, repeated strikes will eventually destroy it. This is why automated defenses (like crushers or water stunners) are necessary to complement your heavy armor.
Final Verdict
Mastering the Scrap Mechanic best builds requires a shift in mindset. You must stop thinking like a gamer and start thinking like a mechanical engineer. Understanding weight distribution, leveraging controller drives for infinite torque, and utilizing logic gates for automated defenses will elevate your gameplay from a struggling survivor to an industrial overlord. Whether you are constructing a lag-free mobile base or a suspension-glitched flyer, the true joy of Scrap Mechanic lies in overcoming the game’s brutal physics.
However, the line between a rewarding challenge and a frustrating grind is thin. When you are ready to remove the resource bottlenecks and truly unleash your architectural potential, utilizing tools like XMODhub can revolutionize your experience. With support for over 5,000 titles—including other engineering masterpieces like House Party and Besiege—XMODhub ensures that your creativity is never limited by an arbitrary resource grind. Get out there, start welding, and conquer the Farmbots.
Stop Grinding, Start Enjoying.
Bypass the tedious resource gathering and unlock your full potential instantly.

I am a passionate gamer and writer at XMODhub, dedicated to bringing you the latest gaming news, tips, and insights.
Connect with me:
LinkedIn Profile ↗


 Nancy Miller