Catherine Hu
Table of Contents
- TL;DR: The Short Answer
- Content Navigation
- Why is Mortal Shell II Crashing? The Underlying Causes
- Step 1: The Engine Level Fixes (DirectX & Launch Options)
- Step 2: Conquering the Stutter (Windows & GPU Tweaks)
- Step 3: In-Game Settings Optimization for Consistent FPS
- Step 4: Fixing Specific Fatal Error Codes
- Step 5: Plugging the Memory Leaks (Pagefile Optimization)
- Benchmarking: The Golden Settings Matrix
- Tired of Troubleshooting? The Ultimate Shortcut
- Frequently Asked Questions
- Final Verdict: Stabilizing the Shattered World
Nothing breaks the immersion of a dark, grueling Souls-like faster than your game freezing right as you attempt a flawless parry. If you are reading this, you are likely pulling your hair out because Mortal Shell II is crashing to the desktop, throwing UE5 fatal errors, or stuttering so badly that the hardening mechanic becomes completely unusable. You are not alone. The shift in engine architecture and the game’s heavy reliance on dynamic lighting have left many PC rigs struggling to maintain a stable frame rate.
Editor’s Note: I spent my first eight hours with Mortal Shell II fighting the game’s code rather than the enemies. Constant micro-stutters during boss encounters and abrupt “Fatal Error” pop-ups in the swamp biomes nearly made me uninstall. After dissecting the config files, testing various upscaling methods, and tweaking hidden control panel settings, I managed to completely eliminate the crashes and lock the game at a buttery-smooth 60+ FPS. Here is exactly how I did it.
TL;DR: The Short Answer
Need to get back into the fight right now? Here are the most effective fixes for Mortal Shell II crashes and stuttering:
- Update GPU Drivers & Perform a Clean Install: Use DDU (Display Driver Uninstaller) to wipe old drivers, then install the latest Nvidia/AMD release.
- Force DirectX 11 (DX11) Mode: Right-click Mortal Shell II in Steam > Properties > Launch Options > Type
-dx11. - Disable Control Flow Guard (CFG): Open Windows Exploit Protection > Program Settings > Add Mortal Shell II executable > Turn off CFG.
- Tweak Upscaling (DLSS/FSR): Switch DLSS/FSR from “Quality” to Balanced and disable Frame Generation if you experience ghosting or micro-stuttering.
- Verify Game Files: Steam > Right-click Game > Properties > Installed Files > Verify integrity of game files.
Content Navigation
- Why is Mortal Shell II Crashing? The Underlying Causes
- Step 1: The Engine Level Fixes (DirectX & Launch Options)
- Step 2: Conquering the Stutter (Windows & GPU Tweaks)
- Step 3: In-Game Settings Optimization for Consistent FPS
- Step 4: Fixing Specific Fatal Error Codes
- Step 5: Plugging the Memory Leaks (Pagefile Optimization)
- Benchmarking: The Golden Settings Matrix
- Tired of Troubleshooting? The Ultimate Shortcut
- Frequently Asked Questions
- Final Verdict: Stabilizing the Shattered World
Why is Mortal Shell II Crashing? The Underlying Causes
Before you start ripping your system apart, you need to understand why Mortal Shell II is behaving this way. The game builds upon the visceral combat and unique shell-swapping mechanics of the original but ramps up the visual fidelity significantly.
The primary culprits for instability usually fall into three categories:
- Shader Compilation Issues: When you enter a new area or execute a new attack animation, the game tries to compile shaders on the fly. If your CPU cannot keep up, you get a massive stutter.
- DirectX 12 Instability: While DX12 offers better modern hardware utilization, its implementation in certain engine builds can cause memory leaks, leading directly to the dreaded “Fatal Error” crash to the desktop.
- VRAM Bottlenecks: The high-resolution textures on the shells and the dense volumetric fog in the environments chew through Video RAM. If you exceed your GPU’s VRAM limit, the game will stutter aggressively and eventually crash.
Let’s crack the code and fix these issues systematically.
Step 1: The Engine Level Fixes (DirectX & Launch Options)
The most impactful fix you can apply takes less than a minute and doesn’t require modifying any system files. We need to force the game to run on a more stable API rendering path.
Forcing DirectX 11
Many of the fatal errors in Mortal Shell II occur because of DX12 API conflicts. Rolling back to DX11 often sacrifices a tiny bit of peak performance but grants massive stability.
- Open Steam and navigate to your Library.
- Right-click on Mortal Shell II and select Properties.
- Under the General tab, look for the Launch Options text box at the bottom.
- Type exactly:
-dx11 - Close the window and launch the game.
Bypassing Shader Caching Stutters
If you are experiencing massive hitches when moving the camera or when enemies spawn, your shader cache might be corrupted or severely limited.
- Nvidia Users: Open the Nvidia Control Panel > Manage 3D Settings > Global Settings. Scroll down to Shader Cache Size and change it from “Driver Default” to 10 GB or Unlimited. Apply and restart your PC.
- AMD Users: Open AMD Adrenalin > Gaming > Graphics > Advanced > Reset Shader Cache.
Step 2: Conquering the Stutter (Windows & GPU Tweaks)
If the game runs but feels like a slideshow during intense combat, the issue lies in how Windows is handling the game’s executable.
Disable Control Flow Guard (CFG)
This Windows security feature is notorious for causing frametime spikes in modern Unreal Engine titles.
- Press the Windows key and type Exploit Protection, then hit Enter.
- Click on the Program settings tab.
- Click Add program to customize > Choose exact file path.
- Navigate to your Mortal Shell II installation folder (usually
SteamLibrary\steamapps\common\Mortal Shell 2\MortalShell2\Binaries\Win64) and select the.exefile. - Scroll down to Control flow guard (CFG).
- Check the box for Override system settings, toggle it to Off, and click Apply. Restart your PC.
Optimize CPU Priority
Sometimes background processes choke the game out of necessary CPU cycles.
- Launch Mortal Shell II.
- Press
Ctrl + Shift + Escto open Task Manager. - Go to the Details tab.
- Right-click the Mortal Shell II executable.
- Hover over Set Priority and change it to High.
Step 3: In-Game Settings Optimization for Consistent FPS
You cannot run everything on “Ultra” and expect a smooth experience unless you are wielding an RTX 4090. To survive the brutal combat, you need consistent frametimes, not just high peak FPS.
Here are the settings you must change immediately:
- Volumetric Fog / Clouds: Drop this to Medium. The visual difference is negligible, but it saves about 15% of your GPU overhead.
- Shadow Quality: Set to High rather than Ultra. Ultra shadows calculate minute details on debris that you will never notice while dodging heavy attacks.
- Anti-Aliasing / Upscaling: If you have an RTX card, use DLSS on Balanced. If you are on AMD, use FSR 2.2 on Quality. Warning: Do not use standard TAA if you can avoid it, as it creates a blurry ghosting effect around your character when you harden.
- Motion Blur & Depth of Field: Turn both Off. Not only do they cost performance, but they also obscure the telegraphed attack animations of bosses, getting you killed faster.
Once your game is running smoothly and you are ready to actually explore the world without fear of crashing, you might realize you are completely lost. If you need help finding upgrade materials or secret lore items safely, check out our comprehensive Mortal Shell 2 Interactive Map & Fast Travel Guide to plot out your optimal route.
Step 4: Fixing Specific Fatal Error Codes
Sometimes the crashes are accompanied by specific error text. Here is how to decode and destroy them.
“Out of Video Memory trying to allocate a rendering resource”
Your GPU is choking on textures.
- The Fix: Lower your Texture Quality from Ultra to High. Ensure you have closed hardware-accelerated background apps like Discord (turn off hardware acceleration in Discord settings) and Chrome.
“Unreal Engine is exiting due to D3D device being lost”
This usually indicates an unstable GPU overclock or a driver crash.
- The Fix: If you have undervolted or overclocked your GPU using MSI Afterburner, return to the default curve. If you haven’t, perform a clean driver installation using DDU in Windows Safe Mode.
Step 5: Plugging the Memory Leaks (Pagefile Optimization)
Here’s the kicker: even if you have 32GB of RAM, Unreal Engine 5 titles can still crash if Windows mismanages your virtual memory. Mortal Shell II has a known memory leak issue during extended play sessions. To stop the game from force-closing without warning, you must manually assign a static Pagefile.
- Press the Windows key, type Advanced System Settings, and hit Enter.
- Under the Performance section, click Settings.
- Go to the Advanced tab and click Change under Virtual Memory.
- Uncheck Automatically manage paging file size for all drives.
- Select the SSD where Mortal Shell II is installed.
- Click Custom size. Set the Initial size to 16384 (16GB) and Maximum size to 32768 (32GB).
- Click Set, then OK, and reboot your rig.
Benchmarking: The Golden Settings Matrix
Stop guessing which settings your rig can handle. If you want to avoid stuttering during critical boss phases, you must align your in-game expectations with your hardware capabilities. Use this matrix to lock in your settings and guarantee a stable framerate.
| Hardware Tier | Target Resolution | Recommended Upscaling | Expected FPS | VRAM Required |
|---|---|---|---|---|
| Budget (RTX 3060 / RX 6600) | 1080p | DLSS/FSR Balanced | 60 FPS | 8 GB |
| Mid-Range (RTX 4070 / RX 7800 XT) | 1440p | DLSS/FSR Quality | 80+ FPS | 12 GB |
| Enthusiast (RTX 4090 / RX 7900 XTX) | 4K | DLSS/FSR Native AA | 120+ FPS | 16+ GB |
Tired of Troubleshooting? The Ultimate Shortcut
Let’s be real: you bought a game to play it, not to spend three hours playing “IT Tech Support Simulator.” Even after fixing the crashes, Mortal Shell II is an incredibly punishing game. The stamina management is brutal, the parry timing window is razor-thin, and losing all your Tar (currency) because of a stray mob can ruin your night.
If you just want to experience the lore, test out different shell combinations, and obliterate bosses without the endless frustration, drop the nonsense and use XMODhub.
XMODhub injects directly into the game engine safely, bypassing the artificial difficulty spikes.
How to Dominate Mortal Shell II in 3 Steps:
- Download XMODhub: Grab the lightweight client from the official site.

- Auto-Detect Mortal Shell II: Launch the game, and XMODhub will instantly recognize your version.
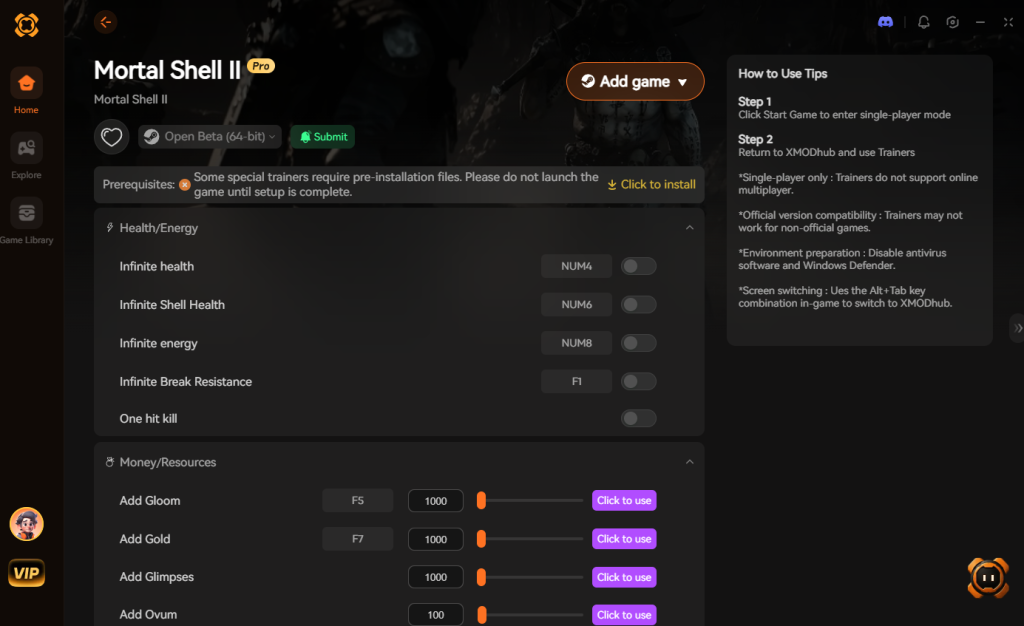
- Toggle Cheats: Use the overlay to activate Infinite Health, Infinite Stamina, Instant Resolve Build-up, or the One-Hit Kill toggle.
Why suffer through bloated boss health pools when you can simply harden, tank the hit, and instantly delete them with XMODhub?
Download Mortal Shell II Trainer Now
Frequently Asked Questions
Will lowering my resolution fix the fatal errors?
Not necessarily. Lowering resolution primarily reduces GPU load and increases FPS. Fatal errors are usually tied to API conflicts (DX12) or CPU/RAM instability. Focus on changing to DX11 and disabling CFG first.
Why does Mortal Shell II stutter only when I switch shells?
When you swap shells, the game rapidly loads high-resolution textures and new animation sets into memory. If your game is installed on a mechanical Hard Drive (HDD), the data transfer rate is too slow. You must install Mortal Shell II on an SSD (preferably NVMe) to eliminate asset-streaming stutters.
Does verifying game files actually do anything?
Yes. It is surprisingly common for Steam updates to corrupt a tiny configuration or shader file. Verifying the integrity of game files compares your local data against the server and redownloads only the broken files. It fixes about 30% of random crash-on-startup issues.
Are there any community patches or mods to fix performance?
Currently, the most effective community-driven fixes involve modifying the Engine.ini file to disable certain forced Unreal Engine post-processing effects. However, doing this incorrectly can break the game’s lighting entirely, so stick to the in-game settings and driver tweaks outlined above unless you are an advanced user.
Final Verdict: Stabilizing the Shattered World
Fixing Mortal Shell II crashes and stuttering boils down to taming its engine. By forcing DirectX 11, adjusting your shader cache, disabling Windows Control Flow Guard, and optimizing your upscaling settings, you can transform a jagged, frustrating mess into a fluid, visceral combat experience. The game demands precision, and you cannot deliver that if your hardware is betraying you.
If you have applied every fix and simply don’t have the patience to grind through the brutal difficulty anymore, remember that XMODhub is the ultimate equalizer. With support for over 5,000 single-player titles—including other punishing Souls-likes like Elden Ring and Lies of P—XMODhub ensures that you dictate the rules of the game, not the other way around. Get your system stable, grab your favorite shell, and show those zealous foes no mercy.
Stop Grinding, Start Enjoying.
Bypass the tedious resource gathering and unlock your full potential instantly.

I am a passionate gamer and writer at XMODhub, dedicated to bringing you the latest gaming news, tips, and insights.
Connect with me:
LinkedIn Profile ↗

 Nancy Miller