We have all been there. You and three friends are deep into a late-game run in Burglin’ Gnomes. Your tiny backpacks are overflowing with high-tier loot—silverware, shiny trinkets, and a massive golden pocket watch that took three of you to carry down the stairs. You are mere inches from the rat-hole exit, dreaming of the massive base upgrades waiting for you back at the gnome home. Suddenly, the floorboards creak. The AI homeowner, fully enraged, rounds the corner. In a panic, your designated kiter drops their stamina management, gets snatched up, and is promptly tied up and tossed into the kitchen oven. The resulting chaos leads to a total team wipe. You wake up back at your barebones gnome home, quota missed, resources zeroed out, and your hard-earned progression completely erased. The extraction-heist loop of Burglin’ Gnomes is incredibly punishing, blending the terrifying quota-management of modern co-op horror with a surprisingly deep base-building mechanic. Surviving the night is only half the battle; the real challenge is extracting enough value to scale your operations.
Editor’s Note:
Having logged well over 100 hours in the closed testing rings and demo builds of Burglin’ Gnomes, I have mapped every single AI patrol route, crunched the numbers on weight-to-value loot ratios, and reverse-engineered the quota scaling algorithms. If you want to stop getting cooked in the oven and start building a subterranean empire, this guide will break down the exact mathematical strategies you need to dominate the human world.
Quick Answer: How to get infinite resources
Core Mechanics: The Economics of the Burglin’ Haul
To truly understand how to master the resource economy in Burglin’ Gnomes, you must first deconstruct the underlying mechanics of the “Burglin’ Haul.” Unlike traditional RPGs where loot is statically converted into currency, Burglin’ Gnomes utilizes a dynamic weight-to-value system heavily influenced by the AI homeowner’s awareness level. Every item you steal from the human world has three hidden stats: Base Value, Encumbrance (Weight), and Noise Profile. Your primary goal is to extract enough Base Value to meet your cyclical quota, with any surplus value being converted into the raw resources required for base upgrades.
The early game is where 90% of players bottleneck. You spawn into a low-tier house with zero equipment, meaning your movement speed is slow and your inventory space is severely limited. The homeowner AI begins in a “Passive” state, wandering predetermined patrol routes. However, every time you pick up an item, drop an item, or sprint across a loud surface (like hardwood floors), you generate a Noise Profile. Once the cumulative noise reaches a certain threshold, the AI shifts to the “Suspicious” state, tightening their patrol radius around the noise source. If you are spotted, they enter the “Hunting” state. Extracting loot while the homeowner is hunting is nearly impossible due to your severe movement penalties when carrying heavy items.
To optimize your resource gathering, you must memorize the extraction math. A common mistake is grabbing the first large item you see—like a toaster or a heavy book. While a toaster might yield 50 resource units, its Encumbrance slows your gnome down by 40%, making you easy prey. Conversely, a wedding ring yields 150 resource units, has zero Encumbrance penalty, and generates no noise when added to your pouch. Understanding these tiers is the foundational step in learning how to get infinite resources for base upgrades in Burglin’ Gnomes through legitimate gameplay.
| Loot Category | Example Items | Average Resource Yield | Encumbrance Penalty | Noise Profile (Drop/Move) | AI Aggro Generation |
|---|---|---|---|---|---|
| Scrap/Junk | Spoons, Pencils, Buttons | 5 – 15 Units | Low (5%) | Low | Minimal |
| Household Heavy | Toasters, Books, Clocks | 40 – 80 Units | High (40-60%) | High | Severe |
| Valuables | Watches, Rings, Coins | 100 – 250 Units | Zero (0%) | Silent | Moderate (if missing) |
| Mythic Relics | Heirlooms, Safes | 500+ Units | Extreme (Requires 2+ Gnomes) | Very High | Instant Hunt State |
By strictly adhering to a “Valuables Only” policy during the first three days of a quota cycle, you can artificially inflate your resource pool. Leave the Household Heavies for the final day, and only if you are desperate to meet the quota. This strategy minimizes your exposure to the homeowner and maximizes your surplus haul, which is the exact currency you need to start crafting functional furniture.
To dive deeper, read our guide on Best Gadgets to Craft Early in Burglin’ Gnomes
Advanced Base Upgrades: Scaling Your Gnome Home
Once you have successfully extracted a surplus of resources, the meta-game of Burglin’ Gnomes shifts entirely to base management. The gnome home is not just a cosmetic hub; it is the mechanical engine that dictates your survivability in higher-tier houses. Upgrading your home requires precise resource allocation. If you spend your hard-earned haul on cosmetic rugs or vanity lighting before securing functional furniture, you will inevitably fail the scaling quotas of the mid-game and face a total progression wipe.
The upgrade tree in Burglin’ Gnomes is divided into three primary branches: Equipment Crafting, Environmental Buffs, and Storage Expansion. Your absolute first priority must be the Tinkering Bench Level 1. This functional furniture piece costs 450 resource units and unlocks the ability to craft basic tools like the Grappling Hook (allowing vertical traversal to avoid floor-level AI patrols) and the Stun Slingshot (which can temporarily daze the homeowner for 2.5 seconds, providing crucial escape windows). Without the Tinkering Bench, you are entirely reliant on basic movement mechanics, which are mathematically insufficient to survive the speed of the AI in Tier 3 houses.
After securing the Tinkering Bench, your next investment should be in Environmental Buffs, specifically the Stamina Spores or the Resting Hammocks. In Burglin’ Gnomes, your stamina regeneration rate between heists is dictated by the comfort level of your home. If you sleep on the dirt floor, you begin the next heist with a 15% maximum stamina penalty. By spending 300 resources on Hammocks, you ensure that all players (in both single-player and multiplayer modes) spawn into the house with a 110% stamina buff. This extra 10% is often the literal difference between escaping through the rat-hole and being thrown into the oven.
Furthermore, you must understand the compounding cost of the quota system. Every time you meet a quota, the next one increases by a multiplier of roughly 1.4x, while the resource cost for Tier 2 and Tier 3 base upgrades scales exponentially. For instance, upgrading to the Advanced Tinkering Bench requires 1,500 resources. If you are not consistently pulling Mythic Relics from the houses, the math dictates that you will eventually hit a wall where your haul cannot cover both the quota and the base upgrade costs. This mathematical bottleneck is exactly why so many players desperately search for methods on how to get infinite resources for base upgrades in Burglin’ Gnomes. You have to hyper-optimize your base layout to reduce crafting costs and maximize pre-heist buffs, treating your gnome home less like a cozy burrow and more like a high-efficiency military FOB.
To dive deeper, read our guide on Fastest Way to Carry Heavy Items & Big Loot in Burglin’ Gnomes
High-Efficiency Heist Routing and Co-op Synergy
Burglin’ Gnomes boasts a single-player mode, but the game’s mechanics are unapologetically balanced around 4-player co-op. Attempting to solo a Tier 3 house is a masterclass in frustration, as the AI homeowner’s patrol density makes it impossible to extract heavy, high-value items without a distraction. To achieve maximum resource efficiency, your squad must operate with military precision, assigning rigid roles and executing pre-planned heist routes.
The optical 4-gnome squad composition breaks down into three distinct roles: The Kiter, The Scout, and The Mules. The Kiter is the most mechanically demanding role. This player equips the lightest gear, maximizes their stamina buffs from the base, and intentionally generates noise to draw the homeowner’s aggro. The Kiter’s job is not to steal, but to manipulate the AI’s pathing, keeping the human trapped in a looping chase around large obstacles like kitchen islands or living room sofas. A skilled Kiter can hold the AI’s attention for upwards of two minutes, completely neutralizing the primary threat.
While the Kiter is working, The Scout utilizes verticality tools (like the Grappling Hook) to bypass ground-floor patrols and locate the Valuables and Mythic Relics. The Scout communicates the location of these high-value items to The Mules (the remaining two players). The Mules are the heavy lifters; they equip strength-enhancing gear crafted from the Tinkering Bench and focus solely on transporting the heavy loot from the drop zones to the extraction rat-hole. This division of labor completely breaks the game’s intended difficulty curve, allowing a coordinated team to strip a house of 2,000+ resource units in a single run.
| Squad Role | Primary Objective | Required Equipment | Ideal Base Buffs | Target Loot Focus |
|---|---|---|---|---|
| The Kiter (x1) | Distract AI Homeowner | Stun Slingshot, Sprint Boots | +20% Stamina Regen | None (Survival Only) |
| The Scout (x1) | Locate High-Value Spawns | Grappling Hook, Spyglass | +15% Move Speed | Rings, Watches, Small Electronics |
| The Mules (x2) | Transport Heavy Items | Heavy Lifter Harness | +30% Carrying Capacity | Safes, Toasters, Heirlooms |
However, this synergy requires flawless communication. If the Kiter runs out of stamina and gets caught, the homeowner immediately resets their aggro and will aggressively hunt the Mules, who are slowed down by their heavy loads. When a Mule drops a heavy item to flee, it generates a massive Noise Profile, virtually guaranteeing they will be caught next. Mastering these roles and understanding the exact layout of the procedurally generated houses is the only legitimate way to approach the efficiency required for massive base upgrades. You must learn to read the room layouts instantly, identifying infinite loops for the Kiter and safe drop-zones for the Mules.
To dive deeper, read our guide on Funniest Ways to Troll Your Friends in Burglin’ Gnomes
Fatal Mistakes: Avoiding the Oven and Team Wipes
The punishment for failure in Burglin’ Gnomes is draconian. Unlike casual co-op games where dying merely forces a respawn, failing a heist in this game triggers a catastrophic chain of events that can ruin hours of progression. The most iconic and terrifying mechanic in the game is the “Oven Penalty.” When the AI homeowner catches a gnome, they do not instantly kill them. Instead, the gnome is tied up and carried to the kitchen. The homeowner will then preheat the oven and toss the tied-up player inside.
This creates a brutal risk-versus-reward scenario for the surviving players. You have approximately 45 seconds to mount a rescue mission. Freeing a player from the oven requires at least two gnomes (one to distract the homeowner who usually guards the kitchen, and one to untie the captive). If you succeed, the rescued player survives, but all their carried loot is permanently destroyed. If you fail, or if the timer runs out, the player is “cooked.” A cooked player is eliminated for the remainder of the quota cycle, drastically reducing your team’s extraction efficiency.
The most common fatal mistake players make is succumbing to greed. The “One More Item” syndrome is the leading cause of team wipes. Players will successfully extract enough value to meet the quota, but instead of leaving through the rat-hole, they will venture back into the house to grab a shiny object just to get a few extra resources for base upgrades. By this point in the night, the homeowner’s AI is usually in a permanent “Hunting” state, and their movement speed is buffed. Getting caught while being greedy not only loses the extra item but risks the entire run.
If your entire team is captured, you suffer a Total Wipe. A Total Wipe means you instantly fail the current quota, all unbanked resources are lost, and in severe cases, the human homeowner will “discover” your rat-hole, resulting in a raid on your gnome home that destroys a percentage of your crafted functional furniture. This mechanic is why the mid-to-late game feels so incredibly grindy. You are constantly taking two steps forward and one massive step back. To protect your base upgrades, you must establish a hard “Pull-Out” rule: once the quota is met and the base upgrade cost is secured, every player immediately extracts, regardless of what loot is left on the table.
To dive deeper, read our guide on Burglin’ Gnomes Fast Base Upgrade Guide (Max Level Quickly)
The Ultimate QoL Solution: Bypassing the Burglin’ Gnomes Grind
Let’s face the harsh reality: the quota scaling in Burglin’ Gnomes is inherently designed to eventually defeat you. By the time you reach Tier 4 houses, the AI homeowner moves faster than your base sprint speed, the quotas require thousands of resources, and the cost to upgrade your home to survive these conditions becomes mathematically absurd. The constant threat of a team wipe destroying your functional furniture turns what should be a fun, chaotic co-op experience into a stressful, punishing grind. If you are tired of losing your hard-earned progress to a single mistake or janky AI pathing, you need a modern solution.
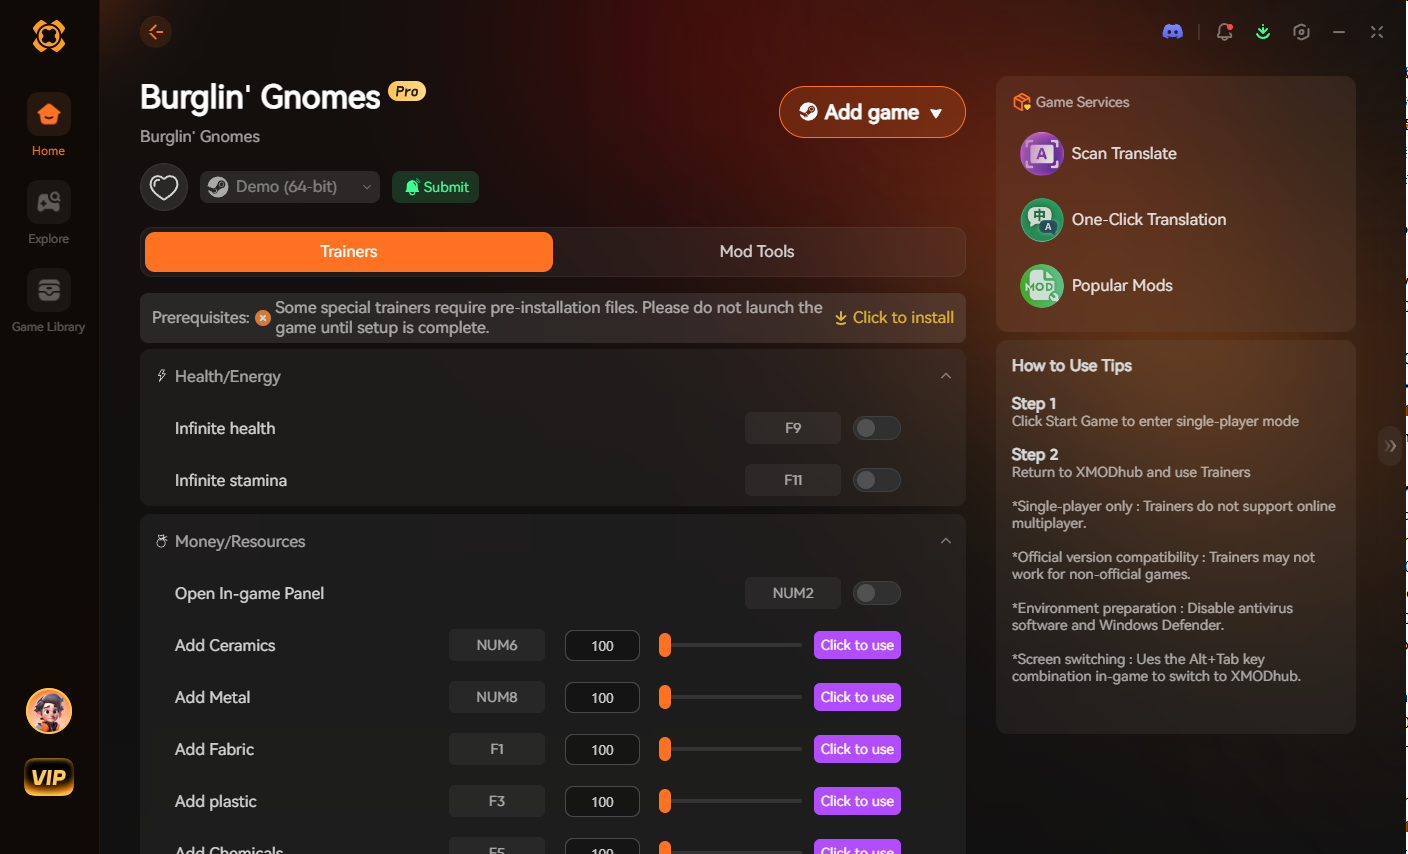
This is where XMODhub becomes the definitive answer for how to get infinite resources for base upgrades in Burglin’ Gnomes. Instead of spending 40 hours grinding the same early-game houses just to afford a Level 3 Tinkering Bench, XMODhub allows you to bypass the artificial inflation of the game’s economy. With a few clicks, you can instantly inject infinite resources directly into your gnome home’s storage, allowing you to experience the full depth of the base-building mechanics without the soul-crushing penalty of the quota system. Furthermore, XMODhub offers critical Quality of Life (QoL) toggles, such as Infinite Stamina for your Kiter, or the ability to completely Freeze the Human AI if a teammate gets unfairly tossed into the oven.
| Gameplay Metric | Vanilla Burglin’ Gnomes Experience | The XMODhub Experience |
|---|---|---|
| Base Upgrades | Requires 10+ hours of flawless grinding per tier. | Instant Unlocks: Infinite resources for immediate max-tier base building. |
| Stamina Management | Punishingly slow regen; requires sacrificing loot space for buffs. | Infinite Stamina: Sprint indefinitely, making kiting the AI effortless. |
| The Oven Penalty | 45-second panic rescue; high risk of total team wipe and lost gear. | God Mode / AI Freeze: Never get cooked again; freeze the homeowner instantly. |
| Quota Deadlines | Missed quotas result in devastating progression resets. | Quota Bypass: Automatically satisfy quota requirements regardless of extracted haul. |
Follow these 3 simple steps to bypass the grind:

Blueprinting Your Empire: The Optimal Base Upgrade Priority List
Whether you are grinding through the vanilla quota system or using a trainer to figure out how to get infinite resources for base upgrades in Burglin’ Gnomes, blindly crafting furniture will still leave your squad tactically disadvantaged. The game does not hold your hand when it comes to build orders, and pacing your structural growth is vital. You must prioritize functional utility over cosmetic flair to survive the relentless patrol density of Tier 3 and Tier 4 houses.
Below is the definitive upgrade path formulated from analyzing high-level co-op extraction data. Following this exact matrix ensures your gnome squad scales perfectly alongside the homeowner’s increasing aggression mechanics.
| Upgrade Classification | Specific Furniture / Node | Strategic Benefit | Resource Cost |
|---|---|---|---|
| Mobility & Crafting | Tinkering Bench T1 | Unlocks essential verticality tools like the Grappling Hook and Slingshot. | 450 Units |
| Stamina Recovery | Resting Hammocks | Grants a crucial +10% max stamina buff for all players in the next heist. | 300 Units |
| Storage & Defense | Reinforced Vault | Protects 50% of your banked resources from being lost during a total team wipe. | 850 Units |
| Reconnaissance | Periscope Map Board | Pre-reveals high-value loot density and AI starting positions before deployment. | 1,200 Units |
| Advanced Combat | Alchemist’s Mortar | Allows crafting of sleep darts and premium stun munitions for the Kiter. | 2,500 Units |
If you are playing without mods, securing the Reinforced Vault should be your immediate mid-game goal. The moment you enter Tier 3 houses, the probability of a total team wipe skyrockets. Without the Vault, a single wipe can erase multiple hours of resource farming. If you are utilizing XMODhub’s infinite resource injection, you can bypass this defensive playstyle entirely and immediately construct the Alchemist’s Mortar, turning your squad from fragile thieves into fully-equipped saboteurs.
Frequently Asked Questions
A: Yes, but with a caveat. XMODhub’s modifications are primarily client-side memory injections. For the infinite resources to sync properly and allow base upgrades for the whole team, you must be the host of the lobby. If you host the game, the modified resource values will propagate to your friends, allowing everyone to enjoy the upgraded gnome home.
A: In the vanilla, unmodded game, failing a quota results in a severe penalty. While you do not lose all your base upgrades, the homeowner AI will “raid” your base, randomly destroying a portion of your functional furniture and wiping your banked resources to zero. This is why using XMODhub to secure your base is highly recommended for casual players.
A: No. The game forces the day/night cycle to progress every time you extract or wipe. There is no legitimate “infinite farm” loop because the quota demands scale exponentially. The only true way to achieve infinite resources without facing the impossible late-game scaling is via memory editing tools like XMODhub.
A: No. Rescuing a tied-up gnome prevents the “Oven Penalty” and saves your teammate from elimination, but gnome bodies hold zero resource value. You must extract actual human loot to gain resources for base upgrades.
Final Verdict
Surviving the terrifying, giant-sized human world of Burglin’ Gnomes requires immense patience, flawless co-op communication, and a deep understanding of the game’s hidden economic mechanics. While mastering the intricate dance of kiting the homeowner and optimizing your loot weight can be incredibly rewarding for hardcore extraction-shooter veterans, the unforgiving quota system and devastating team-wipe penalties simply do not respect the average player’s time.
If you want to skip the frustrating grind and immediately experience the joy of building the ultimate subterranean gnome fortress, XMODhub is your definitive solution. XMODhub’s massive ecosystem of over 5,000 supported single-player and co-op titles like Palworld and Baldur’s Gate 3 ensures you play the game exactly how you want to. Stop letting the AI homeowner cook your friends, and take control of your progression today.

I am a passionate gamer and writer at XMODhub, dedicated to bringing you the latest gaming news, tips, and insights.
Connect with me:
LinkedIn Profile ↗