Every player who has reached the late-game Abyssal Sector in Voidling Bound remembers their first encounter with the Hive Queen. You step into the pulsating, bioluminescent arena, confident in your newly evolved creatures and your upgraded assault rifle. Then, the cinematic ends. Within exactly twelve seconds, your shields are melted by tracking void-spores, fifty drone-adds swarm your position, and the Hive Queen unleashes a map-wide laser that sends you straight back to the respawn screen. Figuring out how to beat the Hive Queen solo in Voidling Bound is widely considered the ultimate rite of passage in this 2025 sci-fi third-person shooter. Because Hatchery Games designed Voidling Bound to blend active shooter mechanics with deep RPG creature progression, you cannot simply out-level this boss; you have to out-play her. Solo players face an absolute nightmare here, as the lack of co-op partners means 100% of the boss’s aggressive AI and bullet-hell mechanics are focused entirely on you and your active companion.
Editor’s Note:
“After 80+ hours of playtesting Voidling Bound, I can confidently say the Hive Queen is a masterclass in kinetic engagement. The secret isn’t just holding down the trigger; it’s understanding the exact 0.4-second i-frame window of your dodge roll and managing your Voidling’s stamina gauge during her Phase 2 ‘Void Cascade’ attack. If you mistime your creature’s active skill deployment by even half a second, her royal guards will regenerate her entire shield.”
Quick Answer: [Question here]
[Direct answer paragraph.]
Mechanics Deep Dive: Understanding the Problem
When players search for how to beat the Hive Queen solo in Voidling Bound, they are usually slamming their keyboards in frustration because they are treating the encounter like a traditional passive monster-taming battle. Voidling Bound is an action-forward, kinetic shooter. The Hive Queen is designed to heavily punish players who rely solely on their gunplay or solely on their creatures. You must synchronize both. Here is a deep dive into the most common fatal errors players make and the underlying mechanics of this brutal encounter.
Mistake 1: Ignoring the Royal Guard Spawns (The Shield Regen Trap)
The most common reason players fail to figure out how to beat the Hive Queen solo in Voidling Bound is a fundamental misunderstanding of her shield economy. At 75%, 50%, and 25% health thresholds, the Hive Queen retreats to the ceiling of the arena and spawns four Elite Royal Guards. Many players make the mistake of continuing to fire at the Queen, trying to chip away at her massive health pool.
Mechanically, as long as even one Royal Guard is alive, the Hive Queen receives a “Hive Mind Tether” buff. This buff grants her a 95% damage reduction and regenerates her energy shields at a staggering rate of 5% per second. If you waste your heavy ammo trying to snipe her on the ceiling, you will run completely dry. The correct mechanical approach is to instantly pivot your camera, command your active Voidling to use a crowd-control ability (like the Grav-Trap or Seismic Slam), and focus fire entirely on the Guards. You have a roughly 15-second window to clear all four before she drops down and unleashes her ultimate attack.
Mistake 2: Poor Voidling Stamina Management During the Bullet-Hell Phase
Because Voidling Bound integrates third-person shooter movement with creature commanding, stamina management is your lifeline. In Phase 2, the Hive Queen initiates her signature “Void Cascade”—a dense, overlapping pattern of tracking void-projectiles that turns the game into a literal bullet hell.
Players often panic and command their Voidling to spam defensive shields or attack skills right before this phase. However, every active command in Voidling Bound drains your creature’s stamina gauge. If your Voidling is exhausted, they cannot perform the “Symbiotic Dash,” a crucial dual-dodge maneuver that grants both the player and the creature extended invincibility frames (i-frames). Without those extended i-frames, the standard player dodge roll is not long enough to pass through the thickest waves of the Void Cascade. You will be clipped by a projectile, staggered, and subsequently one-shot by the follow-up laser. To survive, you must watch the boss’s animation cues (her wings will glow a bright, radioactive purple) and immediately cease giving your companion attack commands to let their stamina regenerate.
Mistake 3: Bringing the Wrong Elemental Evolution to a DPS Check
Hatchery Games built a robust RPG progression system into the creature evolution mechanics of Voidling Bound. Yet, many players walk into the Abyssal Hive using the same early-game kinetic or thermal loadouts that carried them through the tutorial sectors.
The Hive Queen possesses “Reactive Chitin Armor.” This specific armor type dynamically hardens against repeated kinetic impacts (standard bullets) and completely absorbs thermal damage. If you are shooting her with a standard assault rifle and your companion is a base-tier thermal bruiser, you are effectively dealing 30% of your potential DPS. This turns a 5-minute fight into a 20-minute war of attrition, which inevitably leads to a mistake and a wipe. To break her armor, you must exploit the game’s elemental weakness system. Corrosive damage applies a stacking debuff that makes her chitin brittle, allowing your kinetic firearms to deal critical damage. Alternatively, Plasma damage bypasses the armor calculation entirely, dealing direct damage to her health pool.
Best Alternative Methods and Advanced Tips
If you are consistently hitting a brick wall, it is highly likely that your current creature roster simply lacks the statistical baseline required for the Abyssal Sector. Before you bash your head against the boss any further, you need to step back and learn how to breed mutant variants for optimal boss DPS. Once you have secured a genetically superior companion, you can employ these advanced, high-level strategies to dominate the encounter.
Alternative Strategy 1: The Plasma-Sniper Kiting Method For players who struggle with the chaotic, close-quarters bullet hell of the Hive Queen, the Plasma-Sniper Kiting Method offers a safer, more methodical approach to learning how to beat the Hive Queen solo in Voidling Bound. This strategy requires equipping a high-impact Plasma Sniper Rifle and pairing it with a “Phantom-class” stealth Voidling. The arena is massive, featuring several large stalagmites of alien resin around the perimeter. By commanding your Phantom Voidling to deploy its holographic decoy in the center of the arena, you can force the Hive Queen’s aggro AI to lock onto the fake target. While she is distracted, you sprint to the outer edges of the map. Using the stalagmites as hard cover, you can charge your Plasma Sniper for maximum damage. The key here is rhythm: shoot, command the decoy to reposition, roll to the next cover, and reload. When the Royal Guards spawn, use your sniper’s piercing rounds to line them up, taking out two at a time. This method drastically reduces the mechanical dodging required, though it demands excellent aim and situational awareness.
Alternative Strategy 2: The Tank-and-Spank Symbiosis Overload If you prefer an aggressive, in-your-face playstyle, the Symbiosis Overload method is the most visceral way to experience the combat of Voidling Bound. This approach throws caution to the wind and relies on overwhelming DPS and massive damage mitigation. You will need to evolve a “Goliath-class” Voidling with the heavy carapace mutation and equip yourself with an auto-shotgun loaded with Corrosive shells. The strategy here is to stay directly underneath the Hive Queen. surprisingly, her most devastating ranged attacks, including the Void Cascade, have a minimum arming distance. By hugging her hitbox, many of the projectiles will fly harmlessly over your head. When she winds up for her melee ground-slam, you activate your Goliath Voidling’s “Fortress Link” skill. This temporarily tethers your health pools together and grants a massive overshield. You absorb the slam, and immediately unload your Corrosive auto-shotgun directly into her exposed underbelly—her critical weak point. The burst damage from this strategy is so high that you can often skip her Phase 3 entirely, bursting her down before she can summon the final wave of Royal Guards.
Advanced Tip: Manipulating the Swarm Aggro AI In Voidling Bound, the AI dictates that smaller swarm enemies (the drones) will prioritize the target dealing the most consistent area-of-effect damage. You can use this to your advantage. Equip a low-damage, high-tick-rate incendiary grenade. Toss it into a corner of the arena. The drones will mistakenly register the fire as a massive threat and swarm the burning area, completely ignoring you and your companion. This buys you precious seconds of uninterrupted one-on-one time with the Hive Queen.
The Ultimate QoL Solution: Bypassing the Grind with XMODhub
Let’s be brutally honest: mastering how to beat the Hive Queen solo in Voidling Bound takes immense patience, and sometimes, you just want to progress the story without spending 15 hours grinding for the perfect Corrosive mutant and upgrading your Plasma weapons. The creature breeding RNG and the punishing death loop can turn a fun sci-fi adventure into a tedious chore. When the mechanics feel too punishing, XMODhub is your ultimate quality-of-life upgrade.
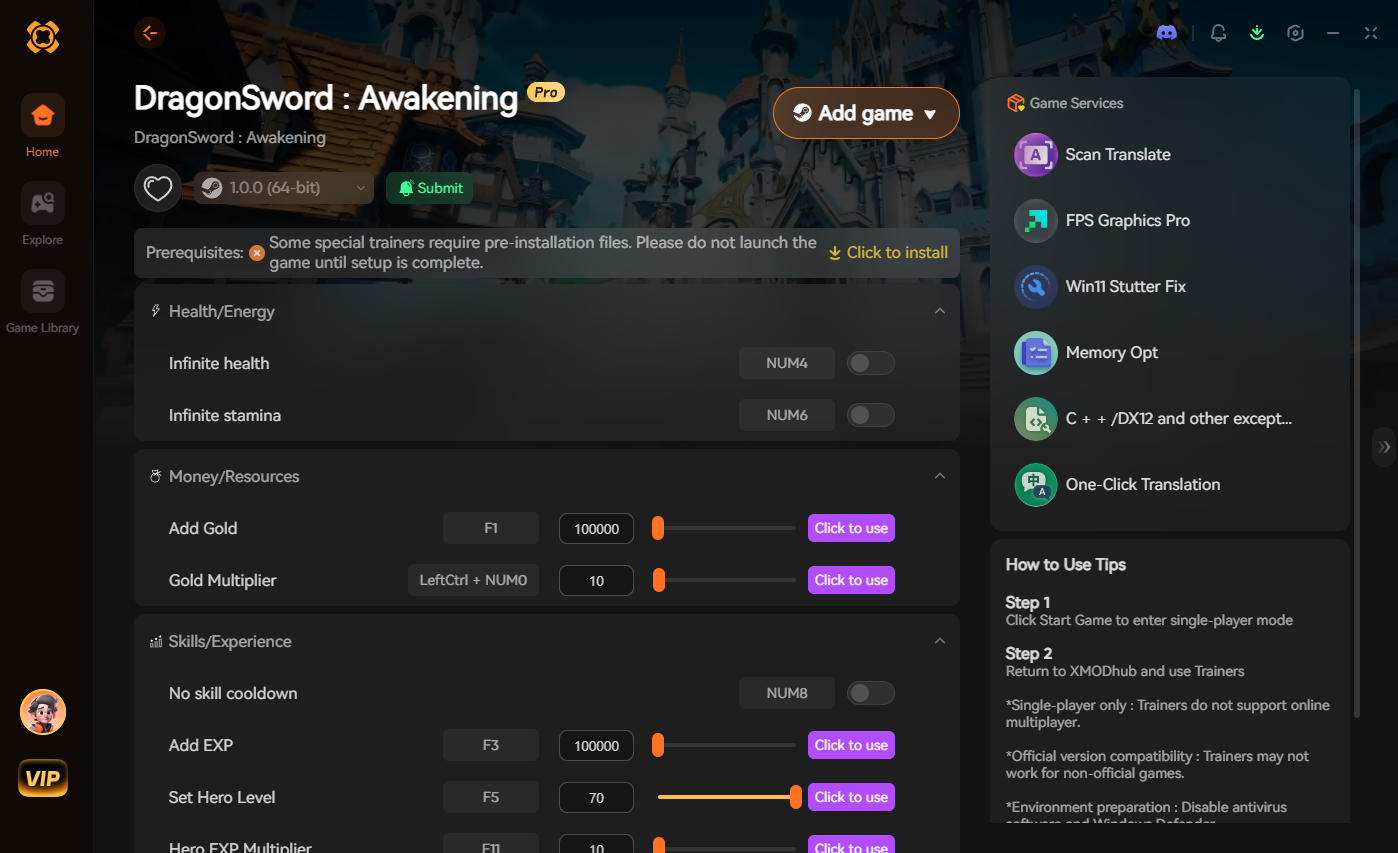
Instead of perfectly timing 0.4-second i-frame windows or farming resources for ammo, XMODhub allows you to tailor the difficulty of Voidling Bound exactly to your liking. Struggling with the Void Cascade? Toggle Infinite Health. Running out of heavy ammo during the Royal Guard phase? Turn on Infinite Ammo / No Reload. Want to skip the DPS check entirely? The One-Hit Kill feature will shatter her carapace instantly. Furthermore, XMODhub offers an Instant Voidling Skill Cooldown cheat, allowing you to spam your companion’s ultimate abilities without worrying about stamina management.
Follow these 3 simple steps to fix this instantly:

Optimal Loadout and Creature Synergy Matrix
To truly optimize your solo run, you need to match your Voidling’s evolutionary path with the correct weaponry. Bringing a mismatched loadout to the Abyssal Sector is the fastest way to get wiped. Below is our meticulously tested synergy matrix to help you build the ultimate loadout for this specific boss encounter.
| Voidling Class | Recommended Evolution | Primary Role in Fight | Synergy Rating |
|---|---|---|---|
| Phantom | Corrosive Stalker | Decoy aggro manipulation and applying chitin-shredding debuffs. | S-Tier |
| Goliath | Fortress Carapace | Absorbing physical ground-slams and providing emergency overshields. | A-Tier |
| Raptor | Plasma Talon | High mobility for executing the Symbiotic Dash and dealing burst DPS. | A-Tier |
| Support | Luminescent Weaver | Constant stamina regeneration for extended i-frames and minor healing. | B-Tier |
| Bruiser | Thermal Behemoth | Completely ineffective due to the Hive Queen’s 100% thermal immunity. | F-Tier |
Phase-by-Phase Attack Pattern Breakdown
Understanding the pacing of the fight is just as critical as your loadout. The Hive Queen operates on a strict three-phase system, each introducing a new mechanic that demands a shift in your strategy.
Phase 1: The Swarm Initiation (100% – 75% HP) The fight begins with basic drone swarms and sweeping laser attacks. Do not waste heavy ammo here. Use standard kinetic weapons to clear the drones and rely on your Voidling’s primary attacks to chip away at her initial health bar. The goal here is strict ammo conservation and memorizing her basic lunge telegraphs.
Phase 2: The Void Cascade (75% – 25% HP) This is where 90% of solo players fail. The Hive Queen will summon her Royal Guards and initiate the “Void Cascade” bullet-hell sequence. As detailed in our mechanics breakdown, you must immediately switch to AoE crowd control to melt the Guards. Once they fall, focus entirely on stamina management. Only attack the Queen in the brief 3-second windows between her purple energy waves. Patience is mandatory.
Phase 3: Abyssal Enrage (25% – 0% HP) In her final phase, the Hive Queen shatters the ceiling, causing alien resin stalactites to constantly fall, drastically reducing your safe zones. Her Void Cascade now fires 30% faster. If you brought a Plasma Sniper or a Corrosive Flak Cannon, this is the time to dump every single round you have left. Ignore the remaining drone adds, pop your Voidling’s ultimate ability, and focus solely on burning down her remaining health before the arena becomes completely unnavigable.
Frequently Asked Questions
A: While player skill can overcome level deficits, it is highly recommended that both your character and your primary Voidling are at least Level 45. More importantly, your weapons should be upgraded to Tier 4 to ensure you can meet the DPS check required to break her shield regeneration during the Royal Guard phase.
A: Yes, but the timing is incredibly strict. Without the “Symbiotic Dash” extended i-frames provided by mobility-focused creatures, you must execute a perfect standard dodge roll precisely 0.2 seconds before the purple wave connects. It is highly advised to stick to the outer edges of the arena to widen the gaps between the projectiles.
A: The “Aegis Plasma Rifle” and the “Corrosive Flak Cannon” are currently the meta choices for this boss fight. The Plasma Rifle bypasses her kinetic armor entirely, while the Flak Cannon shreds her chitin, allowing your companion’s kinetic attacks to deal massive critical hits.
A: Yes. Defeating the Hive Queen solo in Voidling Bound without any co-op summons triggers a unique achievement and guarantees the drop of the “Royal Chitin Plating,” a legendary crafting material required to unlock the final evolution tier for Goliath-class Voidlings.
Final Verdict
Figuring out how to beat the Hive Queen solo in Voidling Bound is a thrilling testament to Hatchery Games’ ability to blend monster-taming strategy with hardcore third-person shooter action. By understanding the shield mechanics of the Royal Guards, utilizing the correct elemental evolutions, and mastering the i-frame dodge roll, you can conquer this imposing boss and claim the legendary loot for yourself. Whether you prefer the methodical Plasma-Sniper approach or the aggressive Tank-and-Spank method, success relies entirely on the synergy between you and your creature.
However, if the grind becomes too steep, remember that single-player games are meant to be enjoyed on your own terms. XMODhub provides the ultimate safety net, offering powerful, undetected mods for Voidling Bound and over 5000+ other titles, including similar action-heavy titans like Ark: Survival Evolved and Palworld. Take control of your gaming experience, eliminate the frustration, and experience the rest of the cosmos without limits.

I am a passionate gamer and writer at XMODhub, dedicated to bringing you the latest gaming news, tips, and insights.
Connect with me:
LinkedIn Profile ↗