Catherine Hu
우리 모두 이런 경험이 있을 것입니다. Sephiria에서 완벽한 플레이를 50분 동안 이어가며, 용감한 토끼를 이끌고 위험한 절차적 생성 탑을 내려가고 있습니다. 완벽한 Rapier 빌드를 갖추고, 인벤토리는 전략적인 Artifact 배치로 가득하며, 챕터 6 최종 보스에게 Parry Counter를 성공시키기 직전입니다. 그때, 역동적인 몬스터의 빗나간 원소 투사체가 여러분의 히트박스를 스쳐 지나가, 무피해 도전과제를 망치고 곧바로 허브 마을로 돌아가게 만듭니다.
편집자 주: 2025년 4월 얼리 액세스 출시부터 정식 출시까지 Sephiria에 1,000시간 이상을 쏟아부은 하드코어 로그라이트 베테랑으로서, 저는 RNG에 의존하는 트로피의 고통을 잘 알고 있습니다. Sephiria에서 100% 달성을 하는 것은 단순히 빠른 반사 신경에 관한 것이 아닙니다. 절차적 생성을 조작하고, 150개 이상의 Artifact와 Slates 간의 깊은 시너지를 이해하며, 잔혹한 DPS 체크를 우회하기 위해 4인 협동 플레이를 언제 활용해야 하는지 정확히 아는 것에 관한 것입니다. 이 가이드는 여러분의 정신을 잃지 않고 모든 도전과제를 잠금 해제하기 위한 확실한 청사진이 될 것입니다.
TL;DR: 짧은 답변
Sephiria 100% 달성을 가능한 한 빨리 하고 싶다면, 다음이 최적의 로드맵입니다.
- 무기 업그레이드 우선순위: 먼저 Swords와 Staves 마스터에 전적으로 집중하세요. 넓은 범위 공격과 원거리 능력은 “60가지 다른 적 처치” 도전과제를 쉽게 만듭니다.
- 정밀 방어 마스터: Spacebar Dash에만 의존하지 마세요. Parry Counter 메커니즘은 게임의 10개 이상의 고유 보스에서 “Flawless Boss” 도전과제를 잠금 해제하는 데 필수적입니다.
- 인벤토리 그리드 최적화: 인벤토리를 퍼즐처럼 다루세요. 기본 Artifact와 원소 Tablet을 결합하여 원소 연쇄(elemental chains)를 발동시키세요. 이는 “Master Crafter” 도전과제에 필요합니다.
- 협동 플레이를 통한 속도 향상: 4인 온라인 협동 플레이에 참여하세요. 전담 탱커가 피해를 흡수하는 동안 원거리 DPS를 플레이하면 6개 챕터 전체를 빠르게 진행할 수 있습니다.
목차
Sephiria 100% 달성 로드맵
Sephiria에서 100% 달성을 하려면 체계적인 접근 방식이 필요합니다. 이 게임은 절차적으로 생성되는 맵 레이아웃, 적 배치, 전리품 드롭을 특징으로 하므로, 정적인 경로 암기에 의존할 수 없습니다. 대신, 끊임없이 변화하는 위협에 적응해야 합니다. 여정은 6개의 힘든 챕터에 걸쳐 있으며, 모든 도전과제에 동시에 집중하려고 하면 좌절감만 커질 것입니다.
도전과제 사냥을 진행(Progression), 전투 숙련도(Combat Mastery), RNG 정리(RNG Cleanup)의 세 가지 단계로 나누어야 합니다. 진행 단계에서는 탑의 바닥에 도달하여 마을을 파멸에서 구하는 것이 유일한 목표입니다. 아직 무피해 보스 처치에 대해 걱정하지 마세요. 6가지 고유 무기를 모두 잠금 해제하고 기본적인 Talents 풀을 모으는 데 집중하세요.
초반 그라인딩의 흔한 실수
대부분의 플레이어는 자원을 너무 분산시켜 초반 도전과제 진행에 실패합니다. 그들은 6가지 무기를 모두 동시에 업그레이드하려고 합니다. 무기당 50개 이상의 고유 업그레이드가 있으므로, 이는 엄청난 자원 소모입니다. 또 다른 흔한 실수는 탑 안의 동물 캐릭터들을 무시하는 것입니다. 이 NPC들은 단순한 배경 이야기가 아닙니다. 그들과 대화하고 거래하는 것은 여러 놓칠 수 있는 사이드 퀘스트 도전과제와 연결되어 있습니다.
더 빠른 진행을 위한 대체 방법
솔로 그라인딩에 어려움을 겪고 있다면, 가장 좋은 대체 방법은 Sephiria의 멀티플레이어 기능을 활용하는 것입니다. 이 게임은 최대 4명의 플레이어가 팀을 이룰 수 있습니다. 고레벨 플레이어가 있는 로비에 참여하면, 팀이 놀라운 속도로 방을 클리어하면서 진행 기반 도전과제를 수동적으로 잠금 해제할 수 있습니다.
경로 최적화를 위한 고급 팁
진정으로 플레이를 최적화하려면 절차적 생성 시드에 주의를 기울이세요. 탑은 무작위적이지만, 알고리즘은 특정 적 유형(60가지 이상)을 특정 생물군계에 그룹화하는 경향이 있습니다. 특정 몬스터의 lore entry나 도전과제에 필요한 드롭을 찾고 있다면, 챕터 1 레이아웃에 해당 생물군계 변형이 나타나지 않으면 즉시 플레이를 재시작하세요.
전투 숙련도: 무기, 대시, Parry Counter
Sephiria의 핵심 루프는 빠르게 진행되는 탑다운 전투를 중심으로 합니다. 전투 관련 도전과제를 잠금 해제하려면 게임의 방어 메커니즘인 Spacebar Dash와 Precise Defense에 대한 절대적인 숙련도를 보여주어야 합니다.
Spacebar Dash는 여러분의 기본 이동 도구입니다. 이는 넉넉한 invincibility frames (i-frames)을 제공합니다. 하지만 몇몇 상위 티어 도전과제는 Parry Counter를 사용하여 적을 처치하도록 요구합니다. Parry Counter는 공격이 적중하는 정확한 프레임에 방어를 성공시키는 Precise Defense를 실행하여 발동됩니다.
6가지 고유 무기 마스터하기
“Weapon Master” 도전과제를 얻으려면 6가지 무기를 모두 완전히 업그레이드해야 합니다.
- Swords: 넓은 범위 공격에 탁월합니다. 군중 제어 도전과제에 가장 적합합니다.
- Staves: 최고의 원거리 DPS 옵션입니다. no-hit 보스 플레이에 필수적입니다.
- Rapiers: 높은 단일 대상 피해를 주어 보스 전투 speedrun에 완벽합니다.
(나머지 세 가지 무기는 강력한 stagger와 elemental application에 초점을 맞춘 특수 빌드가 필요합니다.)
전투의 흔한 실수
플레이어들은 종종 당황했을 때 Spacebar Dash를 남용하여, 보스가 피할 수 없는 AoE 공격을 펼칠 때 stamina가 부족해지는 경우가 많습니다. 또한, 많은 플레이어들이 모든 multi-hit combo를 parry하려고 시도합니다. Sephiria에서는 일부 dynamic enemy 공격이 parry spam을 처벌하도록 설계되어 있습니다.
방어 도전과제를 위한 대체 방법
Parry Counter 도전과제를 위해 Precise Defense를 꾸준히 성공시킬 만큼 반응 속도가 빠르지 않다면, 무거운 shield-based Artifact 빌드로 전환하세요. 특정 Slates는 active parry window를 몇 frames 늘려, frame-perfect 요구 사항을 훨씬 더 관대한 메커니즘으로 바꿉니다.
Animation Canceling을 위한 고급 팁
고레벨 Sephiria 전투는 Animation Canceling에 크게 의존합니다. 무거운 Sword swing이나 Rapier thrust의 ending lag를 Spacebar Dash를 즉시 탭하여 cancel할 수 있습니다. 이를 통해 높은 mobility를 유지하면서 막대한 DPS를 낼 수 있으며, 이는 챕터 6 speedrun 도전과제에 필수적인 기술입니다.
전략적 인벤토리 관리: Artifact와 Tablet
Sephiria의 특징 중 하나는 전략적인 인벤토리 관리 시스템입니다. 장비가 단순히 stat stick인 전통적인 action RPG와 달리, Sephiria는 인벤토리를 물리적으로 배치하도록 강요합니다. 기본 Artifact를 수집하고, 그리드에 다른 Tablet (Slates)을 인접하게 배치하여 강화해야 합니다.
150개 이상의 Artifact와 Slates를 조합해야 하므로, “Master Crafter”와 “Synergy Expert” 도전과제는 매우 특정한 조합을 발견하도록 요구합니다. 예를 들어, Fire Tablet을 Rapier Artifact 옆에 배치하면 단순히 fire damage만 추가되는 것이 아니라, 무기의 heavy attack이 sweeping fiery projectile로 근본적으로 변경됩니다.
이 복잡한 그리드를 마스터하여 damage output을 극대화하는 동안, 용감한 토끼의 외형도 멋지게 꾸미고 싶을 수 있습니다. Customization은 게임의 큰 매력 중 하나이므로, 협동 lobbies에서 돋보이고 싶다면 Sephiria 최고의 토끼 스킨 및 즉시 잠금 해제 방법에 대한 포괄적인 가이드를 확인해 보세요.
인벤토리 Tetris의 흔한 실수
가장 큰 오류는 인벤토리를 dumping ground처럼 취급하는 것입니다. 플레이어들은 종종 Tablet의 directional arrows를 고려하지 않고 high-rarity Artifact를 slot in하는 경우가 많습니다. Tablet의 arrow가 empty slot을 가리키고 있다면, elemental chain 잠재력을 낭비하는 것이며, 이는 late-game DPS를 심각하게 crippling하고 챕터 5와 6 도전과제를 거의 불가능하게 만듭니다.
Build Crafting을 위한 대체 방법
인벤토리 관리가 싫다면, “Raw Stat” build를 선택할 수 있습니다. elemental chains를 완전히 무시하고 base attack damage와 health를 boost하는 Artifact에만 집중하면, brute-force로 처음 4개 챕터를 돌파할 수 있습니다. 하지만 이 대체 방법은 final bosses에게는 크게 falls off합니다.
Elemental Chains를 위한 고급 팁
“Chain Reaction” 도전과제를 잠금 해제하려면 Tier 3 Elemental Chain을 trigger해야 합니다. 이는 핵심 Staff Artifact 주위에 세 가지 complementary elemental Tablets (예: Water, Lightning, Wind)을 triangular formation으로 배치하여 달성됩니다. 이 특정 setup은 dynamic enemies로 가득 찬 entire rooms를 instantly clear할 수 있는 devastating AoE storm을 생성합니다.
보스 섬멸: 10개 이상 보스를 위한 무피해 전략
Sephiria에는 10개 이상의 고유 보스가 등장하며, 각 보스는 100% 달성을 위한 massive roadblock 역할을 합니다. 게임에서 가장 coveted achievements는 “Flawless Execution” trophies로, 단 한 번의 damage도 입지 않고 모든 보스를 defeat해야 합니다.
보스전의 흔한 실수
Greed는 Sephiria에서 ultimate run-killer입니다. Rapiers를 사용하는 플레이어들은 종종 보스의 telegraph가 끝나기 전에 한 번 더 thrust를 squeeze in하려고 시도하다가, 도전과제를 망치는 hit를 입게 됩니다. 또한, 플레이어들은 environment를 utilize하지 못합니다. 많은 boss arenas에는 incoming projectiles를 block하는 데 사용할 수 있는 pillars나 traps가 있습니다.
무피해 플레이를 위한 대체 방법
soloing a boss hitless가 너무 difficult하다면, 대안은 4-player online cooperative play를 exploit하는 것입니다. Sephiria의 aggro system은 highly responsive합니다. 세 명의 teammats가 ultra-tanky melee characters로 플레이하며 constantly taunt the boss하게 하세요. 그러면 여러분은 arena의 very edge에 fully upgraded Staff를 들고 서서, safely dealing ranged DPS without ever being targeted할 수 있습니다.
보스 조작을 위한 고급 팁
모든 보스 in Sephiria에는 hidden stagger meter가 있습니다. continuously applying elemental chains (specifically Lightning and Earth combinations)하면 보스를 prolonged staggered state로 force할 수 있습니다. If timed correctly with your team’s burst cooldowns, you can bypass a boss’s entire second phase, completely eliminating the risk of taking damage.
협동 플레이의 이점: 4인 시너지
Sephiria는 ground up부터 robust multiplayer를 support하도록 built되었습니다. 게임의 cooperative experience는 continuously improved되고 있습니다. 예를 들어, recent updates는 “team inventory viewing” feature를 added하여, Artifact grids를 friends와 coordinate할 수 있게 했습니다.
multiplayer-specific achievements를 unlock하려면 tight coordination이 필요합니다. 단순히 four players가 random Sword builds를 running하는 것만으로는 안 됩니다. 역할을 coordinate해야 합니다.
멀티플레이어의 흔한 실수
가장 큰 mistake teams make는 same elemental Tablets를 stacking하는 것입니다. If all four players are using Fire chains, you will deal zero damage to the Chapter 4 volcanic bosses. Furthermore, failing to utilize the team inventory viewing feature means players often hoard Artifacts that would be vastly more beneficial to a teammate’s build.
솔로 플레이어를 위한 대체 방법
dedicated group to play with가 없다면, public matchmaking에 joining하여 most co-op achievements를 still unlock할 수 있습니다. However, to compensate for the lack of voice comms, play a dedicated support build. Use Staves equipped with Healing and Crowd Control Slates to keep random teammates alive, ensuring you still get the clear-based achievements.
팀 구성에 대한 고급 팁
ultimate Sephiria 4-player composition for achievement farming은 다음과 같습니다.
- The Vanguard: heavy armor Artifacts와 taunt Slates를 사용하는 Sword user.
- The Sniper: purely on critical hit damage와 Wind elements에 focusing하는 Staff user.
- The Duelist: Parry Counters와 applying debuffs에 dedicated하는 Rapier user.
- The Alchemist: team’s economy를 managing하고, animal characters와 trading하며, massive elemental AoE coverage를 providing하는 player.
궁극의 QoL 솔루션: XMODhub
솔직히 말해봅시다. Parry Counter를 mastering하고 150개 이상의 Artifact를 meticulously arranging하는 것이 rewarding하지만, Sephiria에서 “Unlock all 50 upgrades for all 6 weapons” achievement를 grinding out하는 것은 hundreds of hours의 repetitive farming을 take할 수 있습니다. If you are a busy gamer who wants to experience the thrill of 100% completion without the mind-numbing grind, XMODhub is your ultimate solution.
XMODhub은 여러분의 시간을 존중하는 safe, undetectable quality-of-life enhancements를 제공합니다. Instead of running Chapter 1 fifty times just to collect enough resources for a single Sword upgrade, you can bypass the grind entirely.
Sephiria의 경우, XMODhub은 Infinite Health (guaranteeing your hitless boss achievements), Spacebar Dash를 위한 Instant Cooldowns, 그리고 100% Artifact Drop Rates와 같은 incredible features를 offers하여, 몇 달이 아닌 몇 분 만에 dream strategic inventory를 build할 수 있게 해줍니다.
Sephiria 100% 달성을 빠르게 진행하는 방법은 다음과 같습니다.
- XMODhub 다운로드: 공식 웹사이트에서 lightweight, secure client를 설치합니다.

- Sephiria 자동 감지: 애플리케이션을 실행합니다. XMODhub은 Sephiria installation을 자동으로 감지합니다 (whether you are playing the Early Access or full release version).
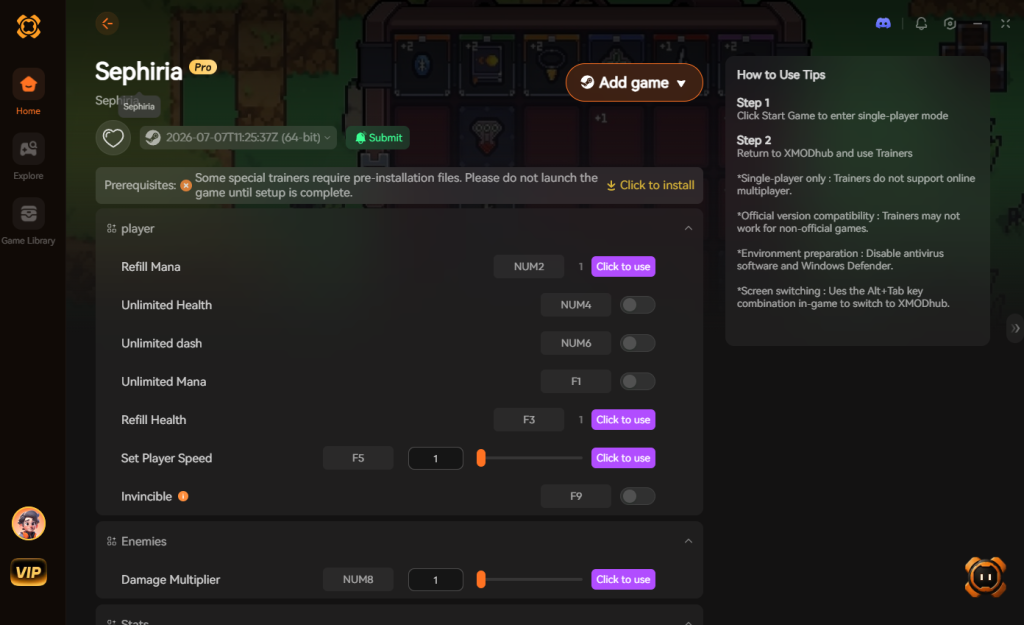
- 치트 활성화: Infinite Stamina 또는 Max Weapon Resources와 같이 필요한 특정 QoL features를 Activate하면 achievements가 effortlessly roll in하는 것을 볼 수 있습니다.
가장 악명 높은 도전과제 및 최적 전략
완벽한 로드맵과 high-level mechanics를 갖추고 있더라도, Sephiria의 handful of specific trophies는 여러분의 patience를 ruthlessly test할 것입니다. These achievements often combine strict time limits with heavy reliance on procedural generation. To help you secure that final 100% completion milestone, here is a strategic breakdown of the hardest achievements in the game and the exact setups required to bypass their difficulty spikes.
| 도전과제 이름 | 잠금 해제 조건 | 난이도 | 최적 전략 / 빌드 |
|---|---|---|---|
| Untouchable Lagomorph | 챕터 6 최종 보스에게 단 한 번의 damage도 입지 않고 defeat합니다. | 10/10 | Staves를 Wind Tablets 및 Lightning Tablets와 결합하여 equip합니다. 이는 off-screen tracking AoE storm을 creates하여, 보스의 melee range에 completely avoiding하고도 maximum DPS를 deal할 수 있게 합니다. |
| The Grand Alchemist | 단일 인벤토리 그리드에서 Tier 4 Elemental Chain을 successfully trigger합니다. | 8/10 | 핵심 Artifact를 네 가지 distinct elemental slates인 Fire, Water, Earth, Wind로 surround해야 합니다. 필요한 specific directional slates를 reliably drop시키기 위해 챕터 3을 farm하세요. |
| Pacifist Bunny | direct weapon damage 없이 챕터 1 전체를 clear합니다. | 7/10 | main weapon을 unequip합니다. Taunt Slates, heavy armor Artifacts, 그리고 environmental traps (like spike pits and explosive barrels)에 entirely rely하여 dynamic mobs를 clear합니다. |
| Master of the Arsenal | 6가지 distinct weapons 모두의 50가지 upgrades를 fully unlock합니다. | 9/10 (Heavy Grind) | Wealth Artifact를 equip하여 resource drops를 double로 늘립니다. 챕터 4 volcanic biome을 repeatedly farm하세요. as it yields the highest concentration of rare upgrade materials per minute. |
위에 언급된 특정 Artifact 및 Tablet loadouts으로 이러한 악명 높은 도전과제를 targeting하면, guesswork를 eliminate하고 platinum run에 필요한 hours를 drastically reduce할 수 있습니다.
자주 묻는 질문
Sephiria에서 4인 co-op 플레이를 하면 achievements가 disable되나요?
아니요, 4인 online cooperative mode에서 playing한다고 해서 achievements가 disable되지는 않습니다. In fact, it is highly recommended to play in co-op for certain DPS-check bosses. The game dynamically scales enemy health, but having a dedicated tank and ranged DPS makes securing flawless boss kills significantly easier.
dynamic bosses 상대로 “Perfect Parry” achievement를 어떻게 farm하나요?
Parry Counters를 가장 빠르게 farm하는 방법은 inventory grid에 “Time-Slip Slate”를 equip하는 것입니다. This specific Tablet increases the active frames of your Precise Defense. Find a low-level dynamic enemy in Chapter 1 that has a predictable, repeating attack pattern, and continuously parry them without killing them until the achievement pops.
6가지 weapon 중 hitless run에 가장 좋은 weapon은 무엇인가요?
Staff는 Sephiria에서 hitless runs에 가장 좋은 weapon으로 universally considered됩니다. By combining the Staff with Wind and Lightning Tablets, you can create a build that deals massive tracking AoE damage from off-screen, ensuring that the 60+ distinct enemies cannot even get close enough to trigger your Spacebar Dash.
procedural generation seeds가 Sephiria의 achievement hunting에 영향을 미치나요?
Absolutely. Because map layouts, enemy placements, and treasure drops are procedurally generated, some runs will naturally be better for achievement hunting than others. If you are looking for specific animal characters to trade with for quest achievements, you may need to reset your run multiple times until the correct NPC spawns in the hub floor of the tower.
최종 평가
Sephiria 100% 달성은 top-down action combat과 strategic inventory management에 대한 여러분의 mastery를 testament하는 것입니다. By prioritizing your weapon upgrades, understanding the intricate synergies between the 150+ Artifacts and Slates, and utilizing 4-player co-op to dominate the 10+ unique bosses, you can conquer the tower and save the brave bunny’s town from doom. Remember that patience, precise Parry Counters, and intelligent positioning are your greatest weapons against the game’s brutal procedural generation.
하지만 50개 이상의 weapon upgrades와 perfect RNG drops에 required되는 sheer volume of grinding이 여러분의 enjoyment를 draining한다면, do not hesitate to leverage XMODhub. With support for over 5,000 top-tier titles—including other massive roguelite hits like Hades II or The Binding of Isaac: Repentance—XMODhub empowers you to play on your own terms, eliminating the tedious grind so you can focus purely on the fun of the game.
그라인딩은 그만, 즐거움을 시작하세요.
지루한 resource gathering을 bypass하고 instantly full potential을 unlock하세요.

저는 XMODhub의 열정적인 게이머이자 작가로, 최신 게임 뉴스, 팁, 그리고 심층 분석을 제공하는 데 전념하고 있습니다.
저와 연결해 주세요:
LinkedIn 프로필 ↗