Catherine Hu
Are you getting completely overwhelmed the moment you encounter anything stronger than a basic boar in Orbis? You’re not alone. Many players jump into Dragon Sword Awakening expecting a typical hack-and-slash experience, only to find themselves stun-locked, out of stamina, and staring at the “Game Over” screen because they ignored the core mechanics. If you’re blindly mashing attack buttons without understanding tag-team swapping, status ailments, or signal skills, you are playing the game fundamentally wrong and missing out on the true depth of its action RPG combat.
Editor’s Note: During my initial playthrough of the Dragon Sword Awakening demo, I got absolutely bodied by the first major elite enemy. It wasn’t until I stopped treating my characters as isolated units and started focusing on triggering status ailments to set up massive tag-team combos that the combat truly clicked. This guide is built from those hard-learned lessons, designed to take you from a button-masher to a combo-chaining maestro.
TL;DR: The Short Answer
To master combat in Dragon Sword Awakening, you must exploit the tag-team and status ailment systems. Here is the core combat loop:
- Initiate: Use a fast-attacking character to build up a specific Status Ailment (e.g., Stun, Burn, Freeze) on the enemy.
- Trigger: Once the ailment is applied, wait for the Signal Skill prompt to appear.
- Tag-in: Swap to the corresponding character who synergizes with that specific status ailment.
- Execute: The incoming character will automatically perform a high-damage Signal Skill upon entering the field.
- Sustain: Manage your stamina efficiently and repeat the loop, utilizing different elements to keep enemies perpetually debuffed.
Table of Contents
- TL;DR: The Short Answer
- Understanding the Foundation: Tag-Team Mechanics
- Mastering Status Ailments and Signal Skills
- Advanced Combo Chaining: The Rotation
- Stamina Management and Defensive Maneuvers
- Skip the Grind: Dominate with XMODhub
- Elemental Synergy Meta: The Best Ailment Combinations
- Shattering the Break Gauge: DPS Optimization
- Frequently Asked Questions
- Final Verdict: Orchestrating Destruction
Understanding the Foundation: Tag-Team Mechanics
Dragon Sword Awakening is not a game where you select a single main protagonist and face-tank your way through the story. The entire combat system is built around a dynamic, fast-paced tag-team structure. Hound 13 designed this game to feel flashy and highly dependent on swapping characters mid-fight.
The Swap System
You don’t just change characters when one is low on health; you swap to maintain offensive pressure. Swapping isn’t instantaneous without consequence—it is an active combat maneuver. When you swap characters without a prompt, there is a brief animation, but when you swap correctly through the game’s intended mechanics, you turn a simple character change into a devastating attack.
To truly excel, you need to understand the archetypes of your characters. Some are designated Enablers (fast attackers, high status buildup), while others are Finishers (slow, high burst damage). Recognizing which character serves which role in your party is step one to mastering the combat flow.
Mastering Status Ailments and Signal Skills
The absolute core of dealing optimal damage in Dragon Sword Awakening revolves around the interplay between Status Ailments and Signal Skills. If you ignore this, you will struggle against bosses with inflated health pools.
Applying Status Ailments
Every character in your roster is capable of applying specific elemental or physical status ailments through their basic attacks and abilities. The game visualizes this buildup beneath the enemy’s health bar.
- The Buildup Phase: You must aggressively assault the enemy with a character designed to stack a debuff. For example, a character utilizing fire abilities will steadily build the “Burn” meter.
- The Threshold: Once the meter is full, the status ailment is applied. This is your window of opportunity. The enemy is temporarily vulnerable, suffering from damage over time, reduced defense, or crowd control effects like being stunned or frozen.
Executing Signal Skills
Applying the ailment is only half the battle; capitalizing on it is where the real damage lies.
When an enemy is suffering from a specific status ailment, a visual prompt will appear indicating that a Signal Skill is ready. This means one of your off-field characters has a devastating attack that specifically targets that exact status ailment.
- The Trigger: The moment you see the prompt, you press the swap button for the corresponding character.
- The Result: The new character bursts onto the battlefield, entirely bypassing their normal entrance animation, and instantly executes a high-tier skill that deals massive bonus damage because it is exploiting the existing status ailment.
This mechanic demands that you build a team that actually works together. To learn how to construct a party where every member complements the others’ status effects, you should review our comprehensive guide on the Best Team Compositions & Builds in Dragon Sword: Awakening. A good team composition ensures that you always have a follow-up ready when an ailment triggers.
Advanced Combo Chaining: The Rotation
Once you understand the basic Enabler-to-Finisher loop, it’s time to chain these actions together into a seamless rotation. Elite enemies and bosses in Dragon Sword Awakening will not fall to just one Signal Skill.
The Infinite Loop Theory
The goal is to create a combat loop where the enemy is perpetually transitioning from one status ailment to the next, preventing them from ever launching a counterattack.
- Start with your fastest Enabler: Rush the enemy and stack the first ailment (e.g., Stun).
- First Signal Swap: As soon as Stun applies, swap to your first Finisher. They execute their Signal Skill, dealing heavy damage.
- Transition to Second Ailment: While the first Finisher is on the field, immediately use their remaining skills to start building a second, different status ailment (e.g., Freeze).
- Second Signal Swap: Once Freeze triggers, swap to your third character (who synergizes with Freeze) for another Signal Skill burst.
- Reset and Repeat: By the time the third character finishes their rotation, your first Enabler’s cooldowns should be refreshed. Swap them back in and start the loop over.
Handling Edge Cases: Boss Mechanics
Bosses often have “Break” gauges or phases where they become temporarily immune to certain status ailments. During these phases, you must adapt. Do not waste your high-cooldown abilities trying to stack an ailment that the boss is currently resisting. Instead, focus on raw damage, perfect dodging, and stamina conservation until the immunity phase ends, then immediately resume your status chaining.
Stamina Management and Defensive Maneuvers
Offense is crucial, but ignoring defense will get you killed quickly. Dragon Sword Awakening utilizes a stamina system that governs your defensive options.
The Art of the Dodge
Dodging consumes stamina. If you spam the dodge button, you will find yourself exhausted, immobile, and completely vulnerable to a boss’s telegraphed smash attack.
- Perfect Dodging: The game rewards precise timing. Dodging at the exact moment an enemy attack lands often triggers a brief slowdown effect or grants temporary invulnerability frames (i-frames). More importantly, perfect dodges often cost less stamina or refund it entirely.
- Stamina as a Resource: Treat your stamina bar with the same respect as your health bar. If you are below 30% stamina, it is time to disengage, let your Enabler take the field (as they usually rely less on heavy, stamina-draining attacks), and allow the gauge to refill.
Positioning and Wall Climbing
Remember that the battlefield in Dragon Sword Awakening is often dynamic. You have mounts and the ability to climb walls. If you are surrounded, use your mobility to reposition. Funneling enemies into a chokepoint makes it significantly easier to hit multiple targets with wide-sweeping attacks, thereby stacking status ailments on groups simultaneously rather than one by one.
Skip the Grind: Dominate with XMODhub
Let’s be brutally honest: mastering perfect dodges, tracking status ailment meters, and memorizing combo rotations requires a significant time investment and precise timing. Sometimes, you just want to experience the classic fantasy story and explore the beautiful continent of Orbis without getting repeatedly smashed by an elite boss because you missed one Signal Skill prompt. If you are tired of the punishing mechanics, there is a definitive shortcut.
XMODhub is the ultimate solution for PC gamers who want to dictate their own playstyle. Why stress over stamina management when you can bypass it entirely?
With XMODhub, you can instantly turn the tide of combat in Dragon Sword Awakening. Here is how easy it is to dominate:
- Download XMODhub: Install the application on your PC.

- Auto-Detect Dragon Sword Awakening: Launch the game, and XMODhub will automatically recognize it.
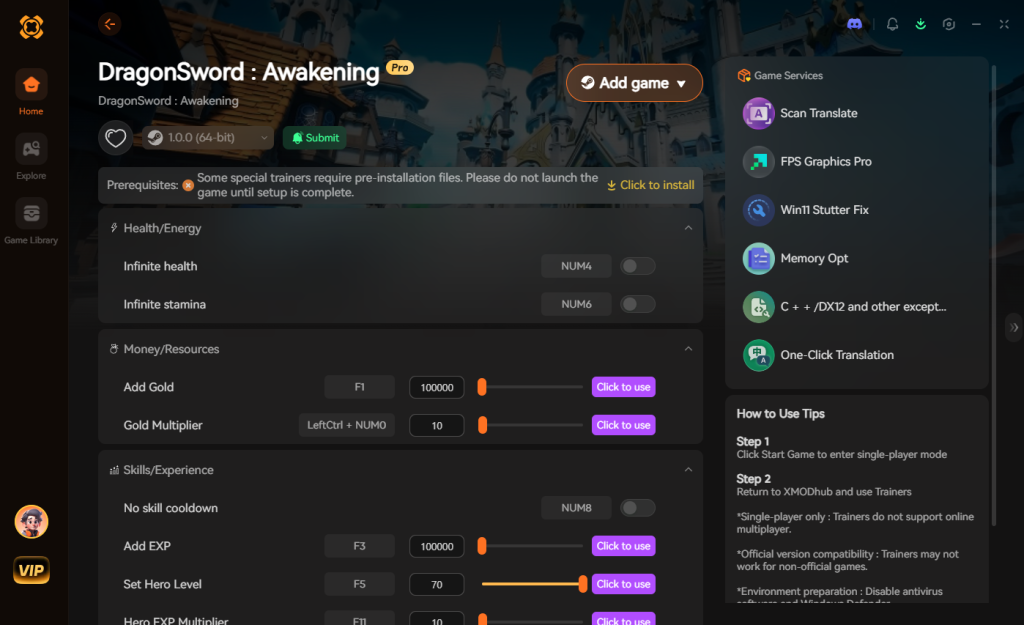
- Toggle Cheats: Enable features like Infinite Stamina, God Mode, or One-Hit Kills directly from the intuitive overlay.
No more frustrating deaths, no more tedious grinding for the perfect rotation—just pure, unstoppable adventure on your own terms.
Download DragonSword Awakening Trainer Now
Elemental Synergy Meta: The Best Ailment Combinations
If you want to min-max your DPS scaling and clear endgame content, randomly throwing elements together won’t cut it. The current meta heavily relies on understanding how specific elemental Status Ailments interact when chained back-to-back.
When a Finisher lands a Signal Skill of a specific element onto an enemy already suffering from a different elemental debuff, you trigger a secondary reaction. Here are the most optimal synergies to build your party around:
| Enabler Element | Finisher Element | Synergy Effect | Best Use Case |
|---|---|---|---|
| Fire (Burn) | Wind (Gale) | Wildfire (AoE DoT) | Clearing massive mob waves quickly |
| Ice (Freeze) | Lightning (Shock) | Superconduct (Shatter) | Bursting down elite enemy health pools |
| Earth (Stun) | Physical (Heavy) | Crush (Armor Rend) | Shredding boss defense scaling |
| Water (Drench) | Ice (Freeze) | Deep Freeze (Hard CC) | Locking down highly mobile targets |
By matching your Enablers and Finishers according to this table, you ensure that every tag-in doesn’t just deal raw damage, but also applies a crippling secondary layer of RNG-free crowd control or defense shredding.
Shattering the Break Gauge: DPS Optimization
Beyond standard health bars, every major boss in Dragon Sword Awakening possesses a heavily armored Break Gauge. Hardcore players know that blowing your ultimate abilities while this gauge is active is a massive waste of DPS.
While a boss’s Break Gauge is full, they have high hyper-armor, meaning your basic attacks won’t interrupt their animations, and they take significantly reduced damage from standard elemental scaling.
The Stagger Phase Strategy:
- Shred the Gauge: Use characters with high “Impact” stats or heavy physical weapons (like greatswords or hammers) to rapidly deplete the yellow Break Gauge.
- Hold Your Cooldowns: Do not use your highest-damaging Signal Skills during this phase. Rely strictly on basic attack chains and perfect dodges to survive.
- The DPS Window: The moment the Break Gauge shatters, the boss enters a “Staggered” state. Their defense drops to zero, and they are completely immobilized.
- Dump Everything: This is your golden window. Immediately trigger your Enabler to stack an ailment, swap to your Finisher, and unleash your most devastating Signal Skill combos to melt their health bar before the gauge regenerates.
Frequently Asked Questions
How do I know which character synergizes with which status ailment?
You must read the character skill descriptions in the menu. Each character’s Signal Skill explicitly states which status ailment must be active on the enemy for the prompt to trigger. Building a team without checking these synergies will result in a clunky, low-damage experience.
Why aren’t my Signal Skills activating even when the enemy is debuffed?
There are two common reasons for this. First, you might not have a character in your party whose Signal Skill matches the currently applied debuff. Second, Signal Skills often have internal cooldowns; you cannot spam the exact same Signal swap repeatedly within a few seconds.
Is it better to focus on one strong character or constantly swap?
Constantly swapping is objectively better. Dragon Sword Awakening is designed around the tag-team mechanic. Staying on one character drastically lowers your damage output because you are missing out on the massive burst damage provided by triggering Signal Skills.
Can Familiars help with status ailments?
Yes, your collectible companions (Familiars) can often provide passive buffs or actively assist in combat. Some Familiars possess abilities that contribute to status ailment buildup, making it easier for your main characters to trigger the crucial Signal Skills.
Final Verdict: Orchestrating Destruction
Mastering the combat in Dragon Sword Awakening is like conducting a symphony of destruction. It requires moving away from the mindset of a solo adventurer and embracing the chaotic, fast-paced rhythm of a tag-team squad. By focusing relentlessly on applying status ailments and perfectly timing your Signal Skill swaps, you can lock enemies in a permanent state of vulnerability and shred through even the toughest encounters on the continent of Orbis. Remember, the true skill lies in your rotation—always be building a debuff, and always be ready to swap for the kill.
However, if mastering these intricate systems feels more like a chore than a challenge, you don’t have to suffer through it. XMODhub is the premier choice for gamers who value their time. Supporting over 5000+ single-player PC games, XMODhub offers a safe, unified platform to tailor your gaming experience. Whether you are looking to bypass the brutal combat in Dragon Sword Awakening or skip the grind in other massive RPGs like Impact Winter or Elden Ring, XMODhub gives you the power to play exactly how you want. Download it today and take back control of your adventure.
Stop Grinding, Start Enjoying.
Bypass the tedious resource gathering and unlock your full potential instantly.

I am a passionate gamer and writer at XMODhub, dedicated to bringing you the latest gaming news, tips, and insights.
Connect with me:
LinkedIn Profile ↗