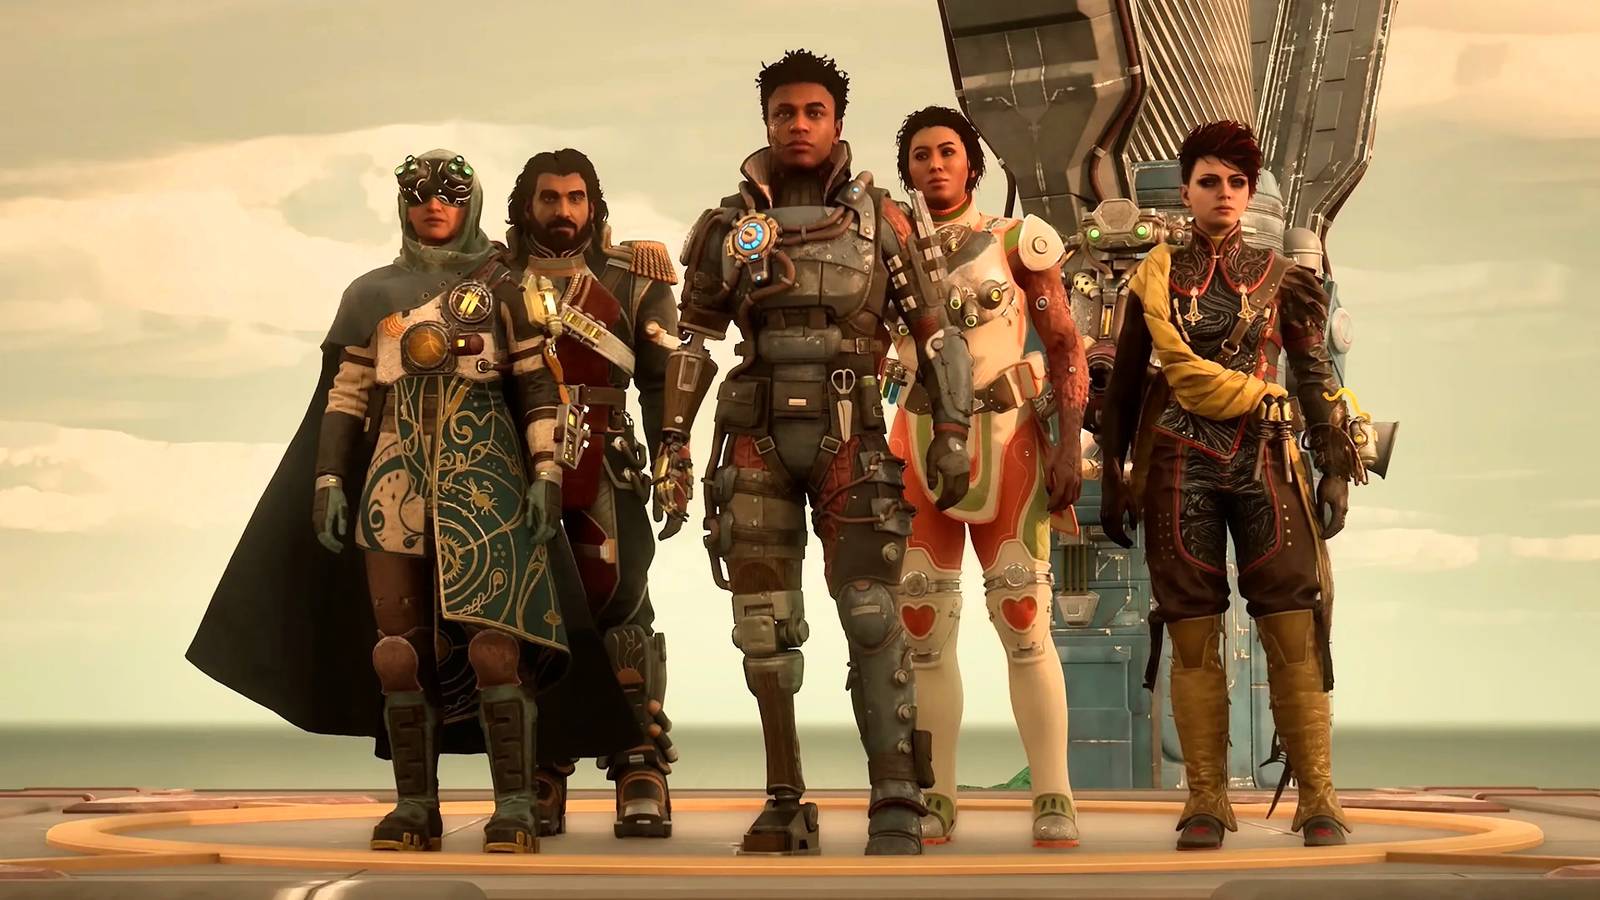
Summary: Get the full 2025 list of The Outer Worlds 2 console commands, money cheats, and mods to unlock credits, items, god mode, and more.
Whether you’re a seasoned space explorer or just starting your journey in The Outer Worlds 2, knowing how to use console commands can transform your gameplay.
Console commands let you tweak everything from your character’s stats to the in-game economy, making it easier to unlock weapons, adjust difficulty, or simply have fun experimenting.
In this guide, we’ll walk you through what The Outer Worlds 2 console commands are, how to enable them, and the most useful cheats available in 2025.
Plus, we’ll explore how tools like XMOD can take your modding experience even further — offering advanced features and one-click cheats without the hassle.
Ready to take full control of your galaxy? Let’s begin.
Table of contents
- What Are The Outer Worlds 2 Console Commands?
- How to Enable the Console in The Outer Worlds 2
- Most Useful The Outer Worlds 2 Console Commands
- Full The Outer Worlds 2 Console Commands List (2025 Edition)
- How to Enhance The Outer Worlds 2 with Xmod
- Conclusion
What Are The Outer Worlds 2 Console Commands?

Console commands in The Outer Worlds 2 are special text-based codes that players can enter into the game’s developer console to modify gameplay instantly. These commands let you do things like:
- Spawn weapons, items, or resources
- Boost stats, skills, or XP
- Toggle god mode or no-clip
- Change game speed or time of day
- Unlock hidden features or bypass restrictions
They’re mostly used for testing, fun experimentation, or speeding up gameplay. While not meant for competitive use, they offer a powerful way to customize and control your single-player experience — especially for players who enjoy tweaking mechanics or skipping grind-heavy parts of the game.
How to Enable the Console in The Outer Worlds 2
Enabling the developer console in The Outer Worlds 2 is usually straightforward, but it may vary depending on your platform and game version. Here’s how you can typically activate it on PC:
Step-by-Step Guide:
- Locate the Game’s Launch Options
- Right-click the game in your Steam or Epic Games library
- Select “Properties”
- Find the field for Launch Options
- Add the Console Command Parameter
- Type:
-console or -devmode
- This enables the developer console when the game launches
- Launch the Game
- Start The Outer Worlds 2 via the game launcher
- Open the Console In-Game
- Press
~ (tilde) or F2 (varies by region or keyboard layout)
- A command input bar should appear at the top or bottom of your screen
Once activated, you can start typing in console commands like god, spawnitem, or addmoney X (where X is the number) to alter gameplay instantly.
Most Useful The Outer Worlds 2 Console Commands
With the mod successfully installed, here’s a list of a few of the most important console commands you can use:
| Command |
Result |
|
Combat.NoDamage
|
Turns combat damage on/off (1/0)
|
|
Combat.InfiniteAmmo
|
Turns infinite ammo on/off (1/0)
|
|
TraitAddDebug (Name)Trait
|
Adds the named Trait
|
|
TraitRemoveDebug (Name)Trait
|
Removes the named Trait
|
|
FlawAddDebug Flaw_Sys_(Name of Flaw)
|
Adds the named Flaw
|
|
FlawClearDebug Flaw_Sys_(Name of Flaw)
|
Removes the named Flaw
|
|
PerkPurchase Perk_Player_(Name of Perk)
|
Adds the named Perk
|
|
RemovePerk Perk_Player_(Name of Perk)
|
Removes the named Perk
|
|
SetAptitudeDebug (Background name)
|
Sets your Background
|
|
WeaponFOV (no.)
|
Sets the weapon FOV value
|
|
AddItemDebug (Item name)
|
Spawns named item
|
Full The Outer Worlds 2 Console Commands List (2025 Edition)
Here are the full Outer Worlds 2 console commands:
- RespecSkillPoints (respec your skill points)
- RespecPerks True (respect your perks)
- TraitAddDebug BrilliantTrait (add a trait)
- TraitRemoveDebug ResilientTrait (remove a trait)
- FlawAddDebug Flaw_Sys_EasilyDistracted (add a flaw)
- FlawOfferDebug Flaw_Sys_EasilyDistracted (receive the pop-up for a flaw)
- FlawClearDebug Flaw_Sys_EasilyDistracted (remove a flaw)
- PerkPurchase Perk_Player_Bulletshield (add a perk)
- RemovePerk Perk_Player_Bulletshield (remove a perk)
- SetAptitudeDebug ExConvict (change your background)
- AddItemDebug name amount (add an item)
- AddItemDebug Collectible_ED_LockboxKey 1 (add Advanced Decryption Key)
Combat and Weapons commands
- Combat.AllowAsyncRadialTraces: 0/1 – Default is ENABLED (1)
- Combat.AllowAsyncShots: 0/1 – Default is ENABLED (1)
- Combat.AverageDamage: Damage will be BaseDamage + (DamageRange * 0.5f) every shot.
- Combat.CritAlways: Attacks will always be critical hits. Overrides Combat.CritNever.
- Combat.CritNever: Attacks can never be critical hits. Overridden by Combat.CritAlways.
- Combat.DamageCollisionDebug: Draw overlap spheres and collision line tests when testing radial damage.
- Combat.DebugInstanceHitTraces: Controls how long debug lines for instance hit traces are drawn after the shot. 0 = no lines.
- Combat.DoTCalculation: Outputs damage amount calculation.
- Combat.ForceKillCam: Forces the kill camera on every kill
- Combat.IgnoreArmor: Ignore armor when calculating damage
- Combat.IgnoreKillCamCooldown: Ignores kill cam cooldown
- Combat.InfiniteAmmo: Infinite ammo from inventory (still reloads)
- Combat.InfiniteMag: Ammo will not be consumed on shot
- Combat.MaxMagazineRecoilDataShotIndex: Maximum supported shot index for pre-calculated magazine recoil data
- Combat.MaxShotsPerFrameMultishot: Number of shots a multishot weapon can run per frame
- Combat.MaxWeaponsFired: 1-999, default 10
- Combat.MinMeleeDamagePercent: Minimum damage of a melee weapon
- Combat.NoDamage: Neither player nor enemies will cause damage
- Combat.NoKillCam: Disables the kill camera
- Combat.OnHitAlwaysCastSpell: OnHit spells will be cast every hit
- Combat.OneShotKills: Players will one shot enemies
- Combat.PerBulletWizz: AI bullet stimulus per bullet or longest trace
- Combat.ProjectileLauncherPrespawnProjectilePool: Prespawn projectile pool if true
- Combat.ProjectileLauncherProjectilePoolDesiredFreeActors: Desired free actors for projectile pool
- Combat.ProjectileLauncherProjectilePoolMax: Max pool size for projectile launcher
- Combat.Recoil.LiveData: Use cached recoil data (0) or parse live (1)
- Combat.ReloadLog: Logs start and end times of reloading
- Combat.TimeDilationInfinite: Time dilation meter will never drain
- Combat.Tunables.BloomDecayTime: Replaces player’s bloom decay time if set
- Combat.Tunables.BloomMax: Replaces player’s max bloom if set
- Combat.Tunables.BloomPerShotPercent: Replaces player’s bloom per shot % if set
- Combat.Tunables.BloomReturnDelay: Replaces player’s bloom return delay if set
- Combat.Tunables.RechamberADSTime: Set ADS rechamber time for ranged weapons
- Combat.Tunables.RechamberTime: Set rechamber time for ranged weapons
- Combat.Tunables.ReloadTime: Set reload time for player weapons
- Combat.Tunables.ShotTime: Set shot time for player ranged weapons
- Combat.Tunables.Spread: Replace starting spread degrees if set
- Combat.WeaponPrespawnProjectilePool: Prespawn projectile pool for weapons if true
- Combat.WeaponProjectilePoolDesiredFreePerShotMultiplier: Desired free actor amount * ShotsPerShot
- Combat.WeaponProjectilePoolMaxPerShotMultiplier: Max pool size * ShotsPerShot
- CombatLog.Armor: Shows armor details
- CombatLog.DTDR: Shows DT/DR calculations
- CombatLog.Damage: Shows crit rolls and damage values
- Melee.AnimSpeed: Set animation speed scalar
- Melee.DrawCollision: Render melee collision
- Melee.RecoilDebug: Every swing will recoil
- MeleeSlot.Debug: Toggle MeleeSlot debugging
- QuickMelee.DrawCollision: Render quick melee collision
- QuickMelee.StealthEnabled: Enable stealth quick melee
Movement commands
- CharMovement.CrouchAreaForcePhase: Entering crouch areas overrides characters to ‘Force’ phase mode
- a.PlayerP3P.CrouchAlwaysCombatPose: 1 = combat pose while crouched, 0 = no
- a.PlayerP3P.GunPointIK: 1 = enable IK for gun pointing, 0 = disable
- a.PlayerP3P.GunPointSmooth: 1 = smooth gun pointing IK, 0 = disable
- a.PlayerP3P.PointAtAimTarget: 1 = point at targets within MaxPointingDistance, 0 = TargetlessDistance
- a.PlayerP3P.RootMotionEnabled: 1 = enable root motion, 0 = disable
- SlideEnabled: Whether the player can slide or not
- SlideAttackEnabled: Whether the player can shoot/melee while sliding
- Stamina.Infinite: Never consume stamina
- Stamina.NoRegen: Stamina will not regen over time
- SetPlayerMaxParkourDistance
- SetPlayerParkourClimbUpHeightMax
Camera and Cinematics commands
- NonCombatCameraForwardMovement.Enable: If set to 1 the player will always face the camera forward while moving while in non-combat.
- TPVCamera.DebugOffset: Multiplier for the distance between the the regular camera position and the debug camera position
- TPVCamera.EnableAsyncWhiskerTraces: When enabled, whisker traces will be performed asynchronously
- TPVCamera.EnableDebugOffset: When enabled an additional offset will be added to the camera. Offset distance can be adjusted by changing TPVDebugOffset
- TPVCamera.EnableWhiskers: When enabled a whisker trace will be performed
- TPVCamera.Profile: When true, displays the current TPV camera profile and its context.
- TPVCamera.ShowYawOffsetDebug: When true yaw offset debug info will be displayed
- TPVCamera.Whiskers.ForceInvisibleDistToCamera: If the dithered character is < this distance from the camera make them invisible. Negative values disable this feature.
- TPVCamera.Whiskers.MinimumOpacityCombat: Minimum opacity for dithered characters when player is in combat
- TPVCamera.Whiskers.OffsetHoldDuration: Controls duration of the delay before the camera returns to normal offset after hold
- TPVCamera.Whiskers.OffsetLerpSpeed: Controls how fast the camera moves to a new offset
- TPVCamera.Whiskers.ReleaseHoldLerpSpeed: Controls the speed in which the camera returns to normal offset after hold
- TPVCamera.Whiskers.UseDynamicGeoDithering: Controls whether or not we dither characters that would occlude the player
- TPVCamera.Whiskers.WhiskerRingSpread: Controls the redius of the whisker rings. Greater numbers mean a wider spread
- TPVCamera.Whiskers.WhiskersNumRings: The number of whisker rings
- TPVCamera.Whiskers.WhiskersPerRing: The number of whiskers to trace per ring
- TPVCamera.Whiskers.WhiskersScale: Increases or decreases the magnitude of camera movement when whiskers get a hit
- TPVCamera.Whiskers.bOnlyDitherCameraDuringCombat: When true characters near the player character will no longer be dithered. Only Characters closer than CameraIgnoreDistance will be dithered
- TPVCamera.Whiskers.bUseForcedFPV: When true Whiskers will force FPV when the camera is pulled in far enough
- OEI.Cinematics.FoVResolution: Changes how FOV is resolved in cinematic targetting. 0: As tight as possible. 1: Resolve from near plane with centered focal distance. 2: Resolve from far plane with centered focal distance. 3: Iterative f-stop expansion with derived focal distance.
- OEI.Cinematics.FoVResolutionIterations: The number of iterations taken to dial in f-stop & focal distance.
- OEI.Cinematics.FramingAdjustment: If enabled, the framing system will attempt to rotate the camera to fit additional target boxes in frame if their ideal screen space framing would push the target(s) outside the edge of the frame. <=0: No adjustments. 1: Framing will be adjusted (default).
- OEI.Cinematics.FramingPrecision: The number of iterations used to determine the best fit
- OEI.Cinematics.PlayerCameraControl: Defines whether or not the player camera can be controlled by the cinematic camera system. <=0: Cinematic player camera control will be disabled. 1: Cinematic player camera control will be enabled (default).
- OEI.Cinematics.ShowFramingTargetRange: If enabled, the framing system’s debug view will display the allowed range for each target. <=0: Off (default). 1: Range will be visible.
- OEI.Cinematics.StageCameras: Defines whether or not cameras built into a stage will be used. false: Stage cameras will be disabled. true: Stage cameras will be used normally (default).
UI and Save Game commands
- Companion.DebugFollow
- Conversation.AdjustCompanionMarksToPlayerPosition: > 0: When entering a conversation, adjusts the stage markers of the companions to be relative to where the player is.
- Conversation.AttachCameraToPlayerSocket: > 0: When entering a conversation, adjusts the camera to the location of the specified socket on the player’s skeleton.
- Conversation.KeepProxyOrientationWhenEnteringConversation: 0 – will use stagemark rotation immediately, (default), 1 – Will keep the proxy orientation
- Conversation.RadioSubtitleTest: Set to 1 to test radio subtitle changes for AR-75331
- Conversation.SkipProxyExitWarp: 0 – Will always warp, (default), 1 – Don’t do a warp, just play the montage
- Conversation.SpeakingCompanionsMoveForward: > 0: Companions will move towards the conversation owner when they are speaking or are soon going to speak for better conversation framing.
- Conversation.ThirdPersonPlayerMesh: > 0: Enables third person player mesh during conversations during gameplay and conversation mode in editor.
- oei.DrawConversationLightingRigDebug: Set to 1 in order to draw debug information about active conversation lighting rigs on screen.
- oei.Language: Sets the 4 character language/region to use for displaying text. Example: oei.Language enus. enus (English US), engb (English UK), esmx (Spanish MX)
- oei.LoadSaveFile: Attempts to load the save file with a given filename. Example: oei.LoadSaveFile autosave
- oei.PauseGameCalendarDuringConversations: When enabled, the game calendar time will be paused during conversations
- oei.PlayEquipAnimOnConversationEnd: 0: Weapon is immediately equipped. 1: Equip anim is used
- Loot.PlayerLevels: Shows the player’s level and the loot level used to generate loot.
- Loot.ShowTable: Shows what loot tables are in this inventory.
- SaveGameManager.AutosavesEnabled: Controls whether or not autosaves (of any type) are enabled
- SaveGameManager.DebugFrequentAutosaves: A debug mode that makes autosaves very frequent
- SaveGameManager.DestroyIndianaCharacters: Controls whether the save game manager is allowed to destroy indiana characters
- SaveGameManager.DisableStateSerialization: If enabled all worlds will be considered invalid for save/load and will therefore not save/load state
- SaveGameManager.ForceSaveSize: When generating a save if the size of it is smaller than this size (in bytes) it will be padded to this size with an extra file. Note that this file is never removed by the save process!
- SaveGameManager.GameStateMetadataEnabled: Controls whether or not the general metadata file also serializes its FGameStateMetadata struct member variable.
- SaveGameManager.MinActorsToParallelize: The minimum amount of actors we need to save at once in order to try to parallelize the work- if we try to save fewer actors than this at once it will just run single threaded to avoid syncronization overhead. 0 always enables, negative numbers disable.
- SaveGameManager.SpawnTimeLimit: Per frame the time limit (ms) for the save game manager kicking off deferred spawns
- UI.Downed.AllowTempResurrect: Allows Temp Resurrect to appear in the Downed/Death menu even in packaged builds.
- UI.EnableNameFilter: If set, named will be run through PD provided name filter asset.
- UI.EnableOnScreenFocusInfo: If true information about the currently focused widget will be displayed on screen (note, this can severely impact performance).
- UI.ExpensiveTextureCount: Determines the number of UI textures we display when over UI texture budget.
- UI.ForceSkipShaderCompilation: Workaround CVar to force Compilation to auto-skip on Init. In case some mechanism prevents it from completing as desired.
- UI.IndicatorRatio: Percentage of Viewport the HUD Indicators will center on
- UI.Inventory.ColoredCategories: Applies unique colors to inventory category pages for debugging.
- UI.LogAudioCueEnum: Will now enable logging of the specific Audio Event called when invoking PlaySoundForEvent.
- UI.MemoryUsageWarningLimit: The memory limit for UI usage – Set UIShowExpensiveTextures to 1 to display expensive textures.
- UI.Minimap.ClusterHeightColors: Lightens fuzzy hostile clusters above the player, and darkens them below the player.
- UI.Minimap.ShowClusterHeights: Lightens fuzzy hostile clusters above the player, and darkens them below the player.
- UI.MinimapShroud: 0 = off, 1 = on
- UI.RenderTransitionDelayFrames: How many frames should be waited between disabling/enabling world renders/actor stages- prevents overlap from render target allocations causing memory spikes
- UI.ShowExpensiveTextures: If true, the most expensive UI textures will be output when over UI texture budget – Use UIExpensiveTextureCount to set the number of displayed textures.
- UI.StatusTagSetting: 0 = Comfortable distance from reticle, 1 = Anchored from top compass element, 2 = Moving based on distance
Miscellaneous commands
- Cover.StepOutRand: Cover.StepOutRand – how much randomness to add to cover step out
- CoverGrass.FadeDepthRange: IAmNoRealVariable
- CoverGrass.FadeMinAlpha: IAmNoRealVariable
- CoverLean.DrawCoverActors: If true then cover lean will be shown
- CoverLean.DrawCoverImpacts: If true then draw impact locations
- CoverLean.DrawLines: If true then cover lean ray traces will be shown
- CoverLean.Enable: If non-zero then the player will attempt to snap to cover
- CoverLean.RotatePlayer: If true then the cover will attempt to rotate the player WIP
- OEI.Chatter.Debug: OEI.Chatter.Debug < 1 (On) / 0 (Off) >
- OEI.Chatter.Trace: OEI.Chatter.Trace < 1 (On) / 0 (Off) >
- OEICrowd.CrowdDetailLevel: The maximum number of crowd characters that are moving at once.
- OEICrowd.Disable: Turn on to disable the crowdsystem for next map load.
- OEICrowd.DisableMoverWaiting: Turn on to disable waiting in a proxy to ensure we hammer on all moving related work.
- OEICrowd.ForceGameThread: Turn on to disable the crowdsystem ticking characters on worker threads.
- OEICrowd.ForceWorkerThread: Turn on to try to force the crowdsystem ticking characters to only run on worker threads.
- OEICrowd.LogAnimProxyWeight: Turn on to log the weights of the anim proxies.
- OEICrowd.MaxAnimProxyVisiblityTestsPerTick: The maximum number of async anim proxy visiblity tests we can kick off for non-rendered anim proxies each tick
- OEICrowd.MergeAnimProxyFillers: Merge crowd characters in anim proxies.
- OEICrowd.OptimizeMovement: Enables crowd movement optimizations.
- OEICrowd.PathingTimeLimit: Sets the max amount of time to spend incrementally work on pathing
- OEICrowd.TimeToWaitBetweenForcingCharactersToMoveMax: Sets the amount of time to wait between forcing characters to move
- OEICrowd.TimeToWaitBetweenForcingCharactersToMoveMin: Sets the amount of time to wait between forcing characters to move
- OEITickManager.ForceSingleThreadPriorityUpdates: Forces the system to run all priority updates on a single thread (not necessarily the game thread), even if the tick set allows parallel processing.
- OEITickManager.ForceSingleThreadTicks: Runs all ticks on a single thread (not necessarily the game thread), even if the tick set supports parallel processing.
- OEITickManager.MultithreadUpdateFrameInfo: If true updating frame counts and cumulative DTs for objects in each tick set will use a parallel for instead of being done on a single thread.
- OEITickManager.OverrideBudgetScale: If greater than 0 this value will be used for budget scaling, regardless of any calculated/provided budget scaling.
- OEITickManager.OverrideJobsToKickWhenTimeBudgeted: If non-zero we will kick this many jobs when doing multi-threaded time budgeted ticks, if this is zero we will kick as many jobs as we have workers.
- OEIWwise.VolumeRetriggerComponent.Debug: Enable debug drawing for the OEIWwiseVolumeRetriggerComponent.
- OEIWwiseAudioRetrievalSubsystem.DebugDraw: Enable Debug Drawing for the OEIWwiseAudioRetrievalSubsystem
- r.Foreground.FOV: FOV (in degrees) for weapon FOV
- r.WeaponFOV.DepthScale: Depth scale used for weapon FOV
- Core.bFastDecimalFormatLargeFloatSupport: True implies we perform additional processing for floating point types over 9223372036854775807 to prevent clipping to this value.
How to Enhance The Outer Worlds 2 with Xmod 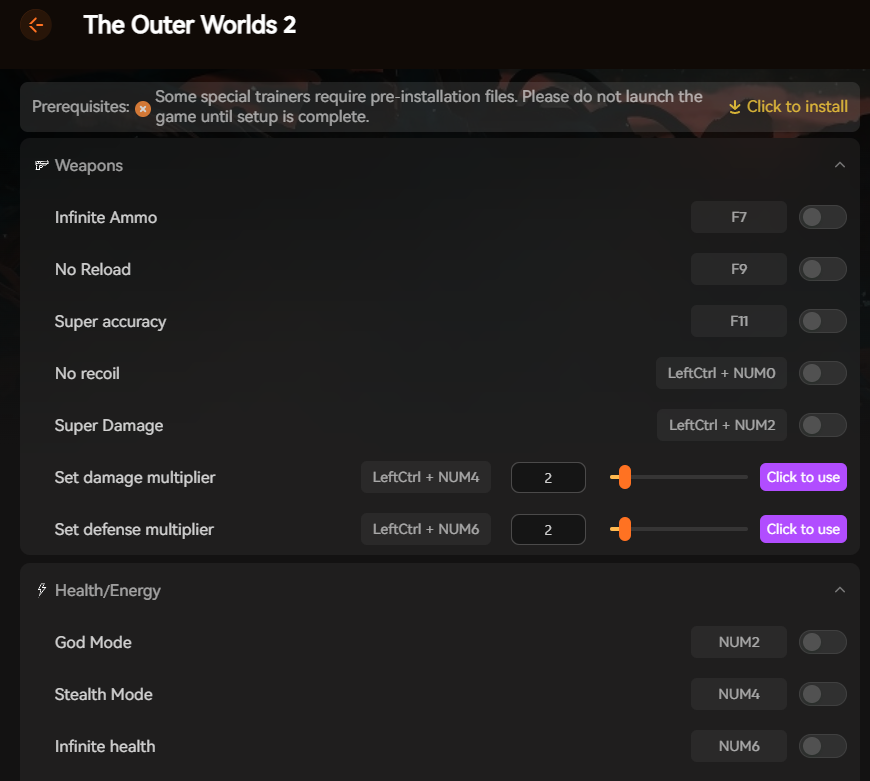
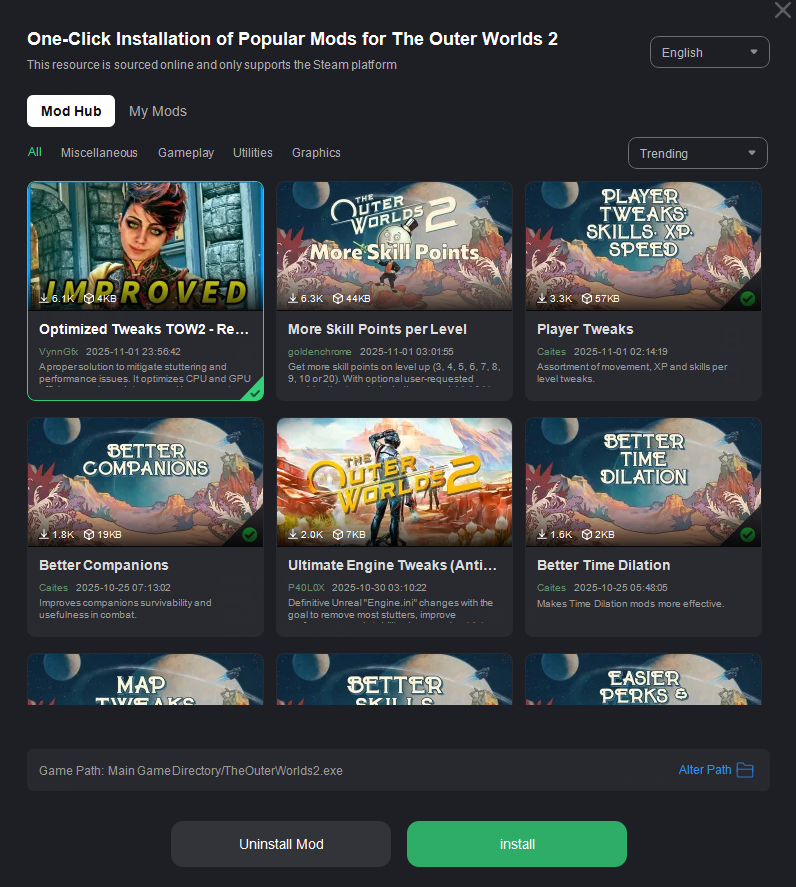
If you don’t want to manually enter console commands or deal with game files, XMOD offers a faster, safer, and more user-friendly way to unlock cheats in The Outer Worlds 2. Instead of typing codes, you get instant one-click toggles for things like infinite ammo, god mode, free crafting, and more — all displayed in a clean menu.
What XMOD Lets You Do in One Click
- Weapons: Infinite ammo, no reload, no recoil, super damage, damage multipliers
- Health/Energy: God mode, infinite health, stealth mode
- Money/Items: Add currency, give all items, free crafting, infinite healing items
- Movement: Infinite jump, speed sliders, world speed control, teleport
- Skills/XP: Add experience instantly
How It Works
- Open XMOD and search for The Outer Worlds 2
- Click Start Game
- Enable cheats using toggles or hotkeys — no console or scripting required
If you want all the power of console commands without typing a single line, XMOD is the easiest upgrade for The Outer Worlds 2 players.
Conclusion
Whether you prefer classic console commands or a modern one-click trainer like XMOD, The Outer Worlds 2 gives you plenty of ways to customize your playthrough. Console commands are great for players who enjoy full control and don’t mind typing codes, while XMOD delivers the same power in a faster, safer, and more user-friendly way.
If you just want quick access to infinite money, god mode, or gameplay tweaks without digging into configs, XMOD is the smarter option. But if you like experimenting, testing builds, or modding the game manually, the console is still a solid tool.