Secure Boot requires all three of the following conditions to be met:
1. Enable TPM
To enable TPM, you need to access the BIOS/UEFI settings. The exact steps vary depending on your motherboard brand and platform (Intel/AMD), but it is usually found under Security or Advanced options.
General Steps to Enable TPM:
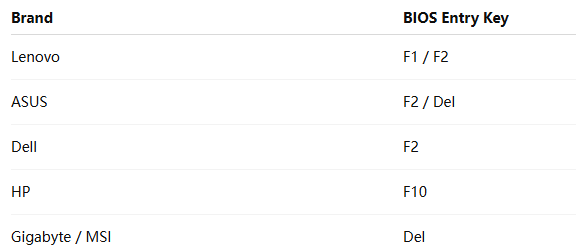
- Enter BIOS/UEFI: Restart your PC and press a specific key during startup (such as Del, F2, F10, etc., depending on your motherboard) to enter the BIOS.
- Locate TPM Settings: Look for menus like “Security,” “Advanced,” or “Trusted Computing,” and find TPM-related options (e.g., “Security Device,” “Intel PTT,” “AMD fTPM”).
- Enable TPM: Set the option to “Enabled” or “On”. Some boards may require selecting “Firmware TPM” or “PTT” mode.
- Save and Exit: Press F10 to save and exit. Your system will reboot automatically.
Brand & Platform Differences
MSI Motherboards
- Intel platform:
Advanced > Security > Trusted Computing > TPM Device Selection→ set to “PPT” - AMD platform:
Settings > Security > Trusted Computing > AMD TPM switch→ set to “AMD CPU TPM”
ASUS Motherboards
- Intel platform:
Advanced > PCH-FW Configuration > TPM Device Selection→ set to “PPT” - AMD platform:
Advanced > AMD fTPM Configuration→ set to “Enabled”
Lenovo ThinkPad
Security > Security Chip→ set to “Enable”
2. Disk Format: Convert MBR to GPT
🔍 Step 1: Check Your Disk Partition Type
- Press Win + X, then select Disk Management
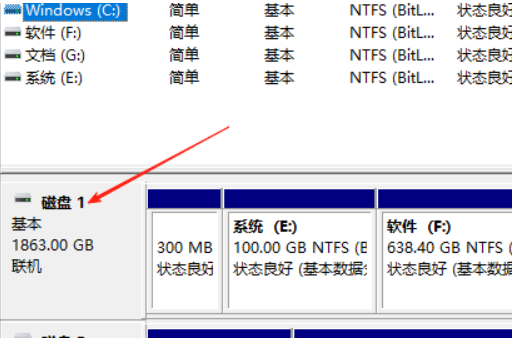
- Right-click on your system disk (usually the one with drive C:) → Properties → Volumes tab
- Check if it says Master Boot Record (MBR)
✅ Step 2: Run Command Prompt as Administrator
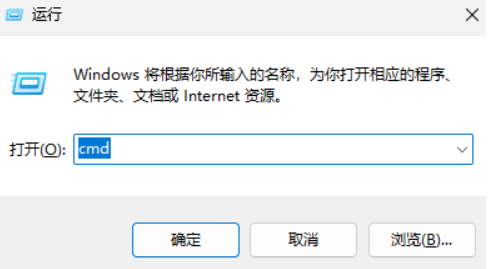
- Press Windows + R, type
cmd, then press Ctrl + Shift + Enter to run as administrator

Enter 【mbr2gpt /validate /disk:1 /allowFullOS】 and press Enter to confirm.
Note: The disk number in the command (disk:0) should match the number listed under the Volumes tab in the disk properties window. (For example, if the disk number for the C drive is Disk 1 as shown in the picture below, use disk:1 in the command; if the C drive disk number is Disk 0, then the corresponding part in the command should be disk:0.)

UEFI (disable Compatibility Support Module / CSM)
🔄 4. Save and restart. The system will now boot from the GPT disk in UEFI mode!
3.Change BIOS to UEFI mode
🚀 Step 1: Enter the BIOS setup
When restarting your computer, repeatedly press the designated key to enter the BIOS:

If you can’t enter BIOS directly:
In Windows, hold down Shift and click Restart → select “Troubleshoot” → “Advanced options” → “UEFI Firmware Settings”
⚙️ Step 2: Set Boot Mode to UEFI
After entering BIOS:
Find the Boot option
Adjust the following settings to:

💾 Step 3: Save and Restart
Press F10 → select Yes to save the settings, and the system will automatically restart.
4. Enable Secure Boot
Check if your system is in UEFI mode:
-
Press Win + R on your keyboard, type msinfo32, and press Enter.
2. If Secure Boot is disabled, please follow the steps below:
Press Win on your keyboard, then search for Change advanced startup options.
In Advanced startup, select Restart now.
After restarting, select Troubleshoot → Advanced options → UEFI Firmware Settings.
In the BIOS, navigate to the Boot options.
Set the following options to UEFI mode (the display may vary depending on the motherboard).
Save and restart.
Press F10 → select Yes to save the settings, and the system will restart automatically.

I am a passionate gamer and writer at XMODhub, dedicated to bringing you the latest gaming news, tips, and insights.
Connect with me:
LinkedIn Profile ↗


