
Running out of fuel just as your base defenses power down is a nightmare scenario in StarRupture. Helium-3 is the lifeblood of advanced crafting and energy production, but finding a reliable StarRupture Helium-3 location often means venturing into the most hostile biomes on the map. Whether you are struggling to spot the vents or keep your extractors running during a storm, this guide covers the coordinates and strategies you need to secure a permanent supply.
Key Takeaways
- Volcanic Biomes – The highest density of Helium-3 vents is found in high-heat zones.
- Visual Cues – Look for distinct blue-green gas plumes rising from ground fissures.
- Hazard Protection – Thermal shielding is mandatory for farming these locations efficiently.
- Automation – Manual collection is too slow; setting up automated extractors is the only viable long-term strategy.
Let’s break down the details below.
Where Can You Find the Best StarRupture Helium-3 Location?
Locating Helium-3 is the first major hurdle for players transitioning from mid-game to end-game technology. Unlike common iron or silica, this gas doesn’t appear in safe starting zones. You need to head toward the more dangerous sectors of the map, typically characterized by extreme environmental conditions that would kill an unprepared player in minutes. In any survival game, risk equals reward, and StarRupture takes this to the extreme with its resource distribution.
Identifying Helium-3 Vents in StarRupture
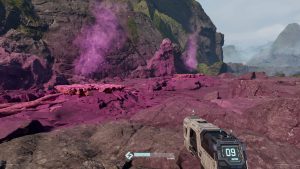
Visually spotting the resource is crucial because scanning range can be limited during storms. Helium-3 vents are distinct from standard steam or toxic gas vents. Look for fissures in the ground that emit a steady stream of blue-green gas. Unlike volcanic smoke which is thick and grey, Helium-3 clouds are translucent and often glow faintly at night.
The time of day significantly impacts your ability to scout these locations. During the solar peak, the intense glare from the lava fields can wash out the subtle blue hue of the gas, making it blend in with the heat haze. I highly recommend scouting at dusk or dawn. During these twilight hours, the bioluminescent quality of the gas makes it pop against the dark basalt rock, allowing you to mark multiple vents from a high vantage point before the mobs become too aggressive.
Navigating Biome Hazards in StarRupture
The best deposits are almost exclusively located in the Volcanic and Acidic Plateaus. These areas constantly drain your suit’s protection. Before heading out, ensure you have crafted high-tier thermal plating. I learned this the hard way when my suit failed halfway through setting up an extractor, forcing a desperate sprint back to safety.
In the Volcanic Fields, the ground itself is a hazard. Lava flows can shift, cutting off your retreat path, and “Magma Spitter” enemies can blend in with the terrain. Pro-tip: If you’re running the ‘Lightweight’ chassis mod, swap it out. You need the ‘Reinforced Plating’ here. The mobility loss is worth not getting one-shot by a random lava plume. In the Acidic Plateau, the danger is more subtle; pools of corrosive liquid look like stable ground but will dissolve standard boots in seconds. Always bring a jetpack to traverse these gaps safely, as touching the floor in the wrong spot can be an instant game over.
Using the StarRupture Resource Map Effectively
Once you find a vent, do not leave without marking it. Open your map and place a custom beacon. I recommend color-coding your beacons—use blue for Helium-3 and red for combat zones. This simple step saves hours of wandering aimlessly when you return with your extraction gear. Advanced players often triangulate these beacons to find the “center” of a resource cluster, which is usually the safest spot to build a teleportation hub or a forward operating base.
How Do You Master StarRupture Helium-3 Farming?
Finding the gas is only step one. To actually use it for crafting, you need a robust farming setup that can withstand the environment. The extraction process is slow, and the infrastructure required is expensive, so planning your layout is essential.
Before you head out to build, make sure your inventory is stocked with the essentials. You don’t want to make a second trip. Bring at least 200 Titanium Plates, 50 Heat Sinks, a Portable Teleporter, and plenty of High-Caliber Ammo. It pays to be over-prepared.
StarRupture Mining Guide: Efficient Extraction Layout
Place your Gas Extractor directly over the center of the fissure. The UI will show an efficiency percentage; aim for at least 90%. Connect the extractor to a pressurized storage tank immediately. Helium-3 tanks fill up quickly, and if the internal buffer of the extractor fills, the machine stops working.
Think about your pipe logistics before you place the first block. I’ve seen too many bases turn into “spaghetti” nightmares where you can’t walk without jumping over pipes. Use vertical stackers to keep your ground level clear for vehicles. For maximum efficiency, consider using “Overclock Modules” on your extractors. These increase yield by 25% but also increase the heat generation of the machine. In a volcanic biome, this can be risky, as an overheated machine will shut down or explode. You may need to build active cooling fins adjacent to the extractor to dissipate the excess thermal energy.
Powering Your Extractors in StarRupture
Since these biomes often have poor sunlight due to ash clouds, solar panels are unreliable. Instead, use Geothermal Generators if you are in a volcanic zone. They provide constant power and synergize perfectly with the heat of the area, ensuring your Helium-3 farming never stops due to night cycles. Geothermal energy is the most consistent power source in the game for these specific biomes, though it requires a significant upfront investment in Titanium and heat-resistant alloys.
Transporting StarRupture Rare Resources Safely
Helium-3 is volatile. If you are transporting it manually, avoid taking damage, as containers can leak. For advanced setups, build a pipeline network or use transport drones to ferry the gas back to your main base. Drones are expensive but safer than risking a truck drive through lava fields. If you’re using drones, set their priority to ‘High’ for Helium-3. You don’t want your fuel transport waiting in a queue behind a shipment of common stone.
If you opt for a pipeline, be aware of the distance. Pressure drops over long distances, requiring you to install Pump Stations every 200 meters. These pumps also need power, which can complicate your logistics network. Many players find that a hybrid system—extracting locally to a large silo and then using a cargo drone for the long-haul trip—is the sweet spot between complexity and reliability.
Defending Your Helium-3 Outpost
One aspect often overlooked by new players is that mining generates noise and ground vibrations. In StarRupture, this activity attracts the local fauna. As soon as your extractors spin up, you will trigger a “threat radius” around your outpost, drawing in waves of enemies.
Establishing a Perimeter
You cannot simply place an extractor and leave. You must build a defensive perimeter. In tower defense fashion, wall placement is critical. Use reinforced walls to funnel enemies into “kill zones” where your turrets can focus their fire. Honeycombing your walls—building a double layer with a gap in between—confuses the AI pathfinding of larger beasts, buying your turrets precious seconds to melt them down. Since Volcanic biomes have enemies with high heat resistance, avoid using flamethrower turrets. Instead, rely on Kinetic Gatling Turrets or Cryo-Beamers, which can slow down charging enemies and shatter their heat-hardened carapaces.
Dealing with Environmental Sieges
It’s not just the creatures you have to worry about; the planet itself is hostile. Volcanic regions experience “Ash Storms” that can clog up turret intakes and reduce their fire rate. Building roof coverings over your critical defense points can mitigate this, but ensure you leave lines of sight open. During a storm, your visibility drops, so having motion sensors linked to your turret network is vital to ensure they engage targets even when you can’t see them visually.
Why Is My StarRupture Helium-3 Extraction Failing?
Even with a good setup, things can go wrong. Here is how to troubleshoot the most common issues players face.
Fixing Common StarRupture Extractor Issues
If your extractor is powered but not producing, check the output pipe. If the pipe is too long or lacks pumps, the gas flow will stall. Additionally, check your storage; if your tanks are full, the entire system halts. A common rookie mistake is mixing pipe networks; if you accidentally connect a water pipe to a Helium-3 line, the entire system will contaminate and jam, requiring you to deconstruct and rebuild the affected sections.
Mistakes in StarRupture Helium-3 Farming Placement
Placement precision matters. Placing an extractor on the edge of a vent might result in only 20-30% efficiency. Always use the construction camera mode to align the intake valve directly with the center of the gas plume. Furthermore, ensure the ground is flat. Building on a slope can cause the extractor’s foundation to clip into the terrain, sometimes blocking the output port and preventing pipe connection.
Overlooking StarRupture Environmental Threats
Weather events like Acid Rain or Heat Storms can damage your buildings. Ensure you build repair towers or shield generators nearby. A damaged extractor works at reduced capacity and will eventually explode if neglected. In an open world game like this, the environment is often your biggest enemy, and neglecting maintenance is the fastest way to lose hours of progress.
Skip the Grind with XMODHUB
Farming Helium-3 can be a slow, dangerous process that takes hours of setup. If you want to focus on base building and exploration rather than resource management, XMODHUB offers a safe, easy-to-use solution to speed up your progress.

Accelerating Your StarRupture Progress
The XMODHUB trainer for StarRupture provides powerful tools to bypass the grind. Instead of dying to heat damage or waiting hours for tanks to fill, you can customize your gameplay experience.
❤️ Infinite Health
Survive in volcanic biomes indefinitely without needing thermal suits or constant repairs.
💰 Infinite Resources
Build as many extractors and generators as you need without farming base materials first.
⏱️ Super Speed
Traverse the map instantly to locate rare vents and resources without the long trek.
⚔️ No Overheat
Keep your mining lasers and weapons firing continuously without cooldown periods.
These featured mods are just the beginning. Whether you’re looking to skip tedious grinding, experiment with different playstyles, or speed up your progression, XMODHUB’s comprehensive toolkit offers dozens more options tailored to your playstyle.
Safe Installation for StarRupture Mods
XMOD is designed with safety in mind. It operates as an all-in-one launcher that auto-updates with the game, ensuring compatibility with the latest patches. It is malware-free and requires no complex script editing—just one click to activate the features you want.
StarRupture Helium-3 FAQ
Ready to enhance your gameplay?
I create content for Xmodhub, where I curate and share game mods, tools, and other resources. My goal is to help players discover great add-ons, enjoy a smoother experience, and have more fun.


I tried manually collecting Helium-3 at first, and it was such a grind! Automating the extraction really does save a ton of time, though. Do you think it’s worth setting up multiple extractors in the same location, or should they be spread out?