Managing a growing community in Quarantine Zone The Last Check isn’t just about building walls; it’s about ensuring your survivors don’t starve while standing next to a fridge. I’ve lost count of how many times my best engineer died because of bad pathfinding or poor job prioritization. In any brutal survival game, your workforce is your most valuable resource. This guide breaks down exactly how to distribute your workforce efficiently so you can stop micromanaging and start surviving.
Key Takeaways
- Role Specialization – Assign jobs based on specific survivor stats to boost efficiency.
- Layout Matters – Reduce travel time by placing storage near production zones.
- Priority System – Set food and water tasks to the highest priority to prevent death spirals.
- Automate Grind – Use XMODHUB to bypass tedious resource gathering and focus on strategy.
Let’s break down the details below.
How to Master Survivor Management Tips?
Effective survivor management is the backbone of any successful run. In the early game, you can get away with manual assignments, but as your population grows, understanding the nuances of NPC behavior becomes critical. If you don’t get a handle on this early, you’ll find yourself constantly putting out fires—literally and figuratively—instead of expanding your territory.
Survivor Roles Explained for Beginners
Not all survivors are created equal. Assigning a survivor with low agility to a scavenging role is a waste of potential and a quick way to get them killed by the infected. You need to look at their character sheet like a hiring manager. Here is a breakdown of the primary roles and the stats that govern their efficiency.
Assigning Tasks in Quarantine Zone The Last Check
The priority system is your best friend, but it can also be your worst enemy if you ignore it. Micromanagement is inevitable early on, but your goal is to set up a system that runs itself. Always set food production and water purification to Priority 1. If you leave these at default, survivors might prioritize repairing a broken fence while the colony starves. For combat roles, ensure you rotate shifts so your guards don’t suffer from fatigue penalties during a night raid. A tired guard is a dead guard.
What is the Best Base Building Strategy?
A well-designed base does half the management work for you. If your survivors have to walk across the entire map to drop off a single log, your efficiency plummets. You need to think about “zoning” your base just like a city planner would.
Mastering Quarantine Zone Resource Allocation
Centralize your primary storage. Place your main stockpile in the center of your base, with production buildings (farms, workshops) radiating outwards. This minimizes the walking distance for all worker types. For resource management, keep a dedicated small storage crate near your main gate for scavengers to dump loot quickly before returning to the field. This “drop-off” point saves them from trekking through the entire base, keeping the mud and potential infection outside your living quarters.
Improving Workflow in Quarantine Zone The Last Check
Pathfinding AI can be tricky. Avoid building narrow corridors where NPCs can get stuck on each other. Double-wide pathways are essential for high-traffic areas. Also, ensure that sleeping quarters are somewhat separated from noisy generators to prevent morale debuffs, which can lead to lower work speeds. Good pathfinding design means creating clear, unobstructed lines of sight between storage and crafting stations. If a survivor has to walk around a wall to get to the tool bench next to them, you’ve failed the layout test.
Advanced Survival Strategies for Veterans
Once you have the basics down, the game throws curveballs in the form of mental breaks and massive hordes. Surviving day 50 requires a different mindset than surviving day 5.
Managing Survivor Morale and Sanity
It’s not just about calories; it’s about sanity. Survivors who constantly eat raw food, sleep on the floor, or witness too many deaths will eventually break. A mental break can be catastrophic—a depressed doctor might refuse to treat patients, or an angry guard might start a fight. Invest in “luxury” items like real beds, a guitar for the common room, or better quality food. These small buffs stack up and keep your workforce efficient. Remember, a happy survivor works 20% faster than a miserable one.
Transitioning to Late-Game Automation
As you reach the late game, your goal should be to automate the basics so you can focus on expansion. Transition from manual scavenging to hydroponics and water recyclers. These buildings require power and maintenance but provide a steady stream of resources without risking lives outside the walls. Set up dedicated “haulers”—survivors with high strength whose only job is to move items from production outputs to storage. This frees up your skilled crafters to keep crafting without interruption.
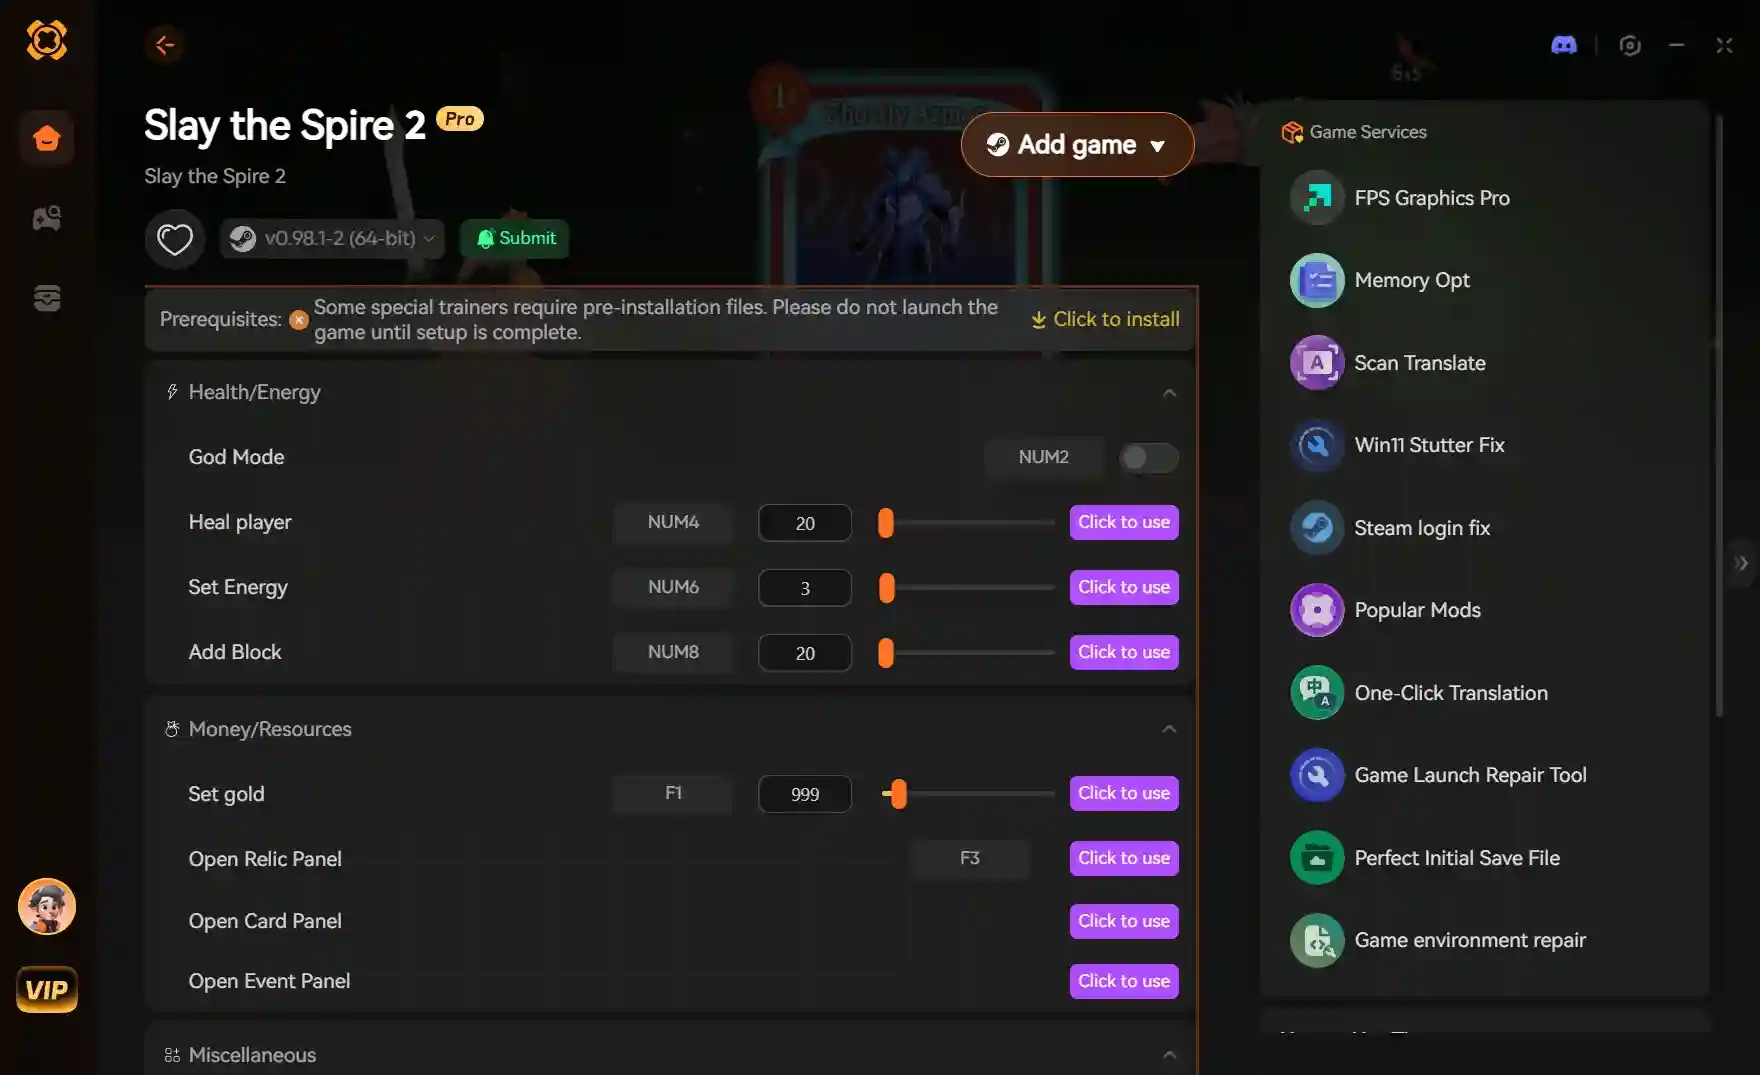
Simplify Management with XMODHUB
Sometimes the grind for basic materials gets in the way of the actual strategy. If you want to focus on base design and defense rather than watching a hunger bar, XMODHUB provides tools to customize your experience.

Enhancing Quarantine Zone The Last Check Gameplay
Using mods can help automate the most tedious aspects of survival. Instead of spending hours scavenging for scraps, you can use resource multipliers to gather what you need in a fraction of the time. This allows you to experiment with larger base layouts and more complex defense systems without the fear of running out of materials halfway through construction. It effectively turns the game from a desperate scramble into a strategic sandbox.
Using Trainers for Better Control
Trainers offer precise control over game mechanics that can otherwise be frustrating. You can stabilize survivor needs like hunger and fatigue, effectively removing the death spiral mechanic while you learn the ropes. Whether you want to test a specific defense setup against a max-level horde or simply build the ultimate fortress without restrictions, these tools give you the freedom to play your way. It’s particularly useful for testing new base layouts without risking your main save file.
Why Do Survivors Die in Quarantine Zone The Last Check?
Even with a good plan, things go wrong. Identifying the root cause of a colony collapse is the first step to fixing it. Usually, it’s not the zombies that kill you; it’s the logistics.
Common Mistakes in Quarantine Zone The Last Check
The most common error is expanding too fast. Adding three new survivors when you barely have food for two is a death sentence. Another issue is neglecting defense depth; a single wall is never enough. You should apply tower defense principles: create kill zones, chokepoints, and fallback positions. Always have a “keep” where non-combatants can retreat during a breach. If your farmers are fighting off raiders with pitchforks, you’ve already lost.
Troubleshooting “Not Working” Assignments
If you find your survivors standing idle despite having tasks assigned, check your zoning. Often, a survivor is assigned to a job but the target object (like a farm plot) is outside their allowed zone. Additionally, check for pathing blockages—a misplaced crate can prevent an entire workforce from reaching the warehouse. Sometimes, simply toggling the job off and on again resets the AI logic.
Quarantine Zone The Last Check FAQ
Ready to enhance your gameplay?
I create content for Xmodhub, where I curate and share game mods, tools, and other resources. My goal is to help players discover great add-ons, enjoy a smoother experience, and have more fun.