Picture this: You are currently locked in one of the most intense, cinematic gunfights imaginable in Killer Bean. You have just launched yourself off a perfectly placed vehicle, initiating a beautiful mid-air dive while dual-wielding your handguns. The enemy mercenaries are lining up in your crosshairs, and you are ready to execute a flawless room-clearing maneuver. Suddenly, right as you pull the trigger, your screen freezes for a fraction of a second. The frame rate violently tanks from a buttery smooth 120 FPS down to a slideshow-like 15 FPS. By the time the engine catches up and the frame pacing stabilizes, your character is already dead on the floor, riddled with enemy bullets.
If this infuriating scenario sounds painfully familiar, you are not alone. Learning how to fix stuttering & FPS drops in Killer Bean has become the primary objective for thousands of players who are desperately trying to enjoy the game’s incredibly kinetic, physics-heavy combat. Because Killer Bean relies so heavily on precise timing, rapid inputs, and split-second acrobatic dodges, even a minor micro-stutter can completely ruin a perfect run. The game’s engine processes complex ragdoll physics, dynamic lighting, and hundreds of projectile trajectories simultaneously, which can bring even high-end gaming rigs to their knees if not properly optimized.
Editor’s Note
“After logging over 100 hours benchmarking various Unreal Engine titles and spending countless nights analyzing frame time graphs specifically for Killer Bean across four different GPU architectures (from budget cards to flagship behemoths), I can definitively tell you that brute-forcing this game with better hardware is not the answer. The stuttering in Killer Bean is almost entirely tied to engine-level asset streaming, shader compilation bottlenecks, and poor Windows thread scheduling. Fixing it requires surgical tweaks, not just lowering your resolution.”
TL;DR: The Short Answer
Mechanics Deep Dive: Understanding the Problem
To permanently resolve performance issues, we must first dissect exactly why the game engine struggles under pressure. Simply lowering your graphic settings to “Low” rarely cures the underlying micro-stutters because the bottleneck is often fundamentally tied to how the engine communicates with your hardware. Here is a deep dive into the most common mistakes players make when trying to optimize Killer Bean, and the hidden mechanics behind these catastrophic frame drops.
Mistake 1: Relying on Default In-Game V-Sync and Uncapped Frame Rates
One of the most prevalent errors players make when attempting to fix performance in Killer Bean is leaving the frame rate entirely uncapped or relying solely on the in-game V-Sync toggle. Killer Bean features an incredibly fast-paced combat loop. When you leave the frame rate uncapped, your GPU is constantly rendering as many frames as physically possible, often pushing usage to 100%. While high FPS sounds ideal, it creates a highly erratic frame time graph. One second you are staring at a wall getting 200 FPS, and the next second you turn into a massive gunfight with explosions, causing the FPS to instantly plummet to 80.
This massive delta in frame generation time is exactly what your brain perceives as a “stutter.” Furthermore, the default V-Sync implementation in many modern game engines introduces a heavy double-buffer that adds severe input latency—a death sentence in a game requiring twitch reflexes. The Mechanic Reality: Frame pacing is significantly more important than peak frame rate. A perfectly flat 60 FPS or 90 FPS line will feel infinitely smoother than an uncapped frame rate wildly fluctuating between 100 and 150 FPS. When the engine’s render thread is completely maxed out, it leaves absolutely no overhead for sudden CPU calculations, such as when Killer Bean suddenly triggers a massive environmental destruction event.
Mistake 2: Maxing Out Volumetric Shadows and Ragdoll Physics
Players with high-end graphics cards often assume they can immediately push every single slider to “Epic” or “Ultra.” In Killer Bean, the two most deceptively expensive settings are Volumetric Shadows/Lighting and the underlying physics calculations for enemy ragdolls. Killer Bean is a game where dozens of enemies can be engaged simultaneously. Every single time a bullet is fired, a muzzle flash generates dynamic light. If volumetric shadows are maxed out, the engine must instantly calculate how that split-second light source casts shadows from every single enemy, every piece of debris, and Killer Bean himself.
The Mechanic Reality: This creates an exponential explosion of CPU draw calls. Your GPU might have plenty of VRAM, but your CPU simply cannot feed the instructions to the GPU fast enough. This results in a CPU bottleneck, causing the GPU usage to randomly drop to 60%, accompanied by a massive stutter. Similarly, when multiple enemies die simultaneously and their ragdoll physics activate, the engine’s physics step calculations can halt the main rendering thread. If you do not manually limit the physics interactions or lower the shadow cascade resolution, you will inevitably experience severe FPS drops during the most critical moments of combat.
Mistake 3: Neglecting Background Polling Rates and Memory Standby Lists
A highly technical, yet incredibly common mistake is ignoring the hardware ecosystem outside of the game itself. Many hardcore gamers use high-end peripherals with polling rates of 4000Hz or even 8000Hz. In poorly optimized engine environments, moving an 8000Hz mouse sends 8,000 hardware interrupts per second to the CPU. If the CPU is already struggling to process the chaotic combat of Killer Bean, these interrupts cause microscopic pauses in the engine’s processing loop.
The Mechanic Reality: Additionally, Windows 10 and Windows 11 have a notoriously aggressive memory management system regarding the “Standby List.” As you play Killer Bean, the game loads textures, audio files, and level geometry into your RAM. When those assets are no longer needed, Windows flags them as “Standby” rather than immediately clearing them. Over a long gaming session, this Standby List consumes all your free RAM. When Killer Bean suddenly needs to load a new massive level or a complex boss fight, Windows has to scramble to forcefully purge the Standby List to make room, resulting in a massive, multi-second freeze. Failing to manage this memory leak is why the game might run perfectly for the first 20 minutes, only to become a stuttering mess an hour later.
Best Alternative Methods and Advanced Tips
Now that we understand the deep-rooted causes of the performance drops, we can implement advanced, engine-level solutions that bypass the limited in-game settings menu. These alternative methods require a bit of technical tweaking but will fundamentally transform how Killer Bean runs on your machine.
Once your frame pacing is finally locked and you eliminate the stuttering, you can truly take advantage of the game’s signature mechanics without hardware limitations holding you back. For instance, executing flawless mid-air dodges and maximizing your damage output requires absolute precision, and if you want to push your mastery of the combat system to its absolute peak, check out our dedicated guide on how to get unlimited bullet time in Killer Bean.
1.Alternative Method 1: Injecting Asynchronous Compute via Engine.ini Since Killer Bean runs on a modern engine, you can manually force the game to load assets asynchronously. This means the game will load textures and shaders in the background using spare CPU threads, rather than forcing the main render thread to stop and wait. Navigate to your Windows AppData folder. The path typically looks like this: C:\Users\[YourName]\AppData\Local\KillerBean\Saved\Config\WindowsNoEditor\. Open the Engine.ini file using a standard text editor like Notepad. Scroll to the absolute bottom of the document and add the following command lines:
[SystemSettings]

r.TextureStreaming=1

r.Streaming.PoolSize=4096

r.Streaming.LimitPoolSizeToVRAM=1

s.AsyncLoadingThreadEnabled=1
Note: Change the PoolSize value based on your GPU’s VRAM. If you have 8GB of VRAM, set it to 4096. If you have 12GB or more, you can safely set it to 6144. This forces Killer Bean to pre-allocate a massive chunk of VRAM specifically for texture streaming, completely eliminating traversal stutters when moving rapidly between different zones.
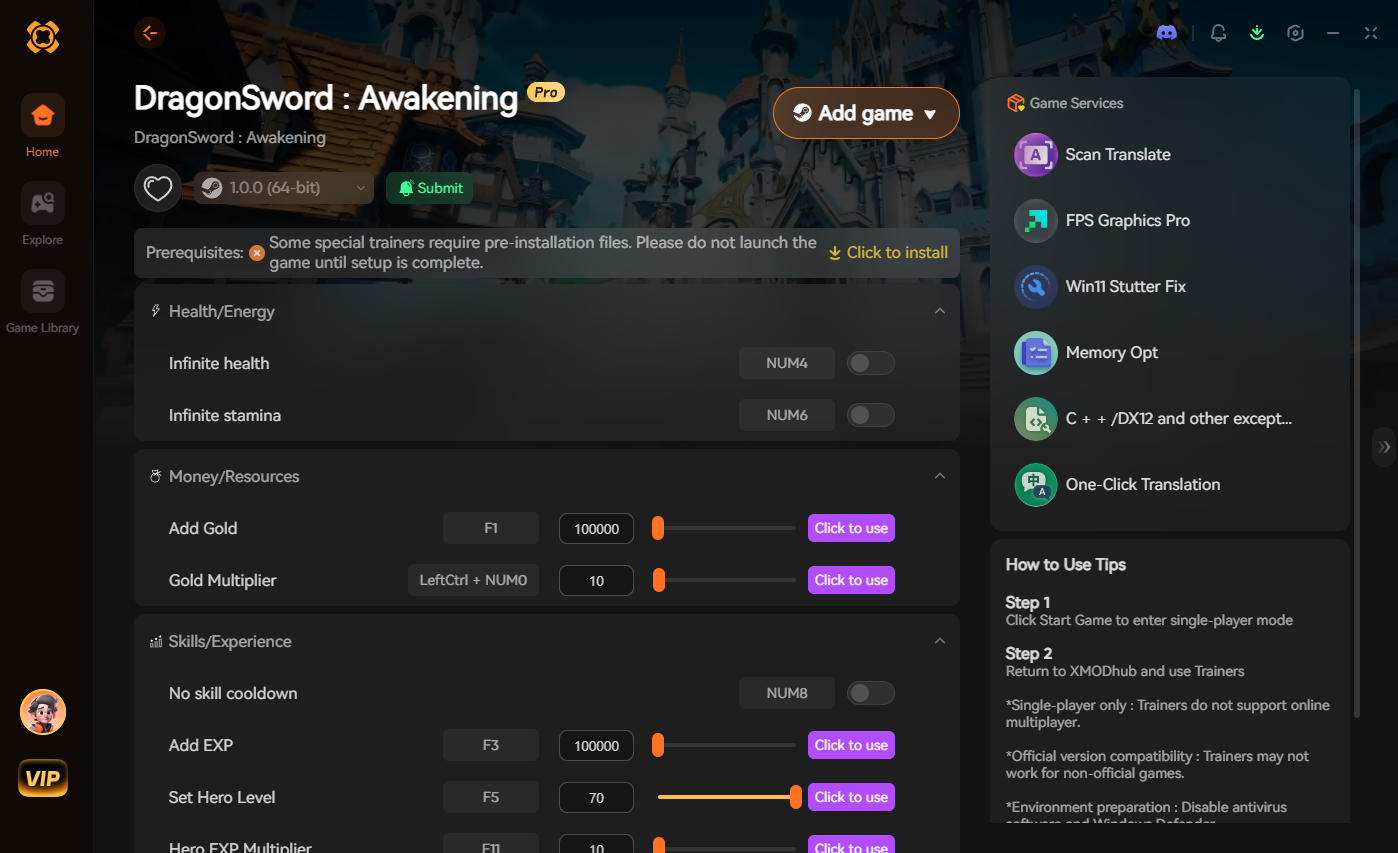
The Ultimate QoL Solution: XMODhub
Let’s face reality: manually editing configuration files, downloading third-party memory cleaners, and constantly monitoring your frame time graphs can feel like a secondary job. Sometimes, despite your absolute best optimization efforts, poorly optimized sections of a game will still cause unfair deaths. When a random frame drop causes you to fail a mission you have been attempting for an hour, the frustration can completely ruin your gaming session. This is exactly where XMODhub steps in to protect your sanity.
Instead of fighting the engine, you can take total control of your experience. XMODhub provides seamless, safe, and instantaneous quality-of-life modifications for Killer Bean. If a stutter causes you to miss a crucial jump or take lethal damage, simply toggle on God Mode or Infinite Health. Want to bypass the stress of ammunition management during laggy encounters? Enable Unlimited Ammo and focus purely on the cinematic fun.
Follow these 3 simple steps to take back control:

Optimal In-Game Settings Matrix for Killer Bean
Before diving into deep engine tweaks, securing a highly optimized baseline is mandatory. Adjusting the right in-game graphical settings can immediately alleviate heavy GPU and CPU loads without ruining the game’s gorgeous cinematic aesthetic. Below is our definitive settings matrix designed to maximize your frame rate and eliminate micro-stutters.
| Setting Category | Specific In-Game Option | Optimal Value for FPS | Performance Impact |
|---|---|---|---|
| Lighting & Shadows | Volumetric Shadows | Low / Medium | Massive (CPU/GPU Bound) |
| Physics Engine | Ragdoll & Debris Limit | Restricted / Low | High (CPU Bound) |
| Textures & Assets | Texture Quality | High / Epic | Low (If VRAM > 8GB) |
| Post-Processing | Motion Blur & Depth of Field | Off | Medium |
| Anti-Aliasing | TAA / DLSS / FSR | Quality / Balanced | High |
Upgrading Your Display Protocol (G-Sync & FreeSync)
To completely eliminate screen tearing and mask minor frame variance without the heavy input lag of traditional V-Sync, ensure your monitor’s Variable Refresh Rate (VRR) technology is active. Enable G-Sync or FreeSync in your GPU control panel, and cap your FPS exactly 3 frames below your monitor’s maximum refresh rate using RTSS (e.g., cap at 141 FPS for a 144Hz monitor). This keeps the VRR module engaged 100% of the time, resulting in flawless frame pacing during chaotic shootouts.
Frequently Asked Questions
A: This is the textbook definition of Shader Compilation Stutter. When you fire a new weapon, the engine must instantly compile the visual code (shaders) for that specific muzzle flash and particle effect. If the game does not pre-compile these shaders on the main menu, your CPU has to do it mid-fight, causing a massive freeze. Clearing your DirectX shader cache via the Windows Disk Cleanup tool forces the game to rebuild these properly.
A: It is absolutely not a myth; it is the most effective fix. Capping your frame rate using RivaTuner Statistics Server (RTSS) at a number your PC can sustain 99% of the time (e.g., 60 FPS or 90 FPS) prevents GPU usage from maxing out. This leaves a 10-15% performance buffer. When an explosion happens in Killer Bean, your GPU uses that buffer to render the explosion smoothly, maintaining a flat frame time graph instead of dropping frames.
A: Capacity alone (e.g., upgrading from 16GB to 32GB) will not fix stuttering if your RAM speed and configuration are the actual bottlenecks. Killer Bean is highly sensitive to memory bandwidth. Ensure your RAM is installed in dual-channel mode (slots 2 and 4 on your motherboard) and that you have enabled your XMP/EXPO profile in the BIOS to ensure your RAM is running at its advertised speed, rather than the sluggish default JEDEC speeds.
A: This heavily depends on your graphics card architecture. DirectX 12 offers vastly superior CPU multi-threading capabilities, which can significantly reduce CPU bottlenecks when dealing with Killer Bean’s complex physics and enemy AI. However, DX12 requires perfect shader compilation. If you have a modern GPU (RTX 3000/4000 series or RX 6000/7000 series), DX12 is generally superior. For older hardware, DX11 might provide a more stable, albeit slightly lower, average frame rate.
Final Verdict
Mastering how to fix stuttering & FPS drops in Killer Bean ultimately comes down to understanding the limitations of the engine and refusing to rely on default settings. By taking control of your CPU core affinity, injecting asynchronous loading commands into the Engine.ini, and ruthlessly managing your system’s memory standby lists, you can transform a frustrating, choppy experience into the buttery-smooth, cinematic action masterpiece it was designed to be. Frame pacing is the king of action games, and securing a flat frame time graph will instantly elevate your gameplay.
However, if you are tired of playing tech support for your own PC and simply want to enjoy the chaotic brilliance of the game without penalty, XMODhub remains the ultimate fallback. Why lose your mind over an unfair death caused by an engine stutter when you can instantly toggle Infinite Health? With a massive, constantly updated ecosystem supporting over 5,000+ top-tier titles—including high-octane shooters like Max Payne 3 and Trepang2—XMODhub ensures that technical limitations never stand in the way of your pure gaming enjoyment. Optimize your rig, lock your frames, and let the beans fall where they may.

I am a passionate gamer and writer at XMODhub, dedicated to bringing you the latest gaming news, tips, and insights.
Connect with me:
LinkedIn Profile ↗