Power is not just a resource in StarRupture; it is the heartbeat of your survival. unlike Factorio or Satisfactory, where a power outage simply stops production, a blackout in StarRupture means death. When the grid fails, your Ammunition Fabricators stop, your Repair Towers go dark, and the alien swarm breaks through your walls.
This isn’t just a basic tutorial. This is the definitive technical manual for energy management. We will dissect the “Physical Contact” grid mechanic, analyze the mathematical ratios for surviving the 15-minute night cycle, compare Wind vs. Solar efficiency across different biomes, and provide a fail-safe blueprint for a “Black Start” recovery system. Whether you are struggling to connect your first Drill or managing a Gigawatt-tier megafactory, this guide covers it all.
1. The Physics of Power: Why “No Wires” Matters
To master the grid, you must unlearn the habits of other factory games. There are no copper cables, no pylons, and no transformers. In StarRupture, the Grid is Physical.
The Principle of Conductive Adjacency
The game engine treats specific entities as “Conductive Blocks.” If Block A generates power and touches Block B, Block B is powered. This creates a “Daisy Chain” effect. The current maximum range for a single grid is theoretically infinite, limited only by your CPU’s ability to render the map.
The Two Conductors: Platforms vs. Rails
Understanding the cost-benefit analysis of your conductor choice is the first step in resource management.
- Platforms (Foundations):Cost: High Carbon/Iron.Platforms create a “Power Area.” Anything placed on top of a powered platform receives energy. This is ideal for compact factories, assemblers, and battery banks. Do not use platforms to connect distant mines; it is a waste of resources.
- Rails (Logistics):Cost: Low.Rails are the “Power Lines” of StarRupture. They transmit items and energy simultaneously. A single rail line can carry 500MW of power from your nuclear reactor to a distant outpost 2km away without loss.
2. Deep Dive: The Mining Connection Logic
“Why is my drill not working?”.
The “Input/Output” Trap
Unlike platforms which power everything on top of them, Drills and Extractors have specific Ports. The visual mesh of the Drill is large, but the “Conductive Point” is tiny.
⚠️ Critical Rule: The Physical Snap
Placing a Rail near the drill does nothing. Placing a Rail under the drill does nothing. You must drag the Rail cursor until it hovers over the Green/Blue Arrow Port on the Drill. You will hear a distinct metallic “Clunk” sound and see the rail model physically fuse with the machine. Only then is the circuit closed.
Scenario: Connecting a Distant Biomass Vent
Let’s say you found a Biomass Vent 500 meters from your base. Here is the optimal build order to save resources:
- Step 1: Locate the output port on your Main Base (or any rail connected to it).
- Step 2: Drag a single continuous Rail line towards the Vent. Use “Straight Mode” to save segments.
- Step 3: Place the Gas Extractor on the vent. Rotate it (using ‘R’) so the Output port faces your incoming rail.
- Step 4: Snap the final rail segment into the Extractor. Wait 2 seconds. The red lightning bolt icon should disappear.
- Step 5: Check the flow. Items should begin moving back towards your base immediately.
3. Energy Sources Tier List & The Math
Understanding your energy budget is key. Below is a detailed breakdown of every power source available in Early Access, their output variance, and optimal usage.
| Source | Output (Day/Night) | Stability | Recommended For |
|---|---|---|---|
| Biomass Burner | 20MW / 20MW | Manual Fuel Required | Emergency Black Starts only. Do not use for automation. |
| Solar Generator | 50MW / 0MW | Weather Dependent | Peak daytime loads (Fabricators, Refineries). |
| Wind Turbine | 15-40MW (Variable) | 24/7 Operation | Base Load (Turrets, Life Support, Shields). |
| Geothermal (Late) | 200MW+ / 200MW+ | Perfect Stability | End-game Mega-factories. Requires Volcanic Biome. |
4. Mastering Accumulators: Surviving the Dark
The StarRupture day/night cycle is the ultimate stress test. Night lasts approximately 15 minutes (real-time). If you rely solely on Solar, your base is dead for 15 minutes. This is when enemies attack.
The Mathematical Ratio (The 2:1 Rule)
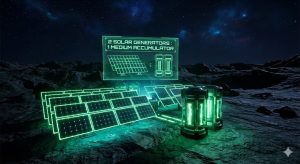
Accumulators (Batteries) have a limited charge rate. Even if you have 100 Solar Panels, a single battery can only absorb so much energy per second. To fully charge an Accumulator during the day cycle so it lasts the full night cycle, use this formula:
2 Solar Generators : 1 Medium Accumulator
This ensures 100% Charge before Dusk.
Pro Strategy: Buffer Zones. Do not place all batteries in one central location. Create “Buffer Zones” near critical defense lines. If a connection to the main power plant is severed by a bile-spitting bug, the local battery buffer will keep the turrets firing for another 2-3 minutes—usually enough time to repair the line. Now that you understand solar ratios, apply this setup to our recommended StarRupture Starter Base Layout for maximum efficiency.
5. Defense: Why Enemies Hate Your Grid
In StarRupture, enemies are attracted to pollution and noise. Power generators produce both. However, the AI is smart enough to target Infrastructure.
The “Sever” Tactic
Flying enemies will often ignore your walls and target the single rail line connecting your Geothermal Plant to your base. If that rail breaks, 200MW of power vanishes instantly, causing a cascade failure.
How to armor your grid:
- Redundancy: Never rely on a single rail line for power. Build parallel rails separated by 4-5 tiles. If one is blown up, the other carries the load.
- Bunker your Batteries: Accumulators explode when destroyed. Chain reactions can wipe out your entire power storage. Build blast walls (Reinforced Iron Walls) between battery banks to prevent a total wipe.
- Decoy Generators: Place a cheap Biomass Burner outside your walls. Enemies may target it first, acting as a distraction.
6. Biome-Specific Power Strategies
Your starting biome dictates your power strategy. What works in the Plains will fail in the Volcanic Wastes.
🌲 The Fungal Swamp
Recommended: Biomass & Wind.
Sunlight is poor here due to spore fog (Solar -30% efficiency). However, organic matter is everywhere. This is the only biome where a massive array of manually fed Biomass Burners is viable early game due to the abundance of fuel.
🏜️ The Arid Plains
Recommended: Solar.
The standard biome. Solar operates at 100% efficiency. Wind is inconsistent. Focus on massive solar farms, but beware of dust storms which can temporarily debuff output.
🌋 The Volcanic Wastes
Recommended: Geothermal.
Solar is mediocre due to ash clouds. However, Geothermal Vents are abundant. Rush the Geothermal research tech. Once established, this biome offers the highest energy potential in the game.
7. Advanced Troubleshooting: The “Grid Overload” Error
The “Grid Overload” red warning text is the most feared notification in the game. It means your demand exceeds supply.
The “Binary Grid” Mechanic
In many games, low power just slows down machines. In StarRupture, it is binary.
Demand: 501MW | Supply: 500MW = 0% Functionality.
This “All or Nothing” mechanic causes a Death Spiral. If power cuts, your miners stop mining coal/biomass. Your generators stop receiving fuel. Power drops further. The base dies.
How to perform a “Black Start” (Recovery)
- Step 1: Physical Disconnect. Do not just turn off buildings. Delete the rail segment connecting your Factory to your Generator bank. Isolate the power plant.
- Step 2: Emergency Fuel. Manually harvest leaves and fill your emergency Biomass Burners.
- Step 3: Battery Charge. Let the isolated grid charge your batteries to at least 20%.
- Step 4: Load Shedding. Turn off your Refinery and Assemblers manually.
- Step 5: Reconnect. Rebuild the rail. The miners will restart. Once coal/fuel is flowing again, turn your Refinery back on.
Constantly dealing with grid overloads can be frustrating. If you just want to keep the lights on without the math, the infinite power cheat in our StarRupture Trainer guide is the fastest fix.
⚡ Skip the Grid Management with XmodHub
Does managing voltage ratios, calculating battery decay, and repairing broken rails sound like work, not fun? We get it. Sometimes you just want to build a cool base and shoot aliens.
The XmodHub StarRupture Trainer includes a powerful “Infinite Power” toggle. This locks your grid energy to max, essentially turning every connected rail into a superconductor of infinite energy. No more blackouts. No more math.
Infinite Battery
Never drain at night.
Instant Build
Construct arrays instantly.
Freeze Daylight
Keep solar panels at 100%.
Download Infinite Power Trainer
🛡️ Safe, Virus-Free & Updated for Latest Early Access Patch
I conduct hands-on compatibility testing, performance benchmarking, and rigorous security screening for every resource on Xmodhub. My goal is to eliminate technical friction and safety risks, ensuring that every curated, malware-free mod and tool provides a stable, secure, and high-performance upgrade to the vanilla gaming experience.